How to dry age steaks at home
What you’ll learn:
- How to dry-age steaks at home, with results just like expensive restaurants
- Use inexpensive vacuum bags designed just for dry aging beef, use your own vacuum sealer
- Honest review of the UMAi Dry Aged Artisan Steak Kit
- Step by step photos and see how steak ages
Updated 5/14/15
We’ve been using UMAi Dry Aged Steak Kits for the past 6 1/2 years. Back in 2009, I had contacted Thea, the owner of company to learn more about their Drybag Steaks product (the old name prior to UMAi). Their older model of bags required a special vacuum chamber vacuum sealer. They’ve redesigned the product so that you can use most vacuum sealers, like the FoodSaver. I tested their starter kit and this is an honest review of their product.
What are Drybags?
The bags are different — during the aging process, they turn into a membrane that allows moisture to escape but do not allow oxygen to come into the bags creating the perfect seal for dry aging steaks.
I’ve now tested this method 4 separate times over the past 6 months regularly for the past 6 1/2 years. For this post, I conducted 4 separate tests…twice with ribeye loin and twice with strip loin. I took about 300 photos during the 4 separate tests. THREE HUNDRED PHOTOS. I’m using the best of the lot – which means that the photos below are a mish-mash from all of the tests. So if the steaks look a little different between photos, that’s why.
A note of caution – for successful dry-aging, you must keep a steady temperature of 34F-38F. If you have an old, rusty, broken refrigerator, please do not attempt. Or, if you only have one refrigerator in the house and your kids open shut open shut open shut the door to sneak finger swipes chocolate cake frosting, you’re better off having someone else do the dry-aging.
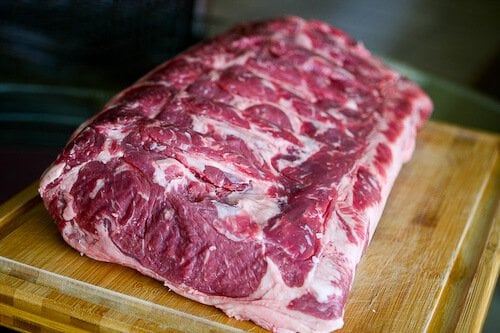
I’d like to introduce you to hunk-o-meat.
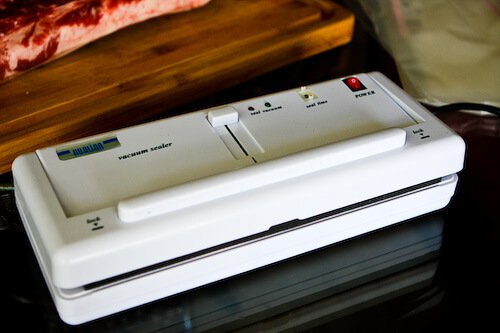
What kind of vacuum sealer can I use with Drybag?
The photo below is an old style chamber vacuum sealer – this is vacuum sealers used to look like prior to Food Saver. You can use many popular brands of vacuum sealer, though some are easier to use than others. The standard vacuum sealers that are flat are easier to override the automatic sealing function, which is essential when sealing the Drybag. The newer, tall sealers make it too harder to override – to manually tell the machine, “stop sucking, just seal.” But it can be done with UMAi’s new bag redesign. Here’s a video using a Food Saver.

This is my old-style vacuum sealer.
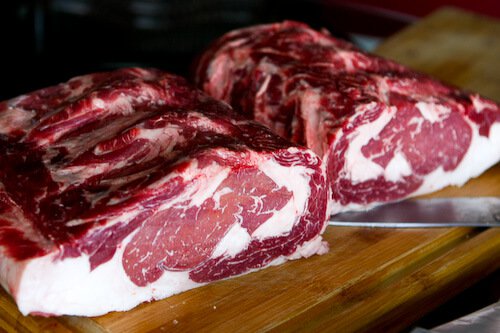
First, I want to cut the hunk in half. It’s too big to fit into the bags, whole.
Here’s a mistake that I made: do NOT trim the outer fat and when you first take the hunk-o-meat out of the cryovac that you bought it in, do NOT wipe off all that gooey bloody mess — Here’s why, explanation from UMAi Dry:
“To create the best (and, ultimately, safest) bond between the surface of the meat and the DrybagSteak material, it is critical that the meat be well coated with proteins–i.e. bloody and gooey like right when you crack it out of the cryovac if you purchase meat from Costco or Sam’s Club.” ~Thea, UMAi Dry
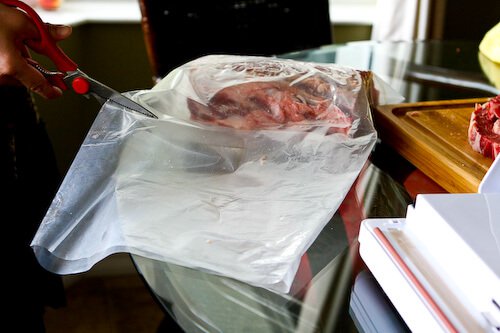
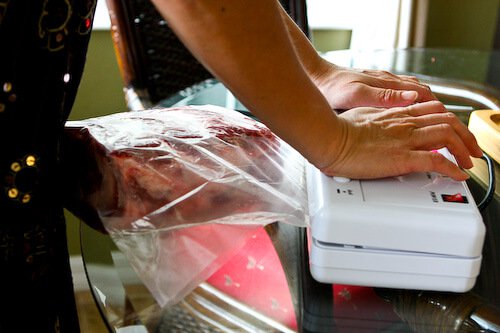
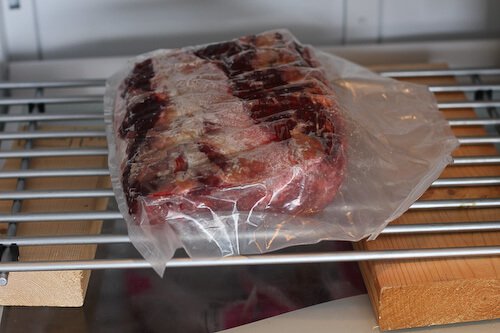
Put hunk into the secret weapon…the Drybag bag. Trim away excess, but leave some room, because you’ll need that extra space to insert into the vacuum sealer.
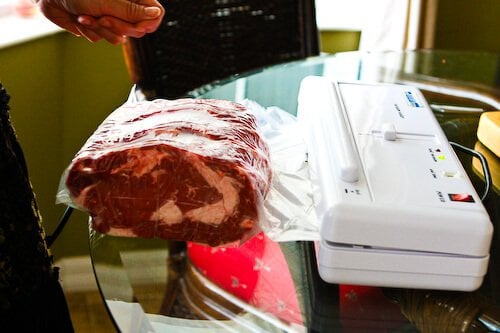
Vacuum seal that baby up.
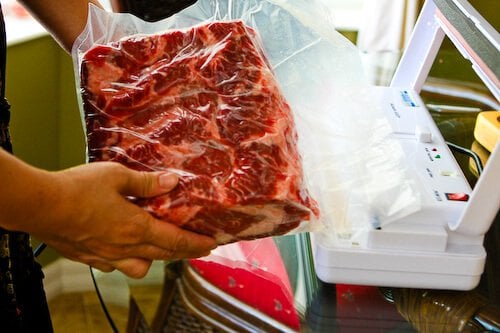
Get it good and tight. Oh and also, only UMAi Drybags work – it actually becomes a membrane. Don’t try to do this with other brand of bags. It won’t work. Foodsaver bags are thick and the whole point of DRY aging is to release moisture. Foodsaver bags will not release moisture. You’ll get sick.
Place it in the refrigerator. Important: you want air circulation, so place it on a heavy rack. Also use a thermometer in the refrigerator to make sure it’s between 34F-38F.
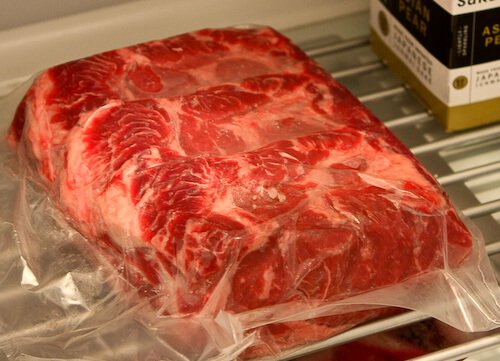
In fact, for test run #2, I propped the rack up with some boards so more air can circulate around the meat.
Notice that during one of my test runs that there is some trapped air inside the bag. This occurred part way through the aging process. This is not good. Trapped air = nasty stuff that gets in the meat. Remember I said I made a mistake– I trimmed the fat and wiped the bloody gooey goop from the loin? Well this is what happens. The membrane couldn’t get a good grip and cling.

It should be nice and tight like this:

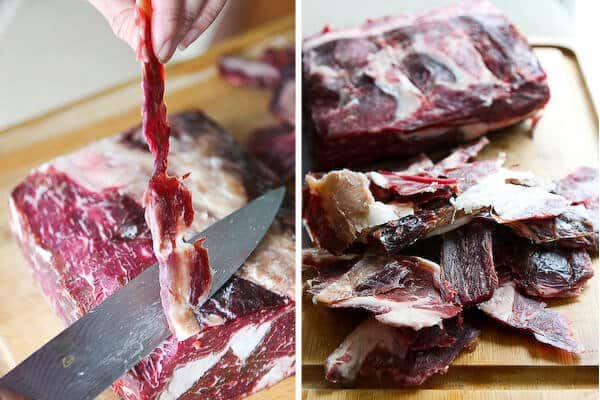
After 7-21 days (I aged for 14 days) the steak is ready! See how the Drybag bag clings? You should have to peel it away like a membrane. It comes off easily.

Trim away the outer, tough layer.

Do that all the away around the loin.

Trimmin’
Now slice the steaks into whatever thickness you’d like. Look at the nice, deep red color that’s typical of aged steaks.
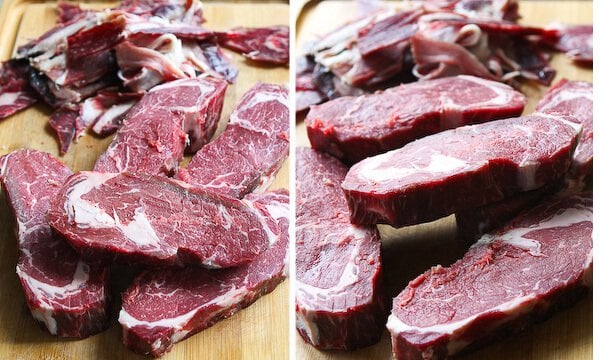
That’s some good lookin’ steak.
As for the taste? Fantastic.
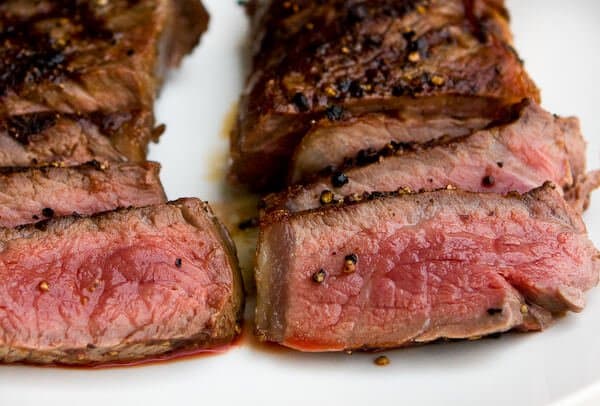
Like most well-aged steaks, it had incredible depth of flavor, deep beefy, earthy, complex flavors that hit every part of the mouth.
And like all steaks, taste and flavors depend first and foremost on how long you’ve aged the steaks, how well you cook the steaks, the breed of the cattle, what they were fed, how they were raised and where they were raised. In fact, you should probably read up on Artisan Steak Tasting.
But take your favorite steak and amp up the flavor and beefy-ness by 10x.
I think what you want to know is:
Q) Does it taste better than professionally aged steaks?
A) About the same. But that also depends on how long the professionally aged steaks were aged. And also results depend on making sure you follow the directions of Drybag (correct sealing, correct/steady temperature, air circulation) and the type of beef you are starting with. Good restaurants and butchers might be aging PRIME steaks…and I tested with CHOICE steaks. That makes a pretty big difference. But I’ll take affordable home-aged steaks over pricey butcher or restaurant steaks any day.
Q) Is Drybag more effective than home-aging without UMAI Dry Aged Steak Bags?
A) Both yielded same results for me, tastewise. When I dry age without the Drybag, I cover the meat with several layers of cheesecloth – which I have to clean every few days. The cheesecloth ends up getting dirty, bloody and crusty. I know, that sounds gross. The Drybag saved me time over changing and washing cheesecloths and worrying about exposed meat in the refrigerator. But it is an expense. The machine with bags plus shipping will set you back $130. Cheesecloth is cheap.
Q) Can I use my current Vacuum sealer and bags and do the same thing?
A) Yes, though some vacuum sealers are easier to use than others. UMAi has updated their product to include inserts into the bag that allow you to use most vacuum sealers. Here’s a video to show you how to seal with a Food Saver V3800.
FINAL THOUGHTS:
The new updates to the product (to include the Vac Mouse bag inserts so that you can use any vacuum sealer) is a big improvement and has take away many of the cons of using the UMAi Dry Age Steak Kit.
Sometimes, the bags are finicky. I had to try 2-3 times to seal and reseal the bags. My biggest advice to you is to leave yourself PLENTY of bag space in case you need to snip and reseal.
Also, part-way through the dry aging, I had to resuck and reseal the bags as I noticed air pockets as shown in the photos above. But this is minor compared to the ease over dry aging the steaks with cheesecloth. Again, cut your bags big – and leave yourself plenty of room to snip and reseal in case you need to.
I can see myself dry aging with Drybags probably 4-5 times a year – remember you have to dry age whole loins, not individual steaks. And a whole loin is massive. In fact, I’ll be dry aging the standing rib roast that we’ll have for Christmas dinner.
For ~$150 (which includes the vacuum sealer, instructions and the bags) it’s totally worth it. But also remember that Drybag is in the business of selling the BAGS…not the machine. You can get a few bags for ~$25.
Target market would be small restaurants and families who have an extra refrigerator/freezer. Since you’re dry aging an entire loin, you better have a lot of friends over to eat…or have the freezer room to store the cut steaks! Totally not recommended if you don’t have an entire shelf in your refrigerator to dedicate to this roast. If you’re refrigerator is slammed already for space and you have a family that constantly opens/shuts, I just wouldn’t recommend dry-aging at home anyways. NOT SAFE as the temperature fluctuates too much.
I use the refrigerator in my garage where I store drinks and booze…and it only gets opened when I want drinks and booze…which…is…um….quite…often. 😉 But still, it doesn’t get opened very much, and I have a fridge thermometer right on the shelf that I’m constantly aware of.
Once I’ve dry aged the loin, I cut them into 1 1/4-inch to 1 1/2-inch steaks and vacuum seal (with my regular Foodsaver vacuum sealer) each steak individually to store and freeze. For my Christmas standing rib roast, I’ll leave it whole.
In terms of number of days to age, I’ve tried 7 days, 14 days and 21 days. The 14-day aging was my sweet spot. Not that 21 days didn’t taste better (it did!) but I’m just impatient like that and it’s hard for me to wait the full 21 days. For Christmas, I think I’ll do the full 21 days. But that’s just because impatience can’t get in the way. Don’t think my family will stand for having Christmas dinner 7 days earlier just because I wanna eat the damn roast.
I’m still unclear on the science of how these drybags work – how does the bag let moisture out and keep oxygen from coming into the bag? Hmmm…if you have an explanation, please let me know! I’ll enter into this post. If you know of other companies distributing similar bags, I’m happy to contact them and test to offer options. Would I recommend the buy? It’s expensive. An entire loin to dry age is expensive. But if you’re a steak whore like me, and can afford it, go for it. Our friends and family *love* the steaks we dry age.
And if dry aging steaks doesn’t appeal to you, how about tenderizing and flavorizing your steaks using this post on salting steaks!?
UPDATE #1: Commenter Bruce has the best explanation I’ve heard so far:
“I’m guessing that the bags work by having tiny holes of just the right size. Oxygen molecules (O2 – two oxygen atoms stuck together) are a bit bigger than water (one oxygen with two hydrogens, but hydrogen is really, really small)”
UPDATE #2: I love my readers! This is from Ron, who’s a regular participant in the Big Green Egg Forums. He uses a 4-inch sleeve of the Foodsaver bag OVER the Drybag bag — and then seals with this Foodsaver. I haven’t tried this method….curious to find out how that works. See his photos and his videos.
UPDATE #3: The owner of DrybagSteaks has emailed me more information about the science and testing of these bags.
Dry aging of beef in a bag highly permeable to water vapour
Effects of dry aging of bone-in and boneless strip loins using two aging processes for two aging times