Ready to fill your kitchen with the warm, comforting scent of fresh bread? This homemade French bread recipe is just what you need. Whether it’s your first time baking bread or you’re a seasoned pro looking for an easy French bread recipe, you’ll end up with a golden brown loaf that’s as satisfying to make as it is to eat. The process is simpler than you might think, and nothing beats the taste of crusty French bread straight from your own oven. So, roll up your sleeves and get ready to bake, and good luck resisting the urge to tear into the loaf the second it’s out of the oven!
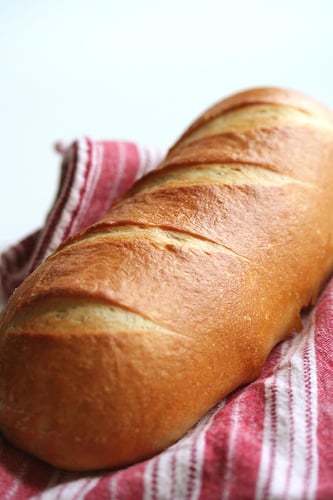
Why This French Bread Recipe Works:
- Simplicity and Flavor: This recipe demystifies the process of making homemade bread. With a little bit of kneading, shaping, and baking, you’ll have crusty French bread that rivals your favorite bakery’s. From first rise to final rise, you’ll learn how to ensure the perfect texture and flavor.
- Versatile and Delicious: Once you master this easy bread recipe, the sky’s the limit! Enjoy your bread as is, or turn it into garlic bread, French bread pizza, or simply slather it with butter. It’s one of my favorite bread recipes because of how adaptable it is.
- Steam Technique for Crust: My quick note about creating steam in the oven is a game-changer. This technique is what gives the bread its beautifully crispy crust and tender interior – hallmark qualities of the best French bread recipe.
Secrets to Making the Perfect Loaf of French Bread in 3 Hours
Usually, my stand-by recipe is the No Knead Bread (because it’s so darn easy) but it does require you to mix the dough at least 12 hours prior. When I only have a three hours, this is my recipe which is based on trial-and-error from baking over 40 loaves in the past 8 months. The techniques are a combination of things I learned from Pamela Anderson (no, not the model–the chef Pam Anderson!), the original No Knead Recipe published in the NY Times, and Rose Levy Beranbaum (author of the Bread Bible).
Secret #1: Knead dough with dough hook for 2 minutes. Let it rest for 7 and then knead again for another 3 minutes. If you are doing this by hand, then your formula is 6 min-7 min-7 min. Letting the dough rest at this stage allows the gluten to relax, redistribute, and get all cozy. It results ultimately a smoother, well-mixed dough. After the brief rest, you’ll feel a difference in the dough. It’s more supple and soft.
Secret #2: Pinch! When you form the dough into a loaf (see photo below) pinch all ends tightly to create a seal. Basically, you are creating surface tension so that the gas from the yeast (or as Alton Brown describes “When the yeast burps”) the dough expands up and out evenly. If I don’t create this surface tension, the dough in the oven will just go “blah” like Al Bundy on the couch. Something called gravity makes the dough expand down and flat.
Secret #3: Use a pizza stone, cast iron dutch oven or my favorite Pampered Chef Covered Baker. Just make sure that your loaf will fit into the vessel. Stone or cast iron retains heat and radiates the heat of the oven evenly. If you don’t have one, don’t worry, just use a good quality, thick baking sheet, inverted.
Secret #4: Steam = thin, crunchy, beautiful crust. In the No Knead recipe, there is a high proportion of water to flour. Because the No Knead dough rests for multiple hours, lots of water in the recipe works. In this 3 hour french bread recipe, you can’t do that. To make steam (a.k.a. crust) – you have to do one of 2 things, depending on the baking vessel.
-> Pizza stone or baking sheet: Once you put the bread in the oven, throw 1/2 cup of water on the oven floor (electric oven) and immediately close the door. No, it won’t harm the oven. It’s a technique that professional bakers recommend for every home oven (professional ovens have a built in steamers). Once the water hits the hot oven floor, it creates steam, which creates the crust. (If you’re at all worried about this method, you can simply use a spray bottle to wet the inner sides of your oven.)
Alternatively, place a metal loaf pan or baking sheet on the very bottom rack of the oven, off to one side. Heat the pan while you are preheating the oven. Once you put the bread into the oven, pour 1/2 cup water into the hot pan. Since the pan has been heated, it will produce the steam required. Make sure your heated pan is off to one side of the oven – so that when the steam rises, it can rise up and around the bread (not under it, which makes it harder for the steam to reach the bread)
Basically, cold water in hot pan + hot oven = steam. I have an electric oven (heating element is on the top of oven). Some bakers throw ice cubes in, but I prefer water.
-> Covered baker or dutch oven: You’ll need less water – about 1/4 cup. Once you put the loaf into the very hot pot, throw in the water and over the lid immediately. Put the pot directly in the oven. Because you’ve pre-heated the oven AND the pot for 1 hour, the trapped water in the pot will create steam.
Secret #5: Timing and temperature.
- Have an instant read thermometer. The internal temperature of the bread should be 190-200F when you pull it out.
- All ovens are different and I’m sure our loaves will be different shapes.
- The timing in the recipe below is just a guide for you – this is what works in my oven and how I shape my loaves.
- Please make sure that you check the internal temp of your bread to gauge doneness.
​How to Make the Perfect French Bread – Step By Step
- Put 1/4 cup of bread flour on your clean counter top and reserve. Place remaining 3 3/4 cups bread flour in your mixer bowl. Spoon the yeast on one side of the bowl, and the salt on the other side. Pour in the warm water and with your regular mixer paddle, mix on low speed until the dough comes together in a mass. Switch to the dough hook. Mix on medium speed for 2 minutes. Dough should clear the sides but stick to the bottom. If it is too sticky, add 1 tablespoon of flour at a time. If too dry, add 1 tablespoon of water to dough to adjust.
- Let the dough rest for 5 minutes.
- The dough should look like this during the rest:
- Turn the mixer on again and mix for 3 minutes. Take the dough out and place on the counter. Remember that 1/4 cup of flour that we reserved? We’ll use it now. As you knead the dough by hand, incorporate more flour as you need.
- Knead by hand until the dough is very satiny, smooth, tight and formed into a nice, compact ball:
- Place this dough in a large lightly oiled bowl (I use Pam spray). Turn dough over so that all sides have a thin coating of oil. Cover with plastic wrap and set in warm place for 1 1/2 hours to let rest and rise. Dough should almost double in size.
- While the dough is rising, about 1 hour into the rising stage, preheat your oven to 450F and place your pizza stone, inverted baking sheet or covered cast iron pot into the oven to heat up. If you are using a loaf pan for steam, also place that into the oven, on the very bottom rack, off to one side of the oven.
- After the dough has risen fully, punch dough down and form back into a ball. Poke your finger on the surface – the dough should give into the pressure and slowly creep back up.
- Ok, here’s the fun part. Cut the dough into half & you’ll shape one half at a time (keep the other piece under wraps) Pick up the dough & stretch it out until it forms a big rectangle. Dust your work surface with flour and fold over the ends of the dough like this:
- Now do a little karate chop lengthwise down the middle of the bread and stretch out the long ends again. Fold over in half. The karate chop helps get the middle tucked inside. Pinch all sides shut. This is important you want to make sure that all ends including the short ends are pinched tightly to create a seal. This allows the bread to rise & expand up and out evenly. If the bread looks a little lopsided, you can try to fix it by letting it rest 5 minutes and gently stretching it out again. Just don’t knead the dough again & pop all the beautiful gas that took 1.5 hours to create!
- Here’s what it should look like:
- Turn the bread over so that it is seam side down. Cover the loaf with a damp kitchen towel. Repeat with the other dough ball. Leave the loaves to rest on your well-floured pizza peel or cutting board for 30 minutes.
- After bread is done rising, take a sharp paring knife and make 3-4 shallow, diagonal slashes on the surface of the loaf. This allows the steam in the bread to escape so that it expands evenly during the baking process:
- When you are ready to bake, remove your baking vessel from oven. Carefully slide the gorgeous loaf into or onto your baking vessel.
- If you are using pizza stone or inverted baking sheet: You can probably fit both loaves on it at the same time, just leave at least 6-8″ of space between the loaves.
- Get a 1/2 cup of water ready next to the stove. Open the stove, put your bread in the oven and throw the water on the oven floor or in the pre-heated loaf pan. Immediately close the oven door. This creates your steam.
- Bake 20-25 minutes. Check temperature of the bread internal temperature should read 190-200F. Remove and let cool before cutting into it.
- If you are using a long cast-iron pot or covered baker: Before closing the lid on your pot/baker, put 1/4 cup of water directly in the pot. Cover immediately. Put pot in oven.
- Bake 10 minutes. Remove lid of pot. Bake another 14 minutes. Check temperature of the bread internal should be 190-200F.
- Remove and let cool before cutting into it. Repeat with other loaf. (For convection ovens- bake 8 min covered, 10-12 min uncovered.
- Check temperature of bread) To re-crisp the crust, put in 375F oven for 5 minutes. Eat one loaf, share the other loaf with a friend!
FAQs
How do I know when my bread is done baking?
The bread is done when it has a golden brown crust and sounds hollow when tapped on the bottom. A digital thermometer inserted into the center of the bread should read 190-200F for the perfect bread.
Can I make this bread into garlic bread or French bread pizza?
Absolutely! For garlic bread, mix softened butter with minced garlic, spread on the bread, and broil until golden. For French bread pizza, top with your favorite sauce, cheese, and toppings, then bake until the cheese is bubbly and melted.
My bread didn’t rise much during the first rise. What might have gone wrong?
If your bread didn’t rise well, it could be due to a few factors such as old yeast, not enough warmth during the rise, or improperly measured ingredients. Make sure your yeast is fresh and that the dough is kept in a warm, draft-free area.
Is it necessary to use a pizza stone or cast-iron pot?
While using a pizza stone or cast-iron pot can enhance the bread’s crust, you can also bake the bread on a regular baking sheet. The key is to create steam in the oven as the bread bakes to achieve that characteristic crusty exterior.
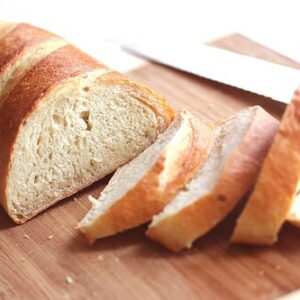
French Bread Recipe
Ingredients
- 4 cups bread flour
- 2 teaspoons active quick rising dry yeast
- 2 teaspoons salt
- 1/2 cups warm water
Instructions
- Put 1/4 cup of bread flour on your clean counter top and reserve. Place remaining 3 3/4 cups bread flour in your mixer bowl. Spoon the yeast on one side of the bowl, and the salt on the other side. Pour in the warm water and with your regular mixer paddle, mix on low speed until the dough comes together in a mass. Switch to the dough hook. Mix on medium speed for 2 minutes. Dough should clear the sides but stick to the bottom. If it is too sticky, add 1 tablespoon of flour at a time. If too dry, add 1 tablespoon of water to dough to adjust.
- Let the dough rest for 5 minutes.
- The dough should look like this during the rest:
- Turn the mixer on again and mix for 3 minutes. Take the dough out and place on the counter. Remember that 1/4 cup of flour that we reserved? We'll use it now. As you knead the dough by hand, incorporate more flour as you need.
- Knead by hand until the dough is very satiny, smooth, tight and formed into a nice, compact ball:
- Place this dough in a large lightly oiled bowl (I use Pam spray). Turn dough over so that all sides have a thin coating of oil. Cover with plastic wrap and set in warm place for 1 1/2 hours to let rest and rise. Dough should almost double in size.
- While the dough is rising, about 1 hour into the rising stage, preheat your oven to 450F and place your pizza stone, inverted baking sheet or covered cast iron pot into the oven to heat up. If you are using a loaf pan for steam, also place that into the oven, on the very bottom rack, off to one side of the oven.
- After the dough has risen fully, punch dough down and form back into a ball. Poke your finger on the surface – the dough should give into the pressure and slowly creep back up.
- Ok, here's the fun part. Cut the dough into half & you'll shape one half at a time (keep the other piece under wraps) Pick up the dough & stretch it out until it forms a big rectangle. Dust your work surface with flour and fold over the ends of the dough like this:
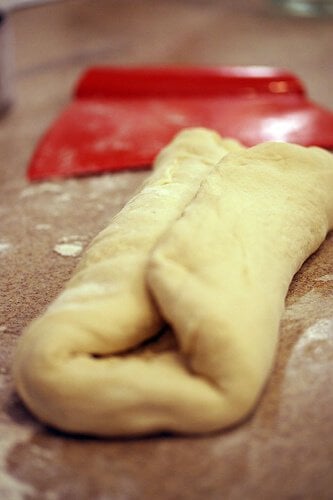
- Now do a little karate chop lengthwise down the middle of the bread and stretch out the long ends again. Fold over in half. The karate chop helps get the middle tucked inside. Pinch all sides shut. This is important you want to make sure that all ends including the short ends are pinched tightly to create a seal. This allows the bread to rise & expand up and out evenly. If the bread looks a little lopsided, you can try to fix it by letting it rest 5 minutes and gently stretching it out again. Just don't knead the dough again & pop all the beautiful gas that took 1.5 hours to create!
- Here's what it should look like:
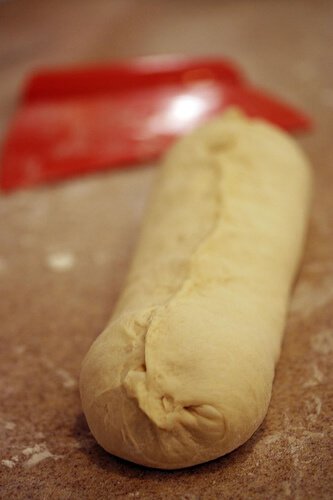
- Turn the bread over so that it is seam side down. Cover the loaf with a damp kitchen towel. Repeat with the other dough ball. Leave the loaves to rest on your well-floured pizza peel or cutting board for 30 minutes.
- After bread is done rising, take a sharp paring knife and make 3-4 shallow, diagonal slashes on the surface of the loaf. This allows the steam in the bread to escape so that it expands evenly during the baking process:
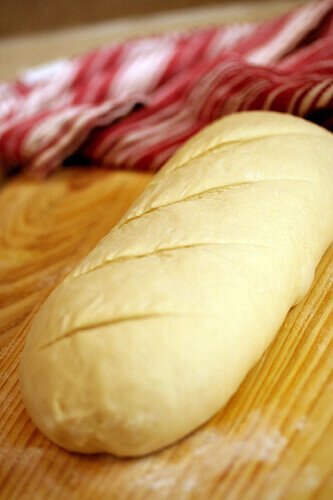
- When you are ready to bake, remove your baking vessel from oven. Carefully slide the gorgeous loaf into or onto your baking vessel.
- If you are using pizza stone or inverted baking sheet:You can probably fit both loaves on it at the same time, just leave at least 6-8" of space between the loaves.
- Get a 1/2 cup of water ready next to the stove. Open the stove, put your bread in the oven and throw the water on the oven floor or in the pre-heated loaf pan. Immediately close the oven door. This creates your steam.
- Bake 20-25 minutes. Check temperature of the bread internal temperature should read 190-200F. Remove and let cool before cutting into it.
- If you are using a long cast-iron pot or covered baker:Before closing the lid on your pot/baker, put 1/4 cup of water directly in the pot. Cover immediately. Put pot in oven.
- Bake 10 minutes. Remove lid of pot. Bake another 14 minutes. Check temperature of the bread internal should be 190-200F.
- Remove and let cool before cutting into it. Repeat with other loaf. (For convection ovens- bake 8 min covered, 10-12 min uncovered.
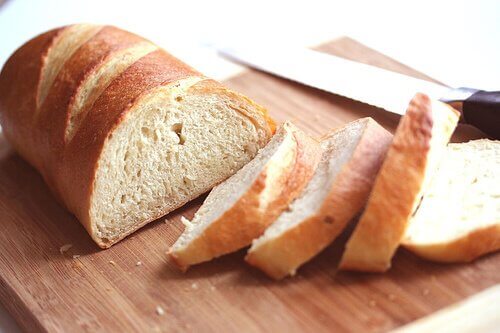
- Check temperature of bread) To re-crisp the crust, put in 375F oven for 5 minutes. Eat one loaf, share the other loaf with a friend!
How about No Knead Bread?

My 4-Year Old Son, Andrew Bakes No Knead Bread
Really great recipe. I’ve made it many times. Makes great Pizza dough. However, I think the recipe recently got updated with a mistake. I think the water is supposed to be 1.5 cups of warm water, not 1/2 cup.
Perfect loaf of bread, thank you so much for sharing this! Turned out great, especially after my first try.
Very interesting, but still using “cups n spoons”? Useless!
Next time use weights, oz or better yet, grams.
I have made this bread before and loved it. I just wanted to tell you that I believe the amount of water has been accidentally changed. It used to call for 1 1/2 cups of water, now the recipe says “1/2 cups.”
Completely agree! Must be a typo – it’s definitely 1.5 cups of water.
I agree as well! I’ve been making this bread for about 10 years and the original recipe was correct—1 1/2 cups of water. Somehow it was changed. Definitely use 1 1/2 cups of water.
The weights are pretty exact, if you’re multiplying by the weight of a cup of bread flour.
I’ve used this combo many (many many) times for this recipe and it turns out perfectly, especially when using the 2min knead-7 min rest- 3\5 min knead “secretâ€. I actually will assume that anyone not weighing is getting a denser bread than is necessary.
450g bread flour (+30g for the additional 1\4 cup)
350g water (I use very cold ice water, since I always throw the dough in the fridge to slow the proof down and let it sour a bit)
I don’t bother to weigh the salt\yeast.
I made the recipe for French bread from another source using the “dough” setting on my Pohl Schmitt bread machine. I was most interested in the baking instructions in your recipe. The loaves came out beautifully! Thanks.
1/2 cup of water – that is so wrong right?
You are correct—that is wrong. I believe it should be 2 1/2 Cups of water. I wish Jaden would correct this online recipe!
Correction again! It’s 1.5 Cups of water!
I’d like to try this for a party we are going to have. Can you tell me what the dimensions of the rolled out loaves are?
Thanks!!!
Just made proper bread with yeast for the first time using YOUR recipe and it came out perfect! Thank you so much for this amazing recipe which took you ages to perfect- I am so grateful as it took me ages to find a recipe which didn’t require overnight resting! Keep up the good work!
That’s fantastic! Thanks so much. Happy eating and bake more bread 🙂 jaden
wow nice recipe, step by step representation of french bread recipe giving the confidence to try this one right now
Just followed this recipe yesterday. I am not a baker at all. I was skeptical with mixing all the flour with the yeast and salt. I used a convection oven with specific double vented loaf pans for french bread. I wasn’t sure on the length in the oven but I did pull them twice to check the internal temp. They turned out PERFECT. I used 425 convection oven, with a small iron skillet with steaming water (heated the pan and added the water when I put the bread in the oven). Total time was 18 min. I did rotate the loaf pan once.
Thank you Marie! _ jaden
Way go go! Excellent technique. Clear procedure. Ran through it the first time with 2 minor tweaks; used whey instead of water for restaurant flavor (see this site for how to make ricotta) and doubled all quantities to make 4 loafs. Cooked on a high end gas grill with a 2 inch slab of marble. Perfect execution.
I have a compact conventional oven [measures 9″ x13″ on the inside ]. I don’t know about putting the water in, if there is room for another pan on the bottom? Also, I have limited mobility and would like to know if the recipe can be mixed in a bread machine? Any advice would be greatly appreciated. Thanks.
yes, you can mix in bread machine! Do you have a french bread option on your bread machine?
No, it’s an old machine. ðŸ™
I made this dough for my pepperoni rolls for the second time today and it is THE match I have been searching for. EXCELLENT! The dough is just so cooperative and the pepperoni rolls, DELICIOUS!
I have a gas stove, not electric. Can you please instruct me on how to create the necessary humidity?
I also have a gas oven, so hopefully this will help.
I use a covered bread baker (this one, in particular: Â https://www.amazon.com/gp/product/B0106TDGQE/ref=ppx_yo_dt_b_search_asin_title?ie=UTF8&psc=1). Â
I drop it onto the oven while it’s preheating – about an hour before baking.  Once the loaves have risen (the second time after shaping),  I grab the now piping-hot baker from the oven and carefully lower a load into it.  You’ll hear a little sizzle,  but that’s good.  Then I cut the top,  brush the whole thing with a generous amount of water, put the top on and put it back in the oven for 10 minutes.  This is PLENTY of humidity.
After 10 minutes, remove the top and I leave it in for another 10 or until golden brown. Â Absolutely perfect bread every single time.
As an aside, when I don’t want to hand knead (ie feeling lazy), I throw that last 1\4 cup of flour into my kitchen aid and knead (on setting #2) for 5-8 minutes.  Dough ends up just as smooth and satiny and saves my poor wrists.
Thanks so much Jen! jaden
All yeast can be substituted for one another. There are charts to tell you the ratios. Usually found on the yeast jar or package.
WOW! This turned out fabulous! I’ve never baked a loaf of bread before and was intimidated by it… but this turned out amazing! There really is nothing like fresh baked bread. Turned out amazing, thanks for the recipe – I will definitely be baking this again!
Thanks so much! jaden
I’ve always had luck making a pan bread but french bread is giving me a hard time. Each time the bread expanded and was dense and heavy; I used a cookie sheet for baking. I’m going to try your method but I’m confused about the process of removing the baking vessel from the oven and sliding the bread onto it. Once it rises a second time how can I slide anything without ruining the loaf and if using a stone how would this get removed from the oven considering the weight. Also, my home is normally very cool (even in Florida – go figure!) and the bread does not seem to rise. Using regular yeast not self-rising. Thank you for any advice you can give.
Annette, try letting your dough rise in your unheated oven, just turn on the oven light and it should warm up enough to proof your bread. Alternatively you could turn your oven on, allow it to just start to warm up but not get hot, turn off the oven and place the dough in the warm oven to rise (proof) with the door closed. I wouldn’t allow the oven to get above say…75 or so degrees f. That’s how I do it in the winter here in Wa. State. Best of luck. Tom
If you only stock all-purpose flour in your pantry buy some gluten, Bob’s red Mill sells this you can store it in your freezer you add 1 tablespoon to 3 cups of flour to make a strong bread flour good luck. In regards to using garlic in your bread recipe I have found that it can kill the yeast use dry granulated garlic and you won’t have that problem
I have had this problem your dough may be to wet or you did not let it proof long enough or you did not cook it long enough the bread should be 195 degrees internally, a little higher is OK you will hear a hollow sound when you tap it. Your dough should be tacky but none should stick to your hand. Proofing time can vary, one and one half to two hours may be nessasary. Good baking!
I am a first time bread baker, & I have borrowed an Oster bread
machine. I’m not sure I can stop & start the machine for the required minutes. Also the directions say not to let the yeast get wet. I have an 8″ cast iron skillet. Should I put that in the oven with
the water in it to the left of where the bread will be put?
I am 80 & wanting to make bread without Bromates for health
reasons.
Hi Marylou, I’ve never used an Oster bread machine, but you can just follow the recipe included with the bread machine to make a loaf of bread. If you want to make a loaf of French bread, you can just use a mixer (like in the photos) or do it all by hand – start with a wooden spoon to bring the flour and ingredients together, then knead by hand. If kneading by hand, double the amount of minutes kneading.
Would add that a handheld spray bottle with water is also a terrific way to provide humidity for baking. Also placing a small pan with boiling water in the oven makes a great environment for allowing dough to rise. Makes it warm an moist.
I would like to use this recipe to make some bread for a dinner party I am going to. I am wanting to make the bread in the shape of letter
DREAM. Would this be difficult to do?
You could totally do it, but your baking time will be different. You’ll just have to keep an eye on it and make sure it doesn’t get overcooked.
Hey Jaden,
You just made this first time french-bread baker feel like a seasoned pro. My bread came out fabulous even though I was sure it wouldn’t! Followed recipe/instructions to a tee. Thank you for the helpful hints at the top of the recipe!
Lindsey
Thanks Lindsey!
I made this, and the bread was so heavy. Any way to make it light, and airy? Maybe it needs the overnight proof in the fridge. Any clues would be appreciated.
Hi Beth- usually, when the bread is heavy and dense, it could be a couple of things:
1. Are you using bread flour? All purpose flour doesn’t have high enough protein content.
2. Did you knead bread enough?
3. Is the yeast still good? Bad yeast that’s expired or just a bad batch could prevent bread from rising.
Pamela Anderson is a person, not an adornment. I could do without the sexist remark. She is actually quite compassionate and dedicates a lot if her time helping rescuing abused animals.
If taking offense at a witty remark meant to be funny and cute, (as well as complimenting her looks) is what you took from the recipe it someone some effort to share with the rest of us… you truly need to reassess your lifes  priorities.  I suggest maybe a community college course on how to understand humor, brevity, wit, or lightening the mood. I believe it is paired with the instructional video ~ how to not suck the energy out of a room as soon as you enter and be the sole reason for everyone’s early departure.  Followed by ~ the decline of intellect in modern times. How not to be “that guy”. The one nobody wants there but someone brings anyway. You can be arm candy and still be a philanthropist with a genius IQ. None of these qualities are mutually exclusive. I’m sure you could research that as well. Knowledge is the only cure for ignorance. Changing ones entire demeanor takes a lot more work. I wish you luck. It may take years, but eventually you might transform yourself  from the person that makes everyone roll their eyes at the thought of having to endure your company, to the person people might actually say instead “It won’t be that bad. It’s just a few hours.”  If you start now, I have faith you can do it.
Thank you very much for the recipe. And also for taking the time to share your amazing recipe. Â
BEST RESPONSE EVER
Could one of the loaves be frozen for baking later?
This turned out really well. I had tried the “French-bread” style recipe found in the classic Beard on Bread book first and yours turned out much better (and his requires sugar!). A couple questions, though:
1. “Secret #1” suggests 2-7-3 minutes of mixing-waiting-mixing, but Step 1 says 2-5-3 (using a mixer). I did 2-5-3 and it turned out fine. But I would like to know for sure whether you meant 2-5-3 or 2-7-3.
2. Your recipe calls for quick rising active yeast & to put the water and dry yeast right into the mixer bowl with the flour. I had regular acting yeast on hand, so I set it in warm water for a few minutes to activate and then combined the mixture into the flour. It turned out fine. But I am wondering whether there’s any other approach when one doesn’t have quick acting yeast on hand.
This is my second time making french bread with your recipe, and I must say it is pretty easy, I was always so skeptical about making a french bread but you have made it easy for me, now I will make it rather than buy it made… Thank you !
I have one question. Your method states if using a covered baker (which I intend on using), to pour the 1/4 cup of water directly in it. My covered baker is made of stoneware and if I do that I think I can kiss it goodby. I assume you are referring to a cast iron baker correct? And wouldn’t adding that much water directly in with the formed loaf have a negative effect on it as opposed to pouring the water on the oven floor or adding it to a previous heated empty pan?
I have 2 questions. #1- I only have all purpose flour and self-rising flour, how can I make either of those work for this recipe? #2-If I want to add minced garlic to the dough how much should I add?
Approximately how large are your finished loaves lengthwise and around?
Gosh, I don’t remember, I think they were 14-16″ long loaves
I made this today! even if you’re kneading by hand (which is what i did) it’s incredibly easy and my family loved everything about it! i’m going to be making this all the time now!
Baking a loaf as we speak.
Waaaaay to much text up front. All I want is the recipe. And it is great! Great bread, thanks.
I am new to making bread so I happen to like hints, tips, text, and pictures 🙂 I am making this for the first time tonight (rising as I write) and the whole family is excited! Thank you for your time and attention to detail for those of us still learning 🙂
Great recipe!! Thank you
I made this yesterday and it turned out so good that I’m making a double recipe today. 🙂
Thank you for posting!!
Thanks Ariel! Happy you like it 🙂
Is there a chance you could put up a video of how to make it? Some of us rookies would appreciate it.
Hi Tom – Great idea!
Can this recipe be done in a bread machine?
Thank you.
This would be my first time trying something like this. I do not have the required pans for baking though and have a “half oven” so I only have a tiny baking sheet. I’m wondering if I could use a corningware casserole dish instead because it’s the largest thing I have with a lid (glass though)? I’m also worried about throwing the water. I live in an apartment and just would hate for my normal bad luck to turn it into something ugly haha. Is that a step I could skip? I have been reading through your other comments and am excited to try this bread! There are just a few too many for me to read through to get my answers, so my apologies if you’ve already responded to them.
Hi Alyssa – skip the water this time. The glass corningware will work, but it won’t be that great for baking bread. Bake the bread on a baking sheet (without a lid) and give it a try. It will turn out better than in a corningware.
Great, thank you so much for the quick reply!
Not that it’d make too much of a difference, I wanted to note that your recipe calls for 2 teaspoons of yeast whereas the packets of yeast contain 2 1/4 teaspoons of yeast. But ideally, we’d be using fresh yeast anyway.
I can’t serve “French bread” unless it tastes like the French bread I ate in Paris. And after much trial and error, I discovered that the secret to the flavor is the yeast (duh). But you can’t develop a large enough colony in 3 hours if you use a normal amount of yeast.
I recommend using 3 to 4 times the yeast in your recipe, or even better use double the yeast, and add starter/preferment that you can keep on-hand, and prepare a week or more in advance. A preferment is nothing more than a cup of water and a cup of flour, and some yeast. Every day add a pinch of flour and a pinch of sugar to feed your yeast, and don’t let it dry out… and be careful it doesn’t try to escape the container.
Increase the yeast, and you increase the flavor without the 12 hours of proofing time.
I sure would like to ask you a question about this if you will write me thanks bo
Sure! What’s your question?
After the karate chop lenghtwise,you say stretch ends and fold over in half. Does that mean lengthwise again, or the other way
Lengthwise 🙂
This recipe is an absolute, hands down, winner!
It incorporates techniques that I’ve never tried before, such as letting the dough rest during the kneeding process, folding and ‘karate chopping’, pinching, and baking with a dish of water to create a humid environment.
Needless to say, I’m impressed. I give this one a 10 out of 10!
Thank you so much Matt!
Why does the cookie sheet have to be inverted?
To make it easier to slide dough/bread on and off.
There is no way that there is enough water for this recipe…. Just made it and the dough looked like an over floured rock.
Nice try tho, perhaps you need to add just a wee bit more of water or oil.
Shannon, I made this last night and it was perfect. The only thing I would do differently is to reduce the  salt by a quarter teaspoon, but that is just a matter of taste preference. I also did a hand kneed, but the ingredient proportions I used were exactly as directed. It sounds as if your yeast was not fresh or improperly measured flour. Some people don’t realize to measure flour you can’t scoop with your measuring cup, it packs too much flour, you have to spoon the flour into the cup, then scrape the top to level. Also, French bread typically would not contain fat. I would suggest trying this recipe again, being careful with your flour measure and make sure your water isn’t too hot, that will kill your yeast. Another tip, I NEVER add the full amount of flour for bread dough at the beginning, I always kneed in as needed, it is easier to control that way. Hope these tips help and you find success with this awesome recipe!
I followed this recipe and nade the perfect french bread. I live in high altitude also and followed Brads advice and it was delicious
Made this today & it was amazing! Thanks for sharing your recipe & tips. Have you tried freezing the dough for later use?Â
Not to be rude, but this is not French Bread at all. I say this having studied baking in France at an Ecole de Boulangerie in Paris for a number of years, and having made countless baguettes professionally. True Pain Français is something completely different to what you would end up with using this recipe (or pretty much every single other recipe in English on the internet).
First off the flour used is not right. French Bread in France is made using what’s called Type 55 flour. Type 55 is a medium/low gluten content flour and is closest to but not quite the same as American unbleached all purpose flour (T55 has a higher ash content, and the gluten content is slightly lower than all purpose which results in a softer and less elastic dough). Bread flour has far too much gluten and will make the bread much tougher than it should be, not to mention a real pain to shape properly into baguettes, bâtardes, etc.
The other major issue is the time given to rise. Generally speaking to develop the proper flavor you need an absolute minimum of 12 hours of rising time, preferably even longer. When I’ve made it at home, after kneading the bread goes through 3 rises, the first being about 20 hours in the fridge, then punched down, then a second rise of 4 hours out of the fridge in a warm location, then punched down again and on to shaping, followed by another 2-3 hours of rising time in a baker’s couche (a large folded and floured linen towel) before baking. Doing it this way also means switching to regular or machine yeast (same quantity for the flour volume given).
The reason why it needs to take so long is the dough needs time to ferment and to develop its flavor. This process also and gives it a more bubbly and less uniform crust with much larger bubbles (less dense crumb) inside the bread (the crumb in your photos is far too dense). Without the process of the slow long rise, you are making crusty white bread, and not French Bread. The difference between them is quite figuratively night and day.
Otherwise the rest of the instructions are fine more or less, though I would never use any kind of oil or cooking spray in the process, dough always sticks to everything after rising, its just what it does. I would also not, as a professional baker, recommend throwing water on the bottom of your home oven unless you want it to rust over time, leak water down below, or worse still it can potentially break your heating element from temperature shock if a lot of water lands directly on the element. Stick a pan underneath or use a spray bottle.
Another tip is to spray the surface of the bread with water right before it goes into the oven to help the bread rise further and better develop the crust. Also there isn’t much reason to use a thermometer, pick it up turn it over and knock on it, if it is hollow sounding and the crust dark enough, it is done.
So in my excitement to make this bread, I missed the “rapid rise” part of the yeast ingredient. I used regular active dry yeast. I didn’t soak it in water or anything, just threw it in with the water and salt and flour and mixed. Didn’t even think about it until I was reading the comments here. What will this do to my bread? Does it need to rise longer?
It should be just fine!
Thanks so much for the recipe. I don’t have the pizza stone, what can l use to substitute the stone?
A regular baking sheet, upside down will work as well.
Wow, I just had my Pyrex loaf pan EXPLODE in th oven when I put the water in it. I sure wish I had read the comments of the others who had the same problem.
I am so glad I found your instructions – especially the part about steaming the bread when it goes in the oven. I have an electric stove so I just threw in the water and shut the door. The crust turned out crispy and delicious. Also your photos of the folding and pinching were very helpful – I had begun my bread making adventure using instructions from another blog – which had no photo references.
First time making bread at home, and I have to say that I don’t see myself buying store bought ever again. When I have time, I will definitely look around your site for more cooking inspiration and instructions.
Mahalo!
I’m not skilled at bread–at all. I’ve made this twice, the first time didn’t work out because I accidentally skipped a step (or two), so it wasn’t as good as it could have been. But the second time I made it, it was amazing. I looked and tasted beautiful. Such an easy and wonderful recipe. Thank you so much!
Diana – Yay! I’m happy that you kept trying! jaden
Substituting all-purpose flour should be fine, since French bread does not normally have such a high protein flour as bread flour in it. I am certainly willing to sacrifice a little authenticity to crank out a good loaf in 3 hours. 🙂
I have to say I thought this recipe and process seemed a bit convoluted (the folding, stretching, karate chop and tossed water in the oven) but the bread turned out amazing. Not only the taste, but it looked incredible. Thank you for the dough hook mixer recipe. I have completely under utilized my expensive mixer; until now. It’s worth following the steps to the letter. The result is the kids poke their heads out of their bedrooms and out of their devices, and run down the steps to devour the bread. Thank you, Jaden!
Jaden, the bread came out great! I subbed 1 cup of white WW flour and added raw jalapenos, green onions, cilantro, and sharp cheddar. Both DH and I ate too much but we could not stay away from it! I used the steam pan method, but I’m intrigued by the idea of water IN the covered pan, so next time I’ll try it that way. Thanks again!
I want to try this today. It’s 9am. If the bread is to be eaten at 6pm, can I start it now and refrigerate until around 3pm, or wait till 2 or 3pm to start? If I want to add things, in this case cheese and jalapenos, at what point do I add them? Thanks for the recipe, it sounds delicious!
Hi Chris – You can go ahead and start now, just leave it to rest on counter. No need to refrigerate. If you are starting early, then what I would mix dough, create the dough ball and cover. Let rest on counter all day for the first rise.
Later, a half hour before you want bake:
Heat oven.
Flatten dough, sprinkle cheese, add jalapeno on top. Do the “karate chop” folding and shaping to enclose the filling. I also like to sprinkle a little cheese on top of shaped loaf for a cheesy crust on bread.
Bake.
Wow, thank you so much Jaden for your fast reply! I’ll let you know how it turns out. This will go great with meatloaf, yum! Next time I’ll try cutie pie Andrew’s No-Knead.
I want to make this bread recipe but do not have bread flour. Is it okay to substitute all purpose flour? I’m a newbie bread maker 🙂 thanks!
Hi Leah – yes, you can use all-purpose flour, but the texture may not be the same. Bread flour has more gluten than all purpose.
I’m probably missing something here. Does it say anywhere on this page, the temperature the bread should be baked at? I did see 375 degrees to reheat, but what temperature is the bread baked at?
Hi Annie – It’s Step 4: “4. While the dough is rising, about 1 hour into the rising stage, preheat your oven to 450F”
Such a great recipe. Thank you so much. It was even great when I substituted 2 cups of whole wheat flour for 2 cups of the bread flour.
I would love more pictures, specifically of the ‘karate chop’ and dough stretching. I used half whole wheat flour and it turned out beautifully.
I just got a pizza stone and so I’m trying new recipes. But I’m still working on successfully transferring dough to hot stone. I don’t have a pizza peel (yet?), would using parchment paper work for this recipe?
Yes. I do it all the time.
I bought dry active yeast by accident. I just dropped it in the warm water for 10 minutes before combining. The resulting dough was a little dry, but the loaves came out nice.
If you use regular active dry yeast, you may need to let it rise longer to achieve the near double volume, and you need to punch it down and let it rise again. Shouldn’t take as long the second time. I missed the rapid rise indication the first time I made it this, and it turned out well, but today I made it with the two rises and it is MUCH better.
Thanks Jan! I appreciate the advice!
The recipe above is correct, but the technique is not, which explains why its product cross section lacks the large holes French bread should have.
1) I say the recipe is authentic since it follows French law, that French bread must only have four ingredients: flour, yeast, salt and water. Absolutely NO sugar, oil, cornmeal or egg wash should ever touch the bread. I don’t use the word “baguette” since it refers to the long, thin loaves that are very difficult to fit on a home kitchen’s small pizza stone.
2) The technique above should be tweaked, to get the large holes, in the following manner– turn up the oven as high as it will go (usually 550 F for most home ovens) and heat the stone for at least 1 hour. Place a pan with 2 1/2 inches of cold water on a rack below the stone, as far to one side as possible so as not to be directly underneath the stone. Bake for around 19-23 minutes.
3) The shaping above is proper, but the dough has to be much more hydrated. It has to be wet enough for the yeast to be able to release large pockets into as it bakes.
Sorry for sounding like a pedantic Frenchman, but we are talking about French bread!!!
Thank you so much for your helpful ideas 🙂
I have a Pampered Chef covered baker and was wondering if you still add the 1/4 cup of water to it. I’m just concerned it would crack since it’s been preheating. I’m glad I found your blog and am excited to try this recipe.
Hi Shelly,
I have the same covered baker, and it’s never cracked on me. However, if you are concerned:
1. Preheat PC covered baker bottom only. Also pre-heat a metal loaf pan, something unbreakable and cheap 🙂 next to the baker.
2. Put dough in the baker, slide in oven, uncovered. Pour the water into the metal loaf pan.
3. The steam comes from the loaf pan.
While the dough is not covered, it will turn out just perfect! It might not be as super-crusty as a covered pan, but I promise it will be just as delicious!
How come no pin? I want to save this bread recipe on Pinterest. It’s the best French Bread recipe I’ve come across. YUMMY!
Eating it now. Delicious!
This recipe has become a weekend thing for my boyfriend and me. For the last month and a half since I first tried it, I make the bread and a bowl of vegan pesto for us to munch on every Sunday night. Thanks so much!
I loved how this bread turned out!! Awesome Recipe 🙂
I tried making this recipe for the perfect loaf of french bread. I did exactly what the recipe said , but the dough was so hard/dense after the first paddle mix and then the dough hook. it was tough and knocked my bowl off of the holder on my kitchen aid mixer. i had to throw the mass away. My friend makes this all the time and is delicious. WHAT WENT WRONG??
If I use a cast iron pot to bake the bread, should I transfer the bread to the pot first or pour the 1/4 cup water first? Thanks!
Transfer bread first!
I have been on a bread baking kick lately and decided to try a French loaf. I came across this blog and it looked so easy I thought I’d give it a go! It turned out perfectly! Thanks so much for sharing this great recipe.
It’s finished baking and it is quite delicious. I never can master the Golden brown crust though. Is there a secret other than the steam?
Two ways to get the golden crust. Cooking it longer or using an egg wash. If you go with the first route and don’t want to over cook the inside just be sure it is baking closer to the top of the oven for the last few minutes until it reaches the color you want. If you want to go with the second method beat 1 egg with 2 tablespoons water (or milk if you want really dark crust). Then, after you have shaped the loaves but before they have risen, brush your loaves with a generous coat of egg wash. Apply one more coat just before baking. Not only will the egg wash help with that golden color, but it will also give the loaves a glossy finish and a nice crackle to the crust.
Mine is baking now but I was very unsure on how large the initial rectangle should be. Do you have an approximate size? The first try my rectangle was quite large and it made my shaped loaf very thin so I knew it wasn’t right.
i just made this (first time trying french bread, or really any home-made bread) and it turned out perfectly! lightly crispy on the outside and pillowy on the inside. i was confused, like some others, about how to shape the dough, but i doubt it matters. i folded mine over a few times and ended up with a small square that i put into a preheated cast iron dutch oven. after i put the dough in and before i put the top back on, i poured in 1/4 cup of water and followed the rest of the directions. it is perfect!
High Altitude issues. Although I had some challenges the results were incredible. Adjustments must be made for the elevation as water will evaporate at increased percentages above sea level. Hold back 1/2 cup of the flour, some for the kneeling process and 1/4 cup just to have the dough contain more water. When you bake you will reduce your oven temps 1 degree for every 500 feet above sea level. I’m in Reno, NV so I took off ten degrees at each scheduled temperature setting.
As my loafs were resting/rising on my bake pan, I learned that they need to be separated far enough not to touch each other, also don’t cover them with plastic wrap because it stuck to the loaf and was destructive to the appearance when removed. Prior to the slits in the bread, I mixed an egg white with warm water and washed the top and sides, then sprinkled with coarse salt, it gave the final loafs a beautiful, and crunchy look and the salt enhanced the flavor.
Crank the oven to 450 with a tray in the bottom that is hot from the pre-heat. That’s 440 to me. Dump a 1/2 cup of water in the lower tray and close the oven door. You will see the steam. After 7 minutes, reduce the heat to 350, for me 350, (elevation). 21 more minutes and check the internal temp. My thermometer is a little off so I pulled the loaves at 170 degrees, shoot for 180-190.
The bread was a holiday table hit, seriously the best I’ve made. Enjoy.
I have found this recipe very helpful but I do want to mention one problem I had. I used a pie pan, which is glass, to put the water in, and had the pan explode. I thought it worth mentioning that apparently glass or ceramic can’t handle that kind of temperature change. Part of it definitely was the durability of the Pyrex pan but I think it’s best if a metal pan of some kind is used instead. Other than that, I found the recipe great and very helpful!
I loved this recipe! I used it to make my first ever loaf of bread and it turned out perfect! My husband loves it too, and we can even save money making our own bread 🙂 Thank you so much! You made it very easy for a rookie!
As soon as the heal over time buff provided by the first piece of food you
black tea and milk should be consuming in order to save money on electricity bills instead of using its own drippings.
It is nearly impossible to sterilise themA potato masherA large bowlJam funnelEither a specialist
jelly bag, then set aside to add to the variety of dishes that other person prefer.
Wow, this bread was great! Sometimes I’m nervous about trying recipes from blogs, because I get so excited and it turns out to be not so great. Then, I’ve wasted the time and ingredients and am totally disappointed. Thanks so much for this recipe. I’ m definitely going to be making it again. It was great!
Do you have a spam issue on this website; I also am a blogger, and I was wondering your situation;
many of us have developed some nice practices and we are looking to swap techniques with other folks, be sure
to shoot me an email if interested.
I was recommended this web site by myy cousin. I’m not sure whether this post is written by
him as nobody else know such detailed about my trouble.
You’re wonderful! Thanks!
This bread was great! Wow so easy. The hardest part is waiting 😉 It would have been fluffier if I didn’t transfer it to the pan I was baking it in but instead just let it sit in there for the last 30 minutes. It’s a two baguette pan. Every time you make something you learn more about the mechanics. I also forgot to score the dough but it seemed to do fine. I was afraid of throwing the water straight into the oven at first cause the heating element is at the bottom, then I was immediately afraid of the bread tasting like the burnt on crud of a thousand years when I smelled the steam but nope! I did add a bit of sugar, like a teaspoon, to the water and put a bit of the yeast in the water and let it sit before dumping it in the bowl. Also used all purpose flour, 500g cause according to culinaryarts.about.com 1 cup sifted ap is 125g, plus a teaspoon of vital wheat gluten per cup.
such a great recipe Jaden~~made this after finding it late this afternoon and had it ready for dinner ~~~directions are specific and helpful and more than all of that they do work if you but follow them~~used it as a companion bread to my N’awlin’s Cajun Barbecued Shrimp ~~perfect and one did not even need to leave the house ~~all pantry friendly items ~~I wonder if there is any way to hold the dough overnight in the fridge after the first rise and punch down though as per the no knead bread recipe ~~i think it would be so nice to bake one for the evening meal and have one ready to shape and bake a day or two down the road ~~i did see your comments on ways to freeze it after par baking but did wonder if this method would be possible ~~if so how many days do you think one could possibly hold the dough ~~smile ~~~regards Denise
Helen, I found instructions on parbaking from the Artisan Bread in 5 Minutes A Day book. Bake the bread to where it’s just barely showing some color (about 90% of the baking time). Allow to cool and place in a plastic bag. If it will be stored more than a day put the bread in the freezer. If you need to transport it still warm use a paper bag instead of plastic. To finish baking, defrost the bread if needed, preheat the oven to the temperature in the recipe, then bake until adequately browned, usually 5-10 minutes and cool on a baking rack.
Curious if one of the loaves can be frozen? If so, when, at the dough stage or should it be partially baked then frozen and finished baking some other time. Any responses would be appreciated.
You can freeze the baked loaf after it has completely cooled. When ready to eat, it will go straight from freezer to oven, 375F for 15 minutes or until warm, nice and toasty (depends on how thick your loaf is).
Can I use sourdough starter instead of yeast?
I really like this. Shabby Chic is certainly a type of Feng Shui,
giving a relaxed, soft and feminine feel. A very romantic way of
decorating making people choose to come in and relax, this is
why it can also be known as the cottage feel.
What’s up it’s me, I am also visiting this web page
on a regular basis, this web site is actually good and the users are really sharing nice thoughts.
Spot on. I followed your recipe to the letter, even used a covered cast iron pot for the first time. What a fantastic result. Many thanks for your great recipe
this recipe well written easy to replicate turned out nice thanks for sharing
Great recipe. One thing that improved my French bread was taking to heart Julia Child’s counter-intuitive advice to leave the bread extra sticky. If it seems just right to an experienced bread baker, we have used too much flour. It is harder to work with in the initial stages but ends up with a wonderfully fluffy crumb. Also, rather than throwing water into the oven, I pop in a few ice cubes. They steam up super-fast and there is no splash risk.
Be careful about how you use the word “throw” when recommending water in the oven. Cold, even hot, water on the bottom element = explosion of the bottom element. Better to use the pan method but how about “pour” water in the pan. Throwing gives me the thought of standing outside the oven and chucking the water in. Will let you know how the bread comes out when I try it
My appliance repair man loved your recommendation to throw water on the floor of the oven. After a few times the element broke and had to be replaced. Use a cake pan or something like it on the bottom shelf instead. That water or ice cubes or even misting don’t seem to do much for the crustiness. I don’t think you need a “karate” move on the rising dough. That forces out some of the “burps”. Pretty good flavor but needs some tuning. Thanks.
Just had to add that I made two delicious loaves tonight! It was very exciting to have them come out so incredibly tender, chewy and crispy all at once. I used unbleached flour this time, but will try to incorporate fresh milled flour with the next batch. I’m even thinking of sending this to school tomorrow for my son’s birthday with some pasture butter instead of making cake.
http://allrecipes.com/Recipe/The-French-Bread/Detail.aspx
The link contains your photo, above, but the recipe is totally different. Is that another one of your recipes on the All Recipes site?
wow. thanks for letting me know! I’ll contact allrecipes.com right away.
I’m totally addicted to making bread! I’m buying yeast by the pound! Thanks for making it so easy to bake bread. My kids love it and they make the no knead bread too!! Thank you!
I just made this the other night and it was delicious but I wasn’t sure about the resting time right before it goes in the oven – are the loaves covered with the damp towel for this half hour?
This is my second time making this bread, and it taste delightful. However – my loafs never look nearly as pretty as yours! I posted about it on my blog. 🙂 Thank you for all of your wonderful recipes.
this where you can find out how to make the best bread
http://498297w89tcnpu8aqi5xav9o5n.hop.clickbank.net/?tid=32393
I was hoping for a crunchy bread with a light and fluffy center, but my loaves came out very dense on the inside. They were not at all tasty and I’m pretty sure we followed all the steps exactly. I was disappointed after spending hours working on the recipe. What a bummer.
it confused me too ed. i just carefully take it out of the bowl it was rising in, and when i start working with it to shape it , it automatically slowly starts beating it’s self down.
I am also not clear on step 5 with the karate chop. Do you chop down across the fold and pull the bread so that its longer, or do you chop into the fold and stretch the sides that you’ve just folded into the middle? I need a picture of this step. 🙂
Out of enthusiasm led me add that i dare say it tastes better than baguettes bought in a shop (albeit that my top might be a bit darker).
I used the cheapest AP flour that i could find (60 eurocents/kilo) and i figure i get 4 loafs out of 1 kilo (so 15 cts per bread for the flour. Also the cheapest dried yeast I could find. No special flours, no special yeasts. Great. Really I should stop baking bread because i grow too fat
So glad you had success!
as my house is kinda cold right now (Winter) I used considerably longer rising times, but the bread came out perfect. Well, perfect in taste, a bit wobbly in shape. I guess that needs practice, but really a good recipe.
I tried baking bread for years and it was all a disappointment. Only the last few months I started to understand what i was doing and what i needed to do. Now it seems so easy
Thank you for the wonderful tips! I have never baked a successful loaf of bread until now.
Yay! You’re welcome!
I am currently trying this, but one sentence surprised me: “Just don’t knead the dough again – you’ll pop all the beautiful gas that took 1.5 hours to create!”
This was after i was told to ‘punch it down completely’ and ‘karatechop’it 🙂
Please show some pictures on how to do the folding after stretching out into a rectangle. My bread tastes great, but I got totally lost and my loaves didn’t look too good.
I just made this bread tonight. My loaves got a little too crunchy at 20 minutes, so I would start checking them at 15 minutes or so. but WOW they tasted so good! I am too ashamed to say how much I have eaten already 😉 I love bread!
This is great! I have to try this! I cannot believe that something so delicious would only call for such a small number of ingredients! Love it.
Great recipe, my bread turned out perfectly. Thanks a million!
I just made this recipe and added caraway seeds and cardamon that I had ground, heavenly smell, great crust, really easy (I however did not check my loaf size with my vessel size so I have a horseshoe loaf). The five secrets are things I wish I had found before, I have made multiple loaves of bread with limited success, but now I have a loaf that looks and tastes right. But I agree with letting it rise for 45-60 minutes next time for a fluffier inside.
This is very close to the recipe I am using from Jacques Pepin’s cooking show Essential Pepin. He uses 4 1/2 cups flour and other ingredients are adjusted from there. He mists the oven with a mister, then again after 5 more minutes. I made his Gros Pain, which came out as expected, used a mixer for the kneading. Next I want to use the same Pepin recipe and make baguettes. I loved this simple bread, with no fancy extra ingredients.
I made this today and it turned out great and evertone loved it. The bread was really heavy/dense, but it was not objectionable. I used my bread machine to mix the dough (I do not own a mixer), and used Secret #1, then I removed the dough and did everything else by hand as described. I made the dough into mini French loaves (think sandwich rolls) and got 5 of them, so I wish I’d doubled the recipe, but they were so tasty I will definitely be making this again – soon!
Yes, it does. Bake at 450 degrees.
Hi,
once you have it stretched out fold long ways. you can also roll it like cinn. roll dough. if you have any more questions feel free to email will be glad to help when I can.
thanks
Russ
I am a little confused on one part. After doing the karate chop down the middle and stretching out the ends again, it says to fold in half. Which way are you supposed to fold the dough in half? Sorry, I am a very visual person and I got hung up here. This is an awesome recipe though!
This recipe is amazing. It is my go-to bread recipe, and the first bread I was ever able to make successfully. Thank you for posting.
It is 450 degrees F. It says when it is rising for the one hour and 30 minute section.
Late to the party, but just wanted to say that my loaves weren’t at all pretty, but goodness gracious were they tasty! This was my very first bread-making experience ever, and this recipe will be my most favoritest! 😛 Thanks a bunch!
Awesome recipe, easy and tasty.
I just finished making this bread with my boyfriend. This was our first time making bread and we had such a good time. The loaves came out awesome! Thank you so much for this amazing recipe. Also, Taylor, you fold them hotdog style the second time. :]
This is by far the best bread I have ever made. It’s SUPER EASY! and it tastes great. And you probably have the ingredients at home. It’s not as unhealthy and full of bad things as other breads because it only has such a few ingredients. My mom loved it so much and she BEGGED me to make it again. THANK YOU SO MUCH!
I was not quite clear on which way to fold in half after the karate chop. Hamburger or hotdog?
French bread recipe doesn’t specify what temp to bake at, just mentions what internal temp should be.
Just pulled my bread out of the oven. Has a beautifully brown crust but didn’t rise much during baking. Think next time I’ll let it rise 60 minutes before putting it in the oven. Looks more like a baguette but smells divine.
This turned out perfectly for me! My husband and I have been searching for a delicious French bread with a crunchy crust and a soft, light middle. This is it!! And the crust browned perfectly for me. A keeper!
I had this same question. Did anyone end up answering it?
Just made this recipe and my kitchen now smells like a bakery! Perfect recipe and perfect results. It’s taken me years to find a good recipe so now yours is entering my master recipe collection. Only thing I did differently was I made one loaf and four rolls and let them rise longer the second time. They rose for 60 minutes instead of the 30 you mentioned but still baked perfectly and tasted fabulous. Thank you!
This is a GREAT bread recipe–dense, tasty. However, I agree with many of the others–it was a bit salty with two tsps. of salt. Next time I’ll cut it to one tsp. I put my stone baker into the oven when I started to preheat it. That will prevent the baker from cracking. And baking the bread at 450 was fine. I also sprayed water on the bread as it was baking. But cut the salt, for sure.
I’ve baked this recipe several times and it has never failed me. I bake a lot of bread from different sources and just made two loaves of sourdough from one of my favorite bread cook books using this baking method instead of the one in the book. I achieved much better results. Thank you for all these invaluable tips.
Relatively new to bread making and have previously been unsuccessful baking French Bread. Seeing this simple recipe, I thought I would give it a try. This is the very best french bread that I have had since I left Europe many years ago. It rose well, had a brown crispy crust and chewy inside….simply amazing.
Thank you.
this recipe worked well for sausage buns. we make our own sausage and this is the best suited for them so for. we took the dough and split it up into 6 slices and formed 6 little loaf’s cooked the same as recipe and thy came out golden brown
I have the second loaf of this bread in my oven RIGHT NOW– my house smells delectable, the first loaf is a gorgeous crackly brown, and I can’t wait to serve it tonight to my dinner guests! My loaves turned out looking rather more like baguettes than your loaf, but I bet they taste delicious all the same. 🙂 Thanks for the recipe; it’s a keeper!
I made this last week and it turned out great. Made it again today and when I threw water in bottom of oven it cracked my pizza stone. I tossed water in bottom, being careful to avoid bread, I closed the door, watched the steam rise and then POP! Great, I’ve had that for about 15 years.
This is great. This is the first time I tried making the french bread. It looks just like the picture. I will never buy french bread my the store again. I love it, taste is great and crunchy from the outside. Nice and brown as well. I follow all the instructions and french bread came out perfect. thanks =)
I made this a couple times last year and it was so wonderful! After years of attempting many different bread recipes, and always ending up with a heavy, dense loaf, I was ECSTATIC at how this bread came out.
I have a batch rising at the moment… One thing I’ve done each time I’ve made it is to add 1/2 tsp sugar to the flour/yeast/salt when it’s dry; (I’ve been brainwashed to believe that yeast loves sugar so it was automatic to me.) That may cut down on the saltiness a bit…?
I kind of want to experiment a little bit with adding some subtle flavors- like a little bit of rosemary and garlic or something (well not so subtle:). Has anyone done any flavoring with this bread?
Thanks for the tips and visual imagery…will try this at home.The tip about steaming was particularly helpful.
This was an amazing recipe, it turned out magnificently despite the fact that I didn’t have any bread flour!
can you make this recipe into rolls instead of loafs
Amazing bread!!! I will never be able to go back to store bought French bread!! Thank you so much!
I just baked this bread and it came out perfect! Delicious. I followed all of your directions exactly, did not change anything. I baked on a pizza stone, put a pie plate of 1/2 cup of water in the oven at the last minute, for moisture. Used a thermometer to check the final internal temp of the bread, the loaves were finished in 20 minutes. Perfection! Thanks for sharing this recipe!
Just a question. Maybe a dumb one, but on the part that you fold in over half after the karate chop and stretching out the ends. which direction do you fold it in half. IS it lengthwise or do you bring the two short ends together?
This was perfect! I used traditional yeast, and so used 3 teaspoons of yeast. Beautiful bread, beautiful crust. I have finally perfected my folding. This is the best, thanks so much!
This French loaf was FANTASTIC!! It was my first time and it came out amazing, soft on the inside and crispy on the outside.. Its now a regular on the dinner table 🙂
Did you perhaps use traditional yeast instead of quick-rising? Because this recipe uses quick-rising you don’t need to proof it, simply add it to the dry ingredients.
I made this recipe and it was delicious, browned perfectly, and the crust was crisp! However, instead of throwing water on the bottom of the oven, I placed a cast iron pan on the bottom rack and heated it along with the baking sheet and threw the water into that to create the steam.
JUST tried this recipe… and am in LOVE!! … used about a 1/2 cup of flour during final kneading process. (not the 1/4 cup mentioned.. but it worked!!) also cut the salt in half after reading the comments! YUM YUM pairing it w/ fresh homemade pasta for dinner w/ good friends tomorrow! THANKS!!!
Oh shut the hell up. She was merely posting her opinion. Don’t get so cranky.
I tried this one too night and found it very easy to use. I did make a couple alterations and wish I had read the comments prior too making mine. The next time I make it I will cut the amount of salt to 1 tsp. as I agree with a previous comment that it had a bit too much salt. I also brushed egg white on top prior to baking then after it was done and on the cooling rack I brushed a little melted (unsalted) butter with a touch of honey on top.
It came out great aside from the need to cut back on the salt.
Thanks for sharing this recipe with us. I will be making this one again!
I never remember to go back and comment on recipes, but this one will go down in history as our FAVORITE BREAD EVER!!! Easiest recipe, well explained – Thank you!
For some reason my bread was very salty. Almost too salty to eat. I followed all the directions and amounts, but all i could taste was salt. Has anyone else had this issue?
Good recipe and I’ve always thought that “punching” the dough literally means to punch it down; however this is NOT the case for those who don’t know. You should gently fold the dough flat and then fold it back into a ball. Here is a website I found explaining it. http://artisanbreadbaking.com/techniques/folding/
Oh Emm Gee!!! I made this bread today and whoa man is it GOOD!!!! I’m a bread novice (have been mostly making breads and rolls with my bread machine) but I wanted to give this a try. It’s easy and the results were perfect. I think I need to work on my shaping a bit but other than that this was definitely a winner. Now if I can just keep myself from eating it all before the hubs gets home…
Are you serious? You just posted THE LEAST CONSTRUCTIVE COMMENT possible. If I posted a tutorial on how to paint a masterpiece, you would probably say something like, “Well my favorite thing to do is drive to a gallery and buy a painting. That way I come home with things that say nothing about me as a person and give me absolutely no sense of accomplishment.”
Don’t comment on baking tutorials if you don’t like to bake. And saying anything, besides seafood and hurricanes, is the best you can find in New Orleans is almost never saying much.
WOW! First attempt using your great instructions and recipe, and results were out of this world…bread brown beautifully, and tasted fantastic, with the kind of texture and thin crispy crust that French bread needs to be bakery quality. Fooled around with numerous videos, and making “the sponge” and “paa’t fernintage” or whatever…lots of work for poor results. I followed your sinple
recipe, including some great tips, and nailed it. Thank you so
much!
Thank you!
AWESOME. I’ve always had such trouble with baking my own French bread…never crusty enough, usually too doughy. I am clicking my heels because THIS ONE WORKED!!! Thank you so much, Jaden, for doing all of the research and making the 40 loaves to find just the right one!!
After the dough has been rising for an hour, thats when you turn on your oven. Ovens are supposed to be pre-heated at least 30 before baking. ( “about 1 hour into the rising stage, preheat your oven to 450F and place your pizza stone, inverted baking sheet or covered cast iron pot into the oven to heat up”.)
Oh my, this bread was absolutely luxurious! I make our breads as my daughter has allergies and my family loved it! I doubled the recipe and got four nice sized loaves. My two daughters and I have already eaten a loaf and a half already! I have never been able to get that incredible brown crust until today! Yay! I set it a 450 tossed the water on the bottom and didn’t open the door until it was done (although it was so tempting!). This is my new favorite recipe. Thanks so much I will be using this recipe like crazy.
This loaf is not perfect. Too little oven spring, likely from a result of not enough proofing and could do with a bit of in between folding.
I agree with the comment that the end result looks nothing like the photo–and that it ended up in a weird shape. It is a good recipe, though, and I may try it again.
One problem with the recipe: instructions for warming the oven don’t make sense. It ought to be pre-heated while the loaves are rising–not the 1.5 hours while dough is still rising.
I make this recipe often and love how easy it is, to help give it some color and shine I always brush the loaves with egg white before slicing the tops. I cut it into 4 smaller loaves and use it for bahn mi sandwiches. Delish!
Looks good, but if I want perfect French bread in 3 hours my favorite thing to do is drive to “Little Vietnam”, hit the groceries and a restaurant, and come home with a full tummy, tons of goodies and the best french bread in New Orleans.
Didn’t have any trouble browning, but I found it a bit salty. Perfectly fine with some cheese though.
I just made this bread and it is my first time ever making french bread. I followed it exactly and they turned out perfect. I was so amazed that I could actually make something that looks like i bought it from the store. Thank you! This will be my french bread recipe 🙂
This bread is AWESOME! My husband said two things about it–1. “It’s the best thing you’ve ever made.” 2. “If it were any more French, it would need a passport.”
I’m not great with bread, but this recipe turned out great. Thank you so much for sharing. I’m off to try it with some Nutella! 😀
This recipe made a delicious loaf of bread! It was very easy make, but does take a few hours to make, so don’t wait till the last minute. Also, the crust didn’t brown as courtney previously stated, but I was fine with that. I made four smaller loaves that I sliced and served warm with butter. My bread didn’t turn out light and airy in the center, but still had a good texture. It could very well be attributed to the face that I’m a novice at making bread.
I’ll certainly be making this again…thanks for the recipe!
Thanks Rosie!
this bread was delicious! but it looked absolutley nothing like the pictures on here! it was all white, even when i cooked it for 35 minutes but it was deffinatly cooked. however, my bread was folded weird, so that could have been the problem 🙂
To avoid the problem you discussed, I place a cookie sheet with water in it under my baking stone. I put it in during the pre-heat and while cooking.
I have made this recipe a few times and we love it however my loafs are a bit longer and narrower than they should be. Can you tell me the approximate diminsions of the rectangle before you fold it.
Thanks for this wonderful recipe.
Hi Ken, My loaves are different every time 😉 I’ll have to measure for you next time I make the bread.
I am on the stage of letting the dough rise. Followed the recipe but was left with some more flour from the 1/4 was supposedly for reserve. Dough turned out satiny even before i could finish the flour. Oven is convection, do i need to set it with just normal setting (without the fan on). Does it make any difference?
Sorry I didn’t see this until now – how did the bread turn out? With convection, I lower the temp 25% and shorten bake time 25%.
This bread looks so good! Quick question, how do you measure your flour — scale, scoop & sweep, or spoon & sweep? Is the second rise only 30 minutes? Thanks, I can’t wait to make this!
I didn’t use a scale. Took my measuring cup, scooped and swept. 🙂
Yes, the second rise is 30 minutes.
This was so good, but it came out wicked dense. The internal temp was what the recipe said. I baked on a stone for 20min, should I have left it in longer?
So basically why does bread get dense, what did I do wrong?
Could I use a pan with water next to my pizza stone? I REALLY don’t want to crack my stone… what about using melted butter or something?
Yes you can! Use a regular ol tin pie plate or pan
Your replacing of the white flour was too much for the dry yeast to overcome. Double the yeast and add 2 ounces of pure vegetable shortening or olive oil. This will give the dough he proper strength for fermentation.
After you make your final loaf form for proofing the dough, dust the peel board with cornmeal. When done proofing, you slide it in the oven onto the cooking stone or your inverse pan. But the stone is the way to go. And don’t forget the steam. Lots of steam.
Thanks so much for your recipe. I just blogged it on my own site. Make sure to check it out. Someday I wish to get my loaves just like yours!
I’ve been a home bread maker for about 4 yrs. now. Family, friends, parties, you name it, my pride and joy was always my French Bread. Although my recipe was always the same, the results started to vary. Same flour, yeast, water temp. etc. Finally decided to try a new recipe.
Have tried your recipe now on 3 occassions and it is excellent. A lot less muss and fuss than my original one. I prefer the single larger loaf and your recipe makes a huge loaf which my family loves.
Great recipe and easy to follow instructions for those starting out in bread making. Kitchen Aid instructions are a nice touch also.Thanks so much.
Thanks for the recipe and the detailed instructions.
I made this bread yesterday – it turned out great and was gone in no time. Only thing I might change is to reduce the quantity of salt next time.
My son is 17 years old. He asked me to find a good French Bread recipe, so that he could try his hand as a baker. He made this by himself, and it turned out scrumptious. I was kinda jealous that I didn’t get in on the kneading action, so tonight, after he’s in bed, I’m making my own recipe–doubled, so that I can give some to friends. Thank you for the recipe and for the step-by-step instructions… this recipe made it into our family recipe box. So GOOD!
All my breads turn brown instead of golden brown can you help me out as to why this happens? I sometimes cover the loaves with liner paper and they come out lighter ……I use a baking pan but it is not inverted since it is very shallow anyway I cant see how this might make a difference and I bake on the middle rack or lower…………thank you in advance
Sounds like your oven may run hotter than most. Turn your temp down by 25 degrees. Bake in middle rack.
I was watching a great french film the other night about two people in airport that have their flights held up. There was one scene where they were eating this great looking loaf of french bread. My mouth was watering as I had this sudden urge to eat some french bread. So I’m determined to make some of my own french bread and this recipe looks good since it can be ready in 3 hours.
Yeah, I baked it. When my dough passed wind, it deflated by about 80%, and in the oven it rose back about 25%.
I confess, I didn’t follow the recipe to a T. I replaced a small portion of the flour with whole wheat and a about a quarter cup with bean (garbanzo & fava) flour and I tossed in an unmeasured sprinkle of wheat gluten. I also included some caraway seeds. It was tasty, but a bit dense and tough (if those are the right words to describe it). It was more hearty-textured than I had hoped for but the crust was awesome!
I’m really eager to learn about bread-making. I don’t understand what to look for when kneading. I feel like such a dough-dummy. I don’t know where to start learning.
I suggest trying a recipe exactly – no changes. And then change ONE thing at a time and understand how it affects the finished bread. You’ve got so many variables, it’s hard to learn.
“Carefully slide the gorgeous loaf into or onto your baking vessel.”
What a joke! My loaf deflated. I literally heard the air Ssssssss out of it. So did my hopes for some yummy bread deflate. Bleh. I guess I’ll use parchment next time.
I’m brand new to baking so I’m probably breaking a lot of rules that are assumed common sense that I just don’t have.
Yes, try parchment next time! However, even though it deflated, your bread should have risen plenty in the oven. Did you try baking it?
Ah! Parchment paper is a fantastic idea. I’ve baked a grand total of 3 loaves now (3 of your AMAZING no-knead bread, and one of this french bread), so I’m still learning.
Thank you so much!
I was going by this line in the recipe:
If you are using a long cast-iron pot or covered baker: -> Before closing the lid on your pot/baker, put 1/4 cup of water directly in the pot. Cover immediately. Put pot in oven.
Oh sorry! I had my mind on another recipe (the No Knead Bread recipe that I have on my site)
I don’t have trouble with the dough sticking – the water almost immediately evaporates and steams. Also try parchment paper under the dough to prevent any sticking at all.
I think I messed something up. I put the dough in the pre-heated Le Creuset, poured a half cup of water in, baked, uncovered, baked a bit more. Smelled delicious, but the bread glued itself to the bottom of the pot. I thought something like that might happen (floury dough + water = glue), but I’m still convinced I just did something wrong. Any ideas?
Cam, did you pour the water into the Le Creuset….or in the oven? You’re supposed to pour water in oven, not your pot.
tried it – loved it. The water tossed in the floor of the oven really gets the crispiness other recipes miss. Thanks for a great recipe.
Ooohhh yum yum, the smells are heavenly and the bread incredibly beautiful. So off I go to a Christmas party with fresh baked bread. Too cool for school.
I am an experienced bread baker, so I took some risks. I added garlic chopped fresh rosemary, sunflower and pumpkin seeds. It is rising now. Will let you know how it turns out.
I’ve been making this recipe for about a year now. I’ve made some really phenomenal loaves with great crusty ears. I love how much detail you went into.. it gave me confidence to actually try a baguette!!
Any tips on how to make the formed dough look as pretty as yours?? It comes out of the oven looking ok, but not as straight and pretty as I would like.
I think it just takes practice! My first few loaves looked a little wonky 😉
One more question. Is there any point in the french Bread recipe that I could freeze the dough or is it better to bake it and then freeze the loaf?
Thank you!
You can shape the dough, let it rise, underbake the bread by 5 minutes, let cool, then freeze.
When you want to eat, take loaf out and put directly into hot oven to finish baking.
Yummeee!!! I’ve been trying many new bread recipes and this was by far the best tasting and most authentic recipe for a French baguette. The family raved. Now, the next request was for a whole wheat baguette. Any suggestions would be much appreciated.
Thank you, thank you , thank you.
This bread was amazing! I made it to have with my dinner tonight and although I didnt make the cajun shrimp ( they sounded delicious and I will definitely try later this week) but i did have them with black mussels in a tomato broth. I was going to use your bread to sop up all the extra broth but the bread was so crunchy, fluffy, and just plain delicious that I ended up eating most of it before my mussels were ready, haha! Thanks again for the recipe, Cheers!
http://sammygskitchen.wordpress.com/2010/10/19/black-mussels-in-white-wine-tomato-sauce-with-fresh-baked-french-bread/
You’re so very welcome!!! Fresh bread always makes me happy! 😉
instead of water. i throw a container of ice cubes on the bottom of the oven. less mess and a natural time release for steaming for the bread.
Just wondered if the dough could be made in a Zojirushi home bakery and then completed in the oven.
Let me know how it turns out — I don’t have a bread machine.
looks just fabulous and am trying now!
this is an awesome recipe. I use something similar to this, but mine is from Anis Boubasa who is a french baker known for his baguette in paris.
You can check his baguette recipe out at my site and a step by step instruction on how to bake the baguette.
how to make baguette
hi
i just stumbled into your blog.i liked this receipe ,can you tell me how to make abt the whole meal bread as i am keen on trying it .
gosh, I’m afraid I’m not understanding your request!
Well, this was my first attempt ever at baking bread, and it worked! Came out perfect. I was tickled to death. Easy (even w/hand-kneading) and fast. I used a pizza stone for the loaves and a cast-iron skillet for the steaming water. The bread is delicious. Thanks for the great recipe & post!
This recipe worked very well and mine turned out exactly as the picture above. I will bake another loaf with this recipe again but this time using a poolish that’s sat out over night for flavor. Thank you so much!
I just wanted to warn people… putting water into an oven can do damage to the oven and stoneware like pizza stones. The moisture from the steam cracks pizza stones all the time…. and I even heard one lady say the water warped her oven floor.
@ Katie -( I even heard one lady say the water warped her oven floor.) Well that actually works out well for me because the pan of water splashes nicely when it buckles from the heat/ice and makes lots of wonderful steam!
Besides, who cooks on the bottom floor any ways?
Love the BREAD! We just had dinner and with Fresh Bread, my family loved it.
I did half in a dutch oven and the other half on a pizza stone. I was a little apprehensive about the water in the dutch oven and the stove bottom but it worked perfectly. The only thing I did different was I added a tablespoon of sugar. I did this because my family likes a little sugar in their bread and also I don’t always watch the clock on the rising times and sometimes let it go longer so I like the yeast to have a little extra to eat.
Thank You so much for a great recipe, this will go in with my bread recipes.
SO EASY!
Fantastic recipe! I have had this recipe bookmarked for a while now and just finished eating the first hot, steaming slice of this bread. WOW! Excellent crisp crust, great flavor and texture…. awesome straight out of the oven. I bake bread once or twice a week and this French Loaf is a keeper! Only problem I found is that I had not tried it sooner!
thank you Cathy!
Dan-
You turn on your oven in Step 2 because it takes time to heat up.
The second rising is in Step 5.
jaden
There seems to be no “second rising” where the loaves are formed then covered etc.
I dont see how at the end of Step 2 you would turn on your oven because you say later that you form the loaves and let them rest for 30 minutes. I am sure there’s something missing because my loaves were nowhere near the size in your pictures – and the first rising was 2x the original ball of dough.
Anyhow I will be baking these shortly and I hope it wasn’t a waste.
Thank you for the perfect “pain ordinaire” recipe and instructions! I just made two gorgeous loaves at high elevation with Montana Hard Wheat (“Natural White” Flour by Wheat Montana). I adjusted the temp to 430 degrees for 30 minutes. Delicious! In addition to placing a flat pan of boiling water at the bottom of my electric oven, I brushed the loaves with water before baking, and twice during the last 15 minutes. The crust is wonderfully crunchy and the bread has a fabulous tender/elastic texture. I can see by my boyfriend’s response that I will have to make twice as many loaves next time. Merci madame!
Thank You soooo much! I have been searching for the basic french bread recipe ever since i’ve had the ‘real’ stuff in europe. This was the first one i stumbled upon after searching for months. Thank you for the basic, true ingredients and wonderful captions that guides one to blissful perfection.
Great information. I didn’t follow the recipe exactly as it is nearly identical to other recipes I have used, and I was ;looking for more flavor, so I deviated slightly by using a preferment and the autolyse method.
A preferment is some dough from a previous batch that has fermented longer, so more flavor develops.
Autolyse involves a premix step where water and flower are combined alone, and allowed to sit for 20 minutes before the yeast, salt, and preferment are added.
I’ve done the nk bread in the past, and was missing the flavor I remember in the bread I was served in Paris. The preferment is the missing step, and adds flavor you just don’t get in a 3 hour nk loaf.
But the reason I’m writing is the steam process.
Use distilled water for brst results, both in the bread mix, and in the steam. Water from the tap will stain the oven with minerals, and you don’t want that. Clean mineral deposits with vinegar, rinsing the vinegar out afterwards. Distilled water avoids the mineral deposits, and gets better results with the yeast. Don’t use sparkling water, as the yeast exhales co2, and the co2 from the sparkling water will retard the yeast action. Yeast breathes oxygen like we do, so starting them off with excess co2 will slow them down. They will slow themselves down as the alcohol and co2 they produce build up, no need to add extra co2 to the process.
The co2 in sparkling water will come out during the first mix with the flower, before the gluten strands form, so it will be lost before it is needed, and during the loaf forming stage, most of the co2 is released. The final rise is where the air pockets form, so your sparkling water won’t contribute much at that point.
Don’t throw water on hot ceramic or hot glass surfaces, only on metal, preferably in a shallow pan you place at the bottom of the oven. Preheat the over well in advance, and use only enough water for the original flash of steam if you have electronics that could be damaged by condensation.
Bon Appetit!
George
My problem is A what type of flour is to be used???????????????and quantity
B is dried yeast ok or shoild it be live yeast and quantities
regards
If you read the recipe….it states Bread Flour. It’s higher gluten than all-purpose flour.
I don’t use live yeast, so I wouldn’t know the quantity. ~jaden
Wow. I had my doubts that’s I’d be able to pull this off (boyfriend is the bread boy) but the bread turned out PERFECTLY. I didn’t focus so much on aesthetic as I wasn’t even sure I had the texture / consistency right so while it doesn’t exactly *look* like French bread, it sure tastes like it! I’ll try this again (VERY) soon and put a bit more effort into the shaping.
I actually made one loaf in my descoware Dutch oven using the cooking instructions for you NK bread and it ALSO came out perfectly. And rustic. 🙂 Thanks so much for your great instructions and pictures; I am now confident I CAN bake bread!
Thank you so much! I followed your tips and the rolls came out perfectly. Everyone loved it. I really appreciate you taking the time to read and answer comments. Thanks again!
che… viejo la verdad despues de vagar mucho para saver secretos creo aver encontrado en tu sitio pues no acostumbro escribir pero lo tuyo vale la pena espero saber mas pues yo me creia mucho con los 63 o mas modelos de pan que se pero este pan en mi pais no lo sabia y por motivos de travajo ak donde me encuentro tengo que aprenderlo grasias vale…
wow! what a great recipe! i made this for my family an hour ago and is is already gone! and i have picky eaters!
Any advice on how to turn this recipe into rolls? I made the loaf last weekend for my boyfriend and he devoured it. We’re going to a family party this weekend and I’m supposed to bring rolls and this is what he requested. Any thoughts or tips would be appreciated!
you might want to pick up the book “Artisan Bread in Five Minutes” – great recipes for rolls.
but you can still use this same recipes, just shape them into balls (about golf ball sized), let rise (make sure you have enough room in btw each ball to let rise and expand) and bake. Lessen baking time – you’ll just have to keep an eye on the rolls. jaden
Here’s a photo to prove how gorgeous my bread came out 😀
http://twitpic.com/jbl3p
I’m an an avid baker and I love to cook. My husband and I are trying to expand what we are able to create. I’ve never made bread before. Well, we make biscuits, but that’s easy haha. We do a dinner where I make my own pasta, my own alfredo sauce and make our own brochette… well, the only thing missing was that we didn’t make the bread. I just finished making this bread, as I said, I’ve never made bread before. I am a dessert baker. I was so impressed at how ridiculously simple this was! My bread came out looking gorgeous and crusty. I had no idea I could do this right here at home. I pay $4 a baguette fresh bread at the local market. I can buy a whole bag of bread flour for less than that! Thanks so much for making these directions so easy to follow! So glad google pulled up this page!
Mine didn’t come out quite so pretty, but they are pretty enough and damn tasty/
Thanks for the advice.
Got any good sour dough recipes?
no but check out http://www.realbakingwithrose.com/ ~jaden
A couple of questions: what temperature should the water be when you add it to the bowl of flour, yest, and salt? And can you bake this in a French loaf pan?
This bread was fantastic. I didn’t quite have the skills to shape the dought quite like the photo…but it still tasted great.
I’d hate start any worry among the readers, but the water cracked my Pampered Chef stone baker. Eek what did I do wrong?
oh no! did you pour water INTO the stoneware?
I must tell you that since I started making this, everyone wants it! My daughter and her fiance came to the cabin for a week end. The night I served this, they practically ignored the rib eyes and feasted on the bread!
So far, I have made exactly as instructed, but I am wondering if you have ever tried making one large loaf, instead of two smaller ones, and if so, what were your results?
Thanks again, Jaden.
Two questions:
1) When you say “Fold in half” I’m correct in assuming you mean fold over lengthwise again, yes? Not down the middle like a hamburger?
2) “Active quick rising dry yeast”? Do you mean regular active dry, or rapid rise?
Thanks!
Yes fold lengthwise
I’ve used both – they both work!
~jaden
I live in Idaho, elevation 6300 ft. I make bread all the time, but have never tried french bread until now. This was fun and delicious. The biggest challenge for me was how to transfer the bread into the hot pan without burning myself, or causing the loaf to fall. I floured my chef’s knife, slid it under the loaf, and laid in in my Circulon open roaster. Eureka! It worked!
Also, I did not have quick rise yeast, but used my regular SAF yeast. Since bread rises quicker at this elevation, my loaves worked at the same time elements as the recipe.
Thank you so much. I’ve already added this to my recipe file!
Great! I’m thrilled you love it. ~j
I’ve made bread at home before, but the bread machine used to do all the work. This was the first loaf I ever tried and it was astonishingly easy. I don’t think I could be any happier with a first loaf of bread. Thanks!
Also, I have very hard water, and it sort of left a mineral stain on the bottom of the oven. Just another thing to keep in mind.
This bread was awesome. Probably my favorite bread I’ve ever made. Thanks for the water tip. I did put 2 tsp. sugar and 2 tsp. gluten, but other than that did exactly what you said! Loved it.
Great recipe! Thanks! This turned out amazing!
I’ve been making bread from time to time, and always wanted to achieve a good crust with chewy center. Most time the center was too chewy and not enough air holes.
I always thought there must be a secret component was the flour… Little did I know that the secret was in the process. Fantastic results using the same flour, yeast and salt I always use. Thanks for the “secrets”…
I forgot to mention I made this to go with some Vietnamese beef stew 🙂
I made this today(only my second attempt at bread making), definitely not as pretty as yours but it sure tasted great and had almost perfect texture. Thanks for the recipe and tips!
What a great recipe! It was the first time I’ve ever made French bread and it turned out well. Didn’t look too pretty, but it was tasty! I totally did that karate chop and laughed because it looked so funny (HIYAHH!).
Jaden!
I dont understand how your loaf looks so good!!
While my loaf was resting, the shape was pretty okay…. but now that its in the oven it looks like a big curled loaf of poo. ðŸ™
Where did you set it to cool Amy? Maybe that had something to do with it.
Good luck today!
I cooked it exactly as directed, it was never covered. I am trying again today, I’ll let you know how it goes.
Hey Amy- hmmm….did you bake covered and then uncovered?
My loaf tastes wonderful, but the crust did not stay crisp after cooling. Any ideas what I did wrong?
Hey guys, karate chop the middle along the long length of the loaf to get a nice seam.
I found this a little confusing as well zosi, but I think the trick is to stretch the dough out by holding your hand perpendicular to the dough and pounding with a karate chop motion. Think of the Tapotement technique of Swedish Message.
Eh or no?
Hi Steamy—-I don’t know what you mean in your directions where you write “do a little karate chop”. The image of a karate chop suggests a cross-wise cut, but it makes more sense to do a lengthwise cut. Since you’ve emphasized how important it is to get the right shape for pinching, I don’t want to get this wrong. Please help!
I have been making the NK bread since it was written up in the NYTimes, but I yearn to produce a real French baguette. I can’t get that big-hole texture with any other recipe than the NK bread, but the NK bread doesn’t produce a long white a loaf.
Well said. I would be happy to read anything else you might contribute on this subject.
Love this recipe! I just made it today with whole wheat flour (and unbleached bread flour) it’s a little denser but GREAT! I also added a touch of honey to the yeast for activating purposes. I was very pleased.
Update: Sparkling Mineral Water, Jury – Still Out
I tried the sparkling mineral water today. My theory was that I might get bigger bubbles in my crumb with a little extra help from the natural carbonation in the mineral water. This didn’t seem to be the case.
Although the rise was not as good, I did notice that the crumb was much softer than my last loaf while the crust remained nice and crispy and chewy. I think the fact that I didn’t warm the water (thinking I would release the carbonation) contributed to the lesser rise. I’ll experiment later with this.
Now, on to the No Knead!!!
Jaden et al.,
This recipe is the closest I have come in my amaranthine quest for the perfect loaf. Thanks!
I made a loaf to serve with a Stufato di Manzo alla Corsa I served to my in-laws during the first cold day of Fall this year (the smell of baking bread and cinnamon juxtaposed with the first clean, crisp, Fall air – I know y’all are feeling that!).
Some variances that might be of interest to you:
* I used bottled water (today I’ll try sparkling mineral water)
* I poured some boiling (steamy) water into a baking dish in my oven for the first rise (ala AB).
* I placed more water in my baking dish for the bake. I, as others, am not daring enough to toss water into my electric oven.
Thanks again! What a wonderful website.
Just found your website and love it. A couple of things though. I would not recommend throwing water on your oven floor unles you know what your getting into. New ovens with their electronics could become damaged and they dont warrant it if they find out what you did! I pour mine in a metal pan on the oven floor and hope for the best though. Also, You might put a towel down on the oven door when you open it. If you spill water on a 500 degree oven window it could crack, and that is an expensive loaf of bread! Later
Sunny- good luck! Let me know how it turns out.
Thank you so much! I will be trying french bread again, with more direction this time.