
Last month, I took a trip to Napa, California, to learn all about the birthplace of those funny little olives I used to put on my fingers, and the surprising invention from a poor, widowed mother! Post sponsored by California Olive Committee. -Jaden
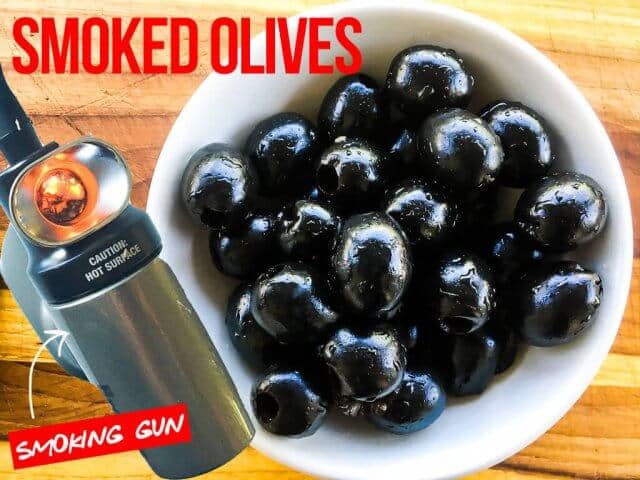
Smoked Olives
With a portable hand-held smoker, a can of California Ripe Olives and a pinch of wood shavings, you can create Smoked Olives for your cheese platter, salads, tapenade, cocktail garnish, and even quesadillas.
A few weeks ago, I missed a phone call with one of my closest food blogging friends, Elise from Simply Recipes. She left a message and invited me to a couple of days in Napa Valley, California, to catch up, enjoy a custom menu she created, and to learn all about California ripe olives. How could I pass up this trip?

Elise, one of the olive growers, Mike Silveira, and me.
In addition to the lovely meals and playing in the CIA kitchen, we learned how to smoke olives from Chef Paul Irving. Elise then used the smoked olives to make Smoked Olive Quesadillas.
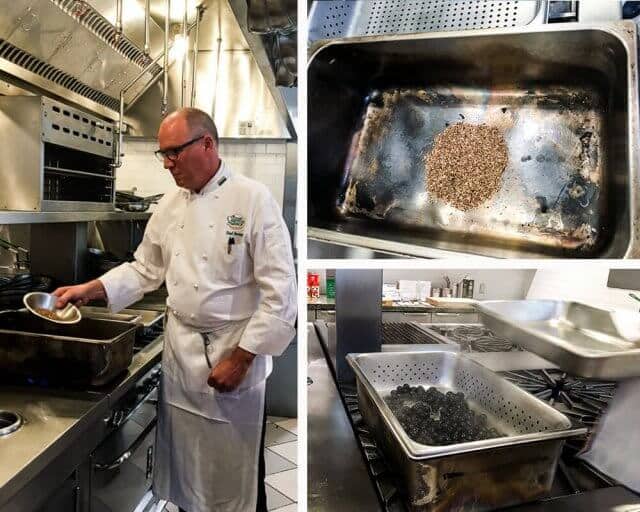
Smoking olives is a messy operation in your kitchen, if you do it on the stovetop. Your drapes, walls and even your dogs will smell like smoke for days! Even in the CIA kitchen, with industrial-powered hoods, the smoke lingered for hours. Fortunately, there’s a better way.
A better way to smoke…the Smoking Gun
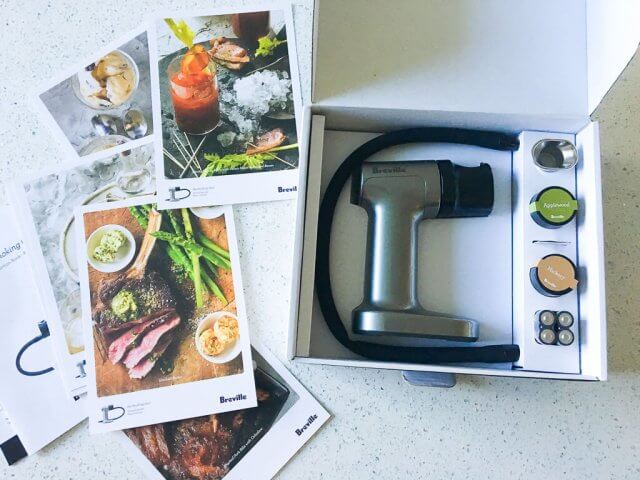
One of the most fun tools in my kitchen is the Polyscience Smoking Gun. For $99, you can smoke anything you want, in your kitchen. The smoker is portable, battery operated and very convenient.
You’ll need small wood chips, but be careful not to purchase wood chips from the home improvement store, which are likely coated and sprayed with harmful chemicals. Either chop a few branches off an apple tree in your backyard or go to a gourmet specialty store or BBQ supply shop for the wood shavings. I purchased mine on Amazon, a variety of 8 pints of Oak, Apple, Cherry, Pecan, Maple, Bourbon, Hickory, Mesquite wood that’s specifically designed for smoking food.

NOTE: Look for wood shavings or very small chips – larger wood chips for your BBQ grill (like these) are too big for the Smoking Gun.
The Polyscience Smoking Gun (in partnership with Breville) comes with recipe cards, 2 wood chip samples (Applewood and Hickory), 4 batteries and extra mesh screens.
How to Smoke Olives with the Smoking Gun
First, let’s chat about what type of olives to use. Of course, since this is a sponsored post, we’re recommending California Ripe Olives, found in cans at grocery stores everywhere. But even if this wasn’t a sponsored post, this actually is the perfect olive to use. The mild, buttery olives take on the smoke beautifully. Heavily pickled olives didn’t work well, as my taste buds were too busy dealing with the acid and salt to pick up the nuance of the smoke. More about California Ripe Olives a little later in this post.
Put a pinch of wood chips into the Smoking Gun. Just a small pinch!

Put your drained olives into a resealable plastic bag, and seal around the Smoking Gun nozzle.
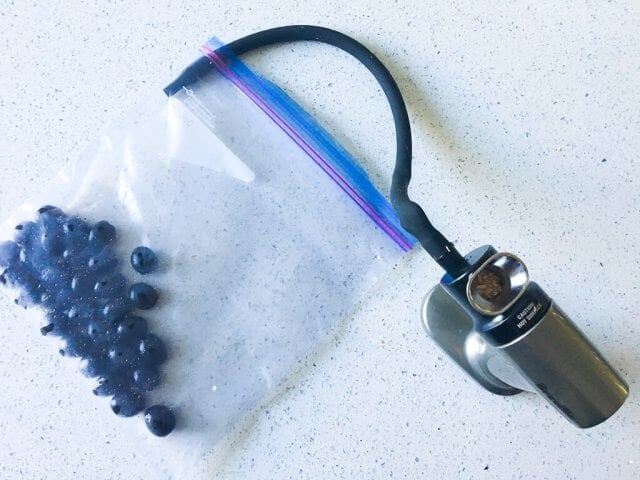
Turn the Smoking Gun on, and light the wood chips with a lighter.
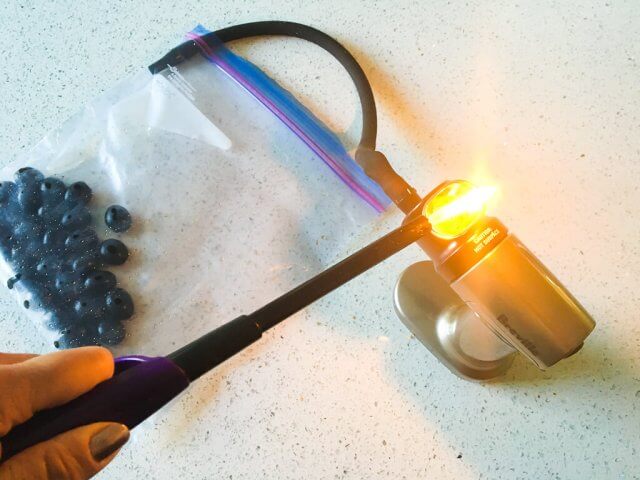
Within 2 seconds, the chips are lit and smoke billows out of the nozzle.

All it takes is a few seconds to fill up the bag with lovely smoke.

When the bag is full of smoke, turn off the Smoking Gun, remove the nozzle and quickly finish sealing the bag to trap the smoke.

Let the cold smoke and olives sit there for a few minutes. Shake the bag a couple of times to disperse the smoke.

The longer you let it sit, the more smoke flavor you’ll infuse.
Using the Smoking Gun to smoke the olives won’t produce the intense smokiness that CIA Chef Paul Irving created. Chef used about a cup of wood chips, and smoked for 30 minutes or so. We’re only using a pinch of wood chips, and infusing for only a few minutes. The effect is a smoky olfactory experience with a transient smoky flavor, just long enough to last through the evening. However, you can intensify the smokiness by repeating the smoking with a new pinch of wood chips.
How about Smoking with Tea?
Oooooh….even better! Instead of wood chips, I’ve also smoked with a pinch of black tea leaves.
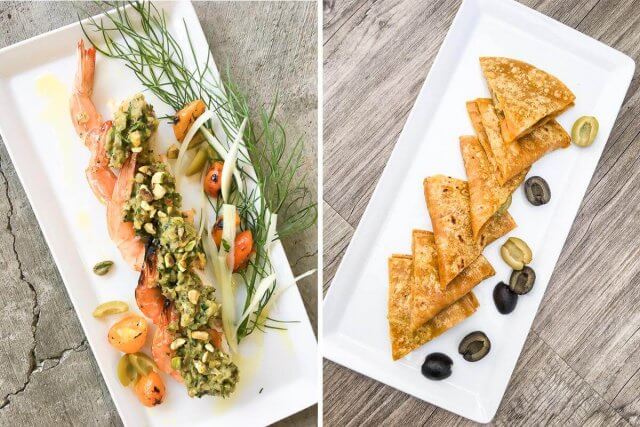
Use the Smoked Olives to make a quick tapenade to serve over grilled shrimp, or a simple quesadilla.
About California Ripe Olives
A poor widow invents an industry
 In the 18th Century, Spanish missionaries brought olive trees to San Diego, California, where they found that combination of sunny days, cool evenings and fresh ocean air was perfect for growing olives. Farmers planted thousands of acres of olive groves in response to the high demand for olive oil. Unfortunately, supply exceeded demand and farmers were faced with a glut of fresh olives that spoiled easily.
One of these farmers was a recently widowed, debt-ridden, 56 old woman named Freda Erhmann. She owned a 20-acre olive grove, and faced with crop that she couldn’t sell quickly enough, Freda set out to find a preservation solution for the fruit. Freda and her son, Edwin, consulted a state university professor for a pickling method, and set to work with 280 gallons of olives in barrels.
“…she turned the back porch into a pickling plant, got some wine-casks, cut them in two, and went to work. Uncertain of the result, she dared not assume the expense of piping water to the vats, so that through all the process of leaching and pickling she carried the gallons of water herself. Passing restless nights, she went to work at five o’clock in the morning, and all through the day and until late in the evening she watched the slow and mysterious changes of the fruit. When at last she took a jar to the University she felt she had failed completely, because the olives showed every shade of green and brown and purplish black; and her surprise can hardly be imagined when the professor, having examined them, exclaimed, “They are the best ripe olives I have ever seen, and you are certainly an adept at pickling!” Source: Ancestry.com
To this day, companies still use the same method to preserve California Ripe Olives that Freda Erhmann invented.
Unique Texture and Taste
The olives that are grown for fruit in California are a different varietal than olives raised for the purpose of pressing into olive oil. California olives are cured to remove the bitterness, and then go through rinsing stages with and without bubbling air to complete the process. Olives cured without oxygen stay green. The olive tanks that have oxygen bubbling through turn will turn the olives a jet black.
This unique curing process gives the olives a firm, smooth, yet buttery texture with a mild flavor.
I’ll be honest with you, I never thought too much about canned olives. In the past, I would buy a can, whatever was on sale, and chop them up for salads, or add them as a layer in my 5-Layer Cheese Dip. I was never very creative with my olive consumption, but it was always an ingredient in a recipe! On this trip to Napa, at the famous Culinary Institute of America, I really got to enjoy California ripe olives by themselves, and discovered the mild, buttery, smooth taste of the olive.
The ironic thing is, I thought the highlight of the trip would be all the wonderful and creative ways to cook with olives. Sure, we did that, but by far, my favorite discovery was realizing that the California ripe olives were perfect just as is. Throughout the two days in Napa, whenever there was a bowl of olives in front of me, I found myself snacking on them, one after another.

We also got to play chef for a few hours in the kitchen of the CIA – here I am with Nik from A Brown Table, Dara from Cookin’ Canuck and Serena from Serena Bakes Simply From Scratch. We created the Grilled Shrimp with Olive Fennel Tapenade that you see in the photo above. Learn more about California Ripe Olives on their site, and connect with them on Facebook.
Thanks for Supporting Steamy Kitchen!
Even if you don’t buy the product shown, just starting your Amazon shopping here helps our small family business. We get a small commission from Amazon that helps keep this site running free!


Thanks for this article on California olives. They are one of my favorite snacks! One of my previous clients was Graber Olive House in Ontario, CA and this reminded me of the many visits I made there. I was surprised by your suggestion to smoke the olives with tea. I’ve had smoked tea, but never smoked olives.
Gah, I have to find one of those smoking guns! I’ve been craving those smoke olives ever since our trip! I’m sure it would come in handy.
We just bought the smoking gun – thanks so much for reviewing it. Next on my list is olives 🙂
Hi Jaden, what a great post!
And perfect timing too as I just bought a Breville smoking gun to play with yesterday. Haven’t even taken it out of the box yet, and now with your instructions, I’ll know exactly what to do. Thanks you! Those smoked olives were to die for weren’t they? I’m looking forward to making more of them.
I love what you wrote about Freda Erhmann, I didn’t know all of those details. What a remarkable woman!
Oh this is too cool! I need a smoking gun in my cooking arsenal, hehehe. There are so many times I would have loved to have had one of this at my grasp.