My head is still spinning from the past few days – we just finished a whirlwind session of photography for my next book (another easy Asian cookbook). This time, instead of doing it all by myself, I enlisted the help of Todd, Diane and Jenna to protect my sanity. Originally, I had planned on having T&D style and shoot the book while I cooked and hid in the kitchen….but Diane insisted that I shoot my own book and that they would help me in the kitchen and with the styling.
Prior to them coming, Diane had sent me a list of things we needed for the shoot – number one on the list was a place to shoot near the kitchen that had plenty of natural light throughout the day. I originally had my prop room way out at a building in the back of the property – it’s a good 2 minute walk from the kitchen, through the living room, across the lanai, out the screen door, dodging the bitey red ants, balancing on large uneven rocks, up the deck stairs, across the deck, tiptoeing across the old (and unused) putting green riddled with more red ants and through the building door.
Can you imagine trying to do that for every single dish? And what if you forgot a garnish? You’d have to trek back and by that time, the food would have been very tired.
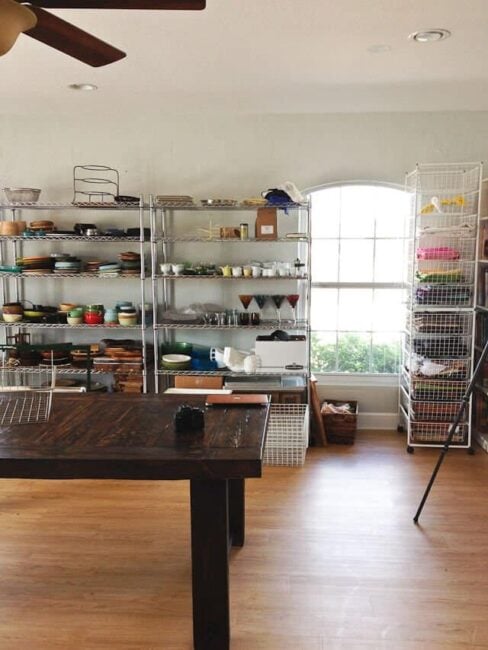
So we converted the already converted garage (the previous owners had made the garage a playroom for the kids) that was adjacent to the kitchen into my photography studio. It made sense, there’s plenty of large windows, double glass doors and it was steps from the kitchen.
With new paint and flooring, the space that used to be our junk/laundry room turned into a light-filled, bright, cheerful place to work. Wire racks from a discount warehouse store, Ikea baskets and bookshelves and a drop-dead gorgeous wooden table from Greentea Design, the number one requirement for a photoshoot was checked off.
I have plenty of dishes and props, but since I normally just shoot on white, the second item on my list was fabric.
Here’s a tip when fabric shopping: don’t go when you’re in a bad mood. Otherwise you’ll end up with drab colors.
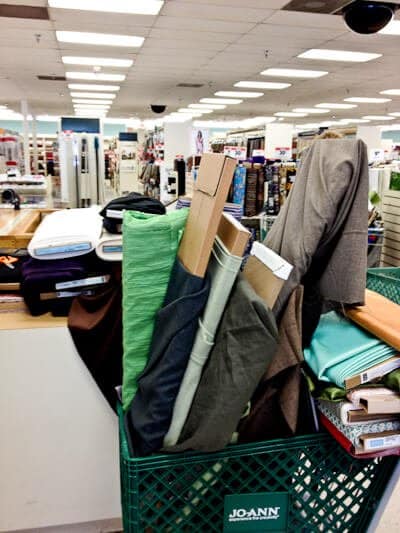
Blah. So I left the store, went and got some coffee, scrolled through Failblog (hahahaaa!) and went back in a much better mood.

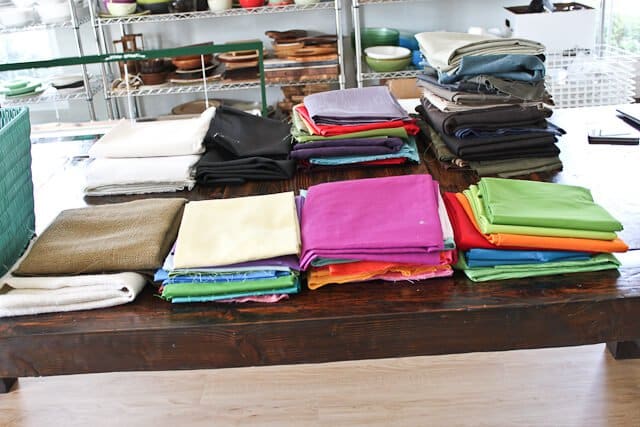
Ta-da! Happy! Bright! Cheerful!
They went organized by color in the Ikea wire baskets on a rolling rack.
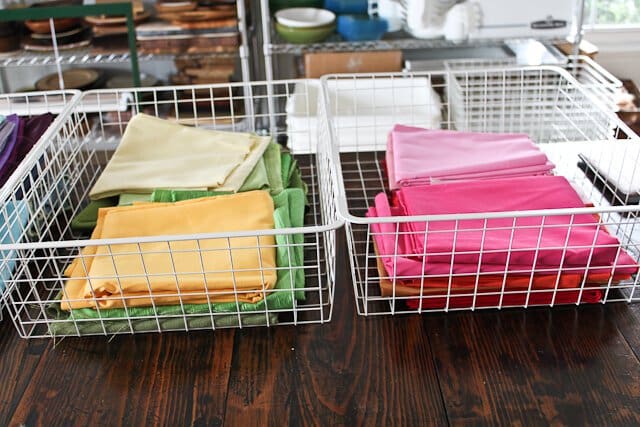

Ikea Antonius system – $38.99 for the frame, I bought two of them and stacked on top of each other. Each wire basket was $6. Plop some wheels on the bottom ka-blam! It rolls around, out of the way.
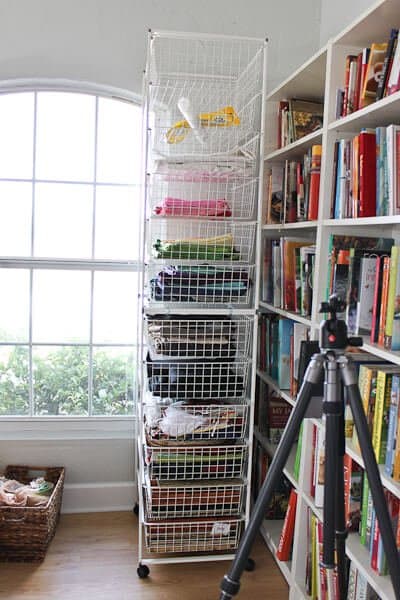
Those are Billy bookcases, $49.99 each. Cheap, functional and even I can put it together. Once Todd and Diane arrived, we first worked on creating a workflow. Normally, when I shoot for the blog, I scout around the house for where there’s a good light. Candidates include: my office, outside patio, dining room table, breakfast nook, family room or the outside kitchen table. It’s a lot of work chasing light, huffin’ and puffin’ moving things around.
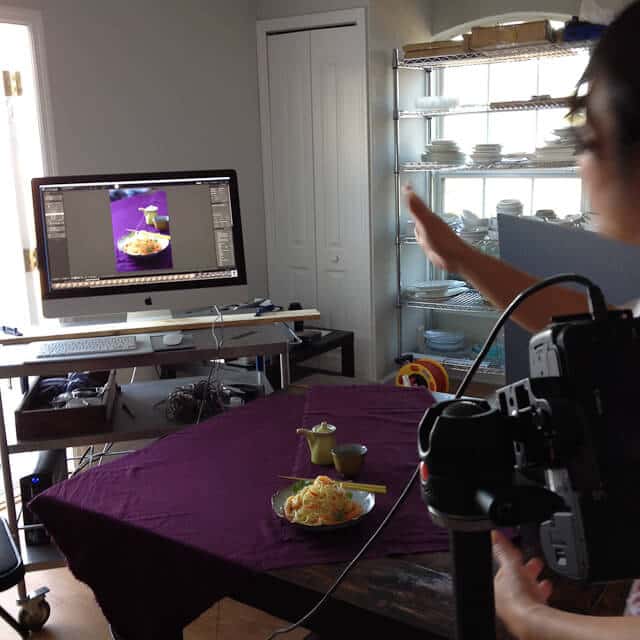
Instead, Diane said we were going to shoot in one spot and use white bounce, black bounce and scrims. For the book (i.e. print) we need to shoot tethered to the computer (that itty bitty tiny screen on the camera isn’t good enough!) and we hooked up a 15ft tether cord from my iMac to the camera.
I use Adobe Lightroom to manage and edit my photos, so we shot directly into Lightroom. The computer was anchored to a $159 rolling cart (yes, also from….you guessed it, Ikea) – Scott used 2 clamps and some plywood to secure it, though we’ll be looking for a more um, pretty solution soon.
I highly, highly recommend Lightroom for food bloggers – it helps me catalog and keep track of my photos AND makes editing so super easy. You can try out Lightroom 4 Beta for free right now.
You can see how awesome it is to shoot tethered – everyone can see immediately on the monitor the shot.
I should also mention that the computer is hooked up to two other things: a 4-drive Drobo and a CyberPower battery backup. I keep my photos on the Drobo and not on the computer hard drive because I just don’t trust my hard drive (how many of you have had your HD crash!!????) The Drobo has 4 hard drives and if one crashes, the other drives can rebuild the data and you won’t lose YOUR ENTIRE COOKBOOK SHOOT. Alternatively, you could backup to a cloud every night, but what happens if you lose your hard drive in the middle of a shoot?
The battery backup is essential – those flimsy power surge bars are useless when it comes to protecting against massive power spikes, surges and outages. The battery backup we have gives me about 15 minutes of time so that I can save and shut down properly. Since we live out in the country (and in hurricanetopia), power outages are pretty common.
Okay, back to the workflow – We shoot with the camera on a tripod since I’m shooting with a macro lens which magnifies every little shake. I have a Canon 5D Mark II and a 100mm macro lens – my favorite food lens (but please don’t think you need this type of fancy camera equipment – I shot half of my first cookbook with a Rebel and a $100 lens)
I never understood why tripods varied from $29 to $2,000 until my $29 tripod broke and tipped over….with $1,000 worth of camera equipment on it. Get a good, sturdy, lightweight, quality tripod – I use a Manfrotto head and a Promaster tripod – though I am constantly fighting to adjust each leg the same height to make it level. I would LOVE a pneumatic tripod with a foot pedal that raises and lowers all three legs simulateously! Sadly, I don’t think they make one affordable.
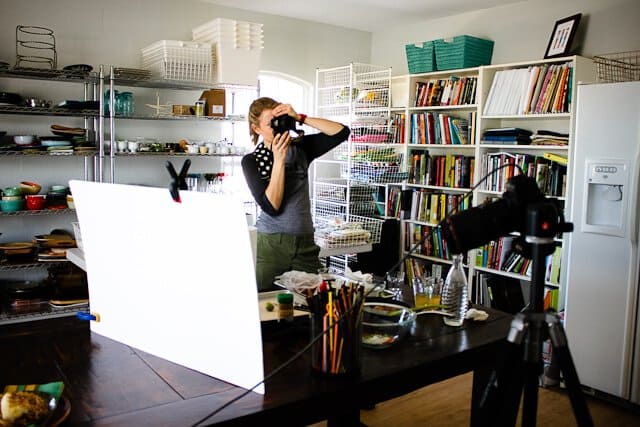
The bounce was a $4.50 foam board held up with clamps secured to a block of wood. (That’s Jenna taking a picture of the hero wall!)
Sometimes, to get the perfect shot (like the egg swirl on Egg Drop Soup) we have teamwork — Diane and I swirl the egg and the moment we pull back….
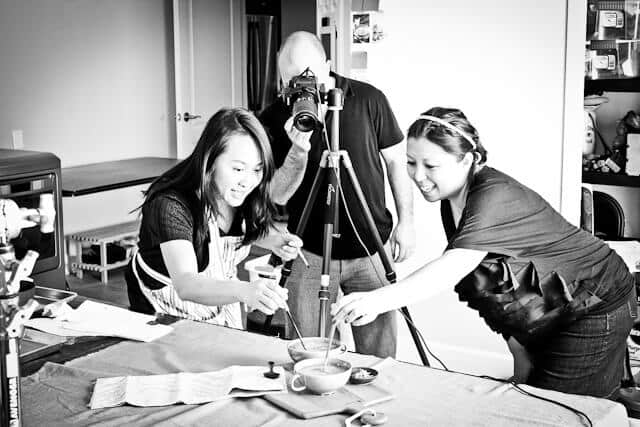
Todd shoots.
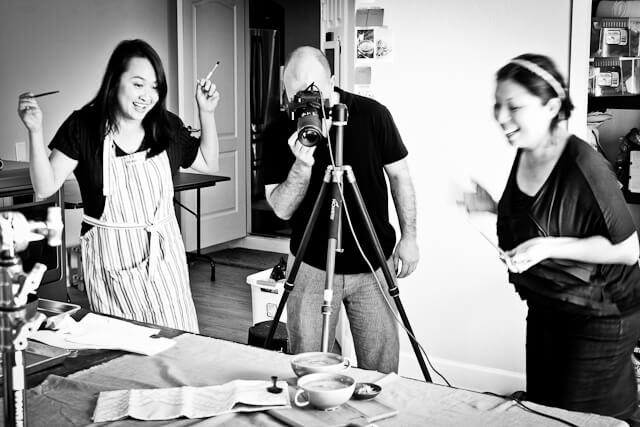
Jenna was amazing in the kitchen – she can chop!-chop!-chop! lightening fast. She and Todd were in charge of prep and cooking of the dishes. Once a dish was ready, it was placed on a full sized sheet pan along with the garnish sitting in ice water and any other ingredients we needed to plate the dish. That was transported to a table right by the door (see above table behind Diane) and ready for Diane and I to style and shoot.
Once we were done with that particular dish’s shoot, everything goes back on the sheet pan, back to the same table ready for Jenna to pick up and bring back to the kitchen.
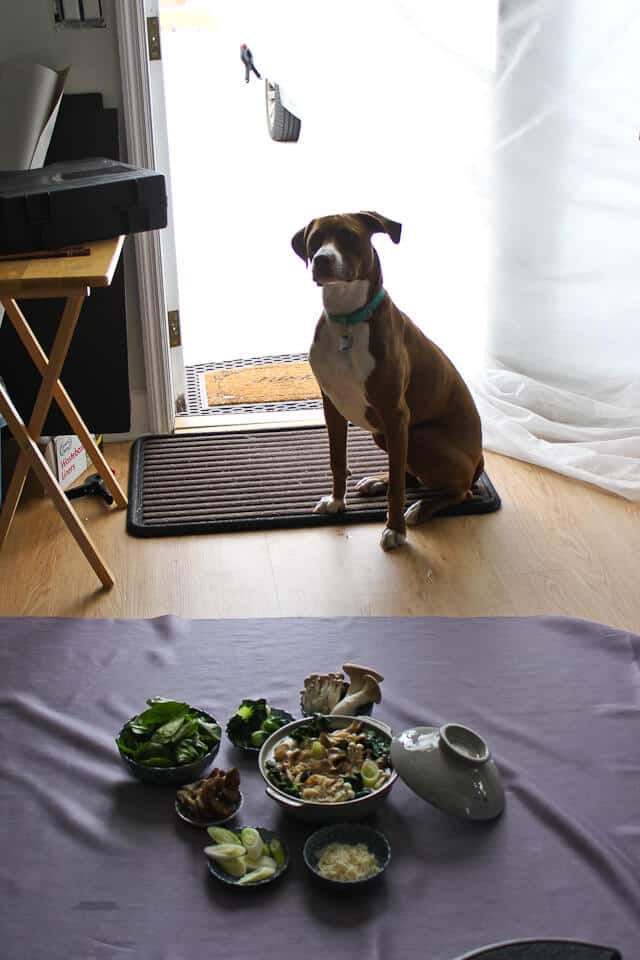
We had a crew member who served as the handsome security guard…..
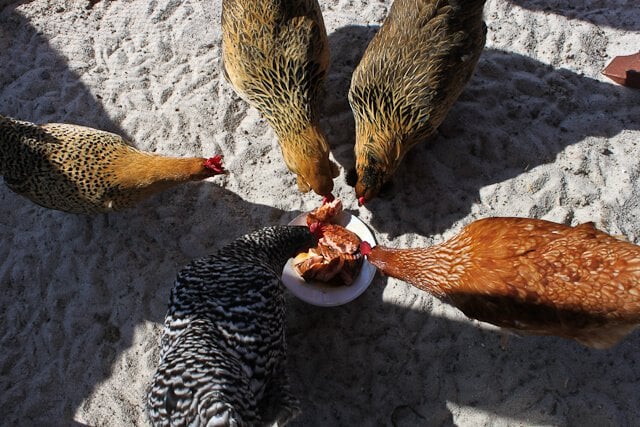
and taste testers….
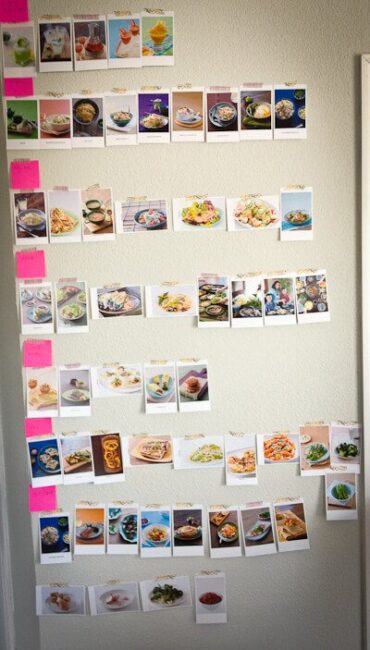
We had one wall that was our “hero wall” – all of our final shot arranged by chapter so that we could get an idea of how the book was shaping up.
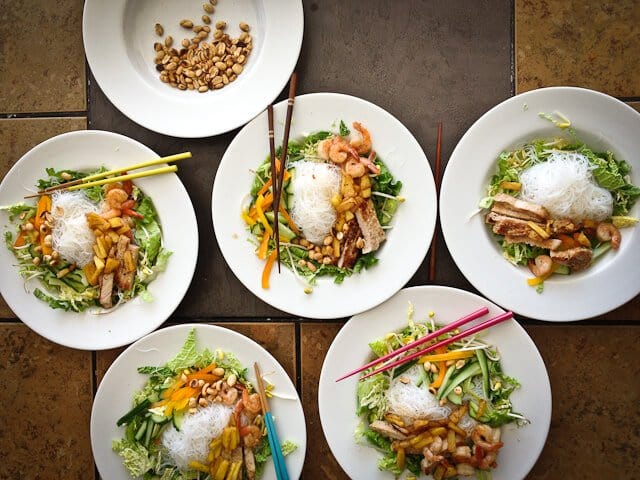
When you’re doing a cookbook photoshoot, you inevitably end up with TONS of leftover chopped ingredients – which we used for our meals….fried rice, pizza, spring rolls, Vietnamese rice noodle bowls.
It was non-stop eating – not only did we eat all the dishes we made for the shoot, but we actually cooked MORE food every couple of hours. 3 breakfasts, 3 lunches, 2 snacks and 2 dinners was quite normal for us.
At the end of the week, we celebrated with a trip to the beach! Toes in sand, mojitos and a frisbee.
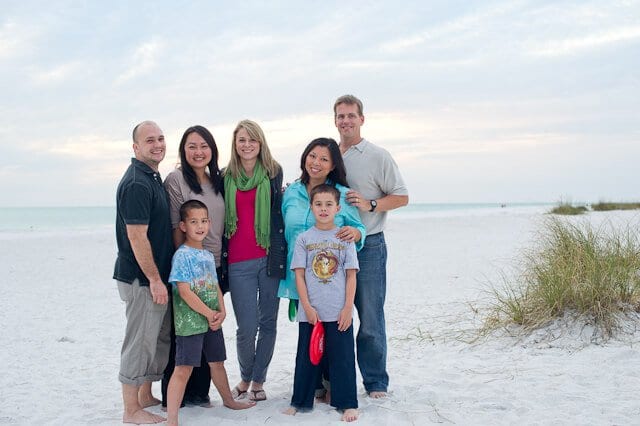
I wont’ lie – it was exhausting work – but working with good friends made it all so much more fun than attempting to do it all by myself! Big, big, big thanks to Diane, Todd, Jenna, Scott (he was our tech support), the boys, the hens (our official taste-testers) and our security guard Coco. The book doesn’t come out until next Spring, we’ve got a couple months of writing and recipe testing left – then off to the publisher for editing, layout and design! See more photos over at Todd and Diane & Jenna‘s blogs.

Thank you, Jaden, for sharing your photo shoot!
Really interesting to see how you went about to create the images for your book.
Cheers,
Merisi
I love your photo shoot studio! It is so bright, organized, and heavy-duty! (By the way, I hope you will never have to use the battery backup or lose any photos!) I never imagined how much work it takes to create a cookbook until I read your post here. Good luck with everything and I look forward to seeing your next cookbook!
I am in love love love with this table and have been stalking it and pondering it ever since you posted it. Is it the narrow Maru or the wide? And it comes in varying lengths. Just wondering which one you opted for and if you are still over-the-moon happy with it. Obviously a big purchase and the West Elm table I have is nice, but this is…well, spectacular!
I have a question…The picture with the chickens and a bowl…what are you feeding them?….
Salmon teriyaki leftover from photoshoot (no, I don’t feed my chickens chicken…..that would be so wrong)
Thanks gal for this wonderful sharing. It was great to see what went through for a cookbook shooting. I am always learning to cook, style and take pictures and I have learnt from what you shared today. you have made me more determined to save up for the 100mm macro L lens.
Look forward to your cookbook and I believe is going to be as good or if not better than the first one I bought and hug. 🙂
What a cool behind-the-scene look at putting together your cookbook. I can’t wait for it to be published!
Holy moly I’m exhausted just reading this. WOW! I know how much work a photoshoot takes and I’m in awe of the amazing synergy and teamwork you have going with T&D. I’m a huge fan of T&D and can only imagine how gorgeous the photos in your cookbook will be. Congrats on it all!
BTW: I’m in LOVE with that dining table. WOWZA!
So helpful that you included all equip, and so many details. Congrats on the whole thing. It was fun to see you guys in action. I will have to check out the drobo–been having hair-tearing-out probs with tethering–must be my external drive, since I added more ram and it hasn’t improved; I wish someone in my household was tech savvy 🙁 Looking forward to seeing you in Orlando!!
I love reading about the behind the scenes work it takes to photograph food and a cookbook none the less! Thanks for sharing your journey with us!
Cool post Jaden! I love seeing those behind the scenes shoots and thanks for the awesome low budget tips on the racks. I’m currently converting one of our bedrooms into a small studio and was already thinking what to use for fabric storage but now I know!
Loved reading about all that goes into the photo shoot.
Question though, is the recipe testing for new recipes or the ones you already took photos of?
Karen
So fun to see you all together! When will this book come out, Jaden? I haven’t reviewed Steamy Kitchen yet! Must do.
Such an interesting post, and Coco is doing such a good job watching very intently while maintaining calm….so cute.
I really enjoyed reading through the whole process behind shooting for your upcoming cookbook. Sounds like a lot of fun and a lot of work, so much better when you’re working with friends that you can have a laugh with. Can’t wait to see your new book!
Jaden – I’m speechless!! Thank you for taking us on this journey with you – it’s inspiring! I can’t wait til next spring to see the final copy!!!
Hey Girl, this was so exciting to read. Congratulations! Excitedly looking forward to the book.
That would be great. If you’ve noticed a decline in comments on your blog that could be why. I miss your great recipes.
Great information. I always pick up fabulous paper sheets at our local Art Mart for my photos that have fabulous tectures on them. I don’t know why I’ve never picked up colored fabric – simple, inexpensive and colorful.
I have a question though, since you started your store I don’t get emails anymore for your food blog. Why is that? I miss getting those!
That’s strange! I’ll make sure I add you to the email newsletter that I send out (almost) weekly with updates from the blog. xo jaden
Thank you for sharing this, Jaden! I love your prop room (especially that gorgeous table- I want one!), and I can’t wait for your new cookbook to be released! 🙂
wow something really nice to see 🙂
thanks for sharing.
Hey Jaden, I love that you’re sharing this process with us. It’s got structure and planning but also this homey, down to earth style about it, like the shots of your fabric shopping.
It reminds us that not all cookbooks are created in some sterile facility but in the warmth of someone’s home, with passion and a lot of creativity.
You are the Quentin Tarantino of the food world.
Wow, thanks for the peek at the behind the scenes workings. It is so interesting to see how it all unfolds.
This is probably my favorite post I have read on any blog in weeks. Team Hair inspired and educated me. My 23 y/o son better hurry up and finish school…I want a prop room and he is living in it right now (ha ha! Well, partly joking)
Wow. What a week! Thanks for sharing with us. And I LOVE all of your props. So awesome!
I’m slowly making my way through your first book and I’ve loved every recipe I’ve made! Can’t wait for the next book; this peek behind-the-scenes was fun.
Your photography space is just amazing!
Thanks so much for sharing the behind the scenes moments. I love hearing how others work!
What fun you guys are having!! I cannot wait to cook from your next book!! Too cool.
Great tips for shooting a cookbook! Looks like you guys had a blast 🙂
LOVE this behind the scenes look! I always love seeing what’s really in the room when the camera is pulled back. Your photos are gorgeous and I can see why – you put a lot of hard work into it!
Now I’m hungry!
Great tips for shooting food, thanks.
Very nice. There is a good bit of information here and I love the “Hero Wall”! Brilliant!
Talk about a dream team! So excited for your book! Congrats! And thanks for sharing the behind the scenes!
I love that how you converted the garage, it looks awesome Jaden! And so perfect being right off the kitchen. It looks like y’all had a wonderful time and the cookbook will surely reflect it! 😀
P.S. That table is totally gorgeous!
So fun to see how it all comes together! I cannot wait to get my hands on the book.
loooved reading about your process. A lot of work but a lot of fun as well! can’t wait to see everything in print!
Wow, congrats on all the hard work–to you and to your team! Can’t wait for the new book.
It’s so fun to see the work that goes into creating a cookbook! I’m excited for the new one.
P.S. Your dog is incredibly well behaved.
Absolutely fascinating. Thank you so much for sharing this with us.
Loved reading this! I’m fascinated- sounds like tons of work but SO MUCH FUN!
Thank you for the article. It was quite easy to follow and entertaining in addition to informative. Take care.
I love seeing how everything unfolds behind the scenes and can’t wait for your cookbook to come out!
Loved this … your new photo studio is beautiful — jealous of the prop shelves! My props are currently crammed into a jelly cabinet with all the linens shoved onto one shelf. I can’t wait for the day when we buy our dream house by the beach and I have the space I crave for my office. Looks like your cookbook is shaping up to be absolutely lovely.
love the breakdown you give of your expereince. I can’t wait to see the final outcome in the book!
I love it when you share your behind the scenes work. I also have to walk around the house scouting for good light–your new studio is so functional, organized, well-lit and huge! Nice to see the all-stars at work. Looking forward to the finished product. 🙂
BTW, you are the one who got me using the EGO Lowel lights when I started blogging a couple of years ago. They come in so handy for winter shoots. Thanks for being so great at sharing what you know! 🙂
Great post, thanks for letting us in on the little secrets surrounding food photography!
Looking forward to the book!
I love seeing all the behind the scenes stuff!! Excited to see your next cookbook, Jaden! 🙂
Aaahh.. how exciting!! Can’t wait to meet you, Scott, Diane and Todd at Food Blog Forum Orlando next month! Woop!!
I loved reading this fascinating behind the scenes look at how a cookbook shoot comes together! Thanks for the peek into your busy week. Can’t wait for the book to come out!
Love, love, love this. Can’t wait to see the cookbook!
I love that you shared all of your equipment with us! Okay, I thought the same thing about a tripod until you told us your equipment got damaged!?! 🙁 I need to get a new tripod too. We’re redoing our office right now and that’s where I shoot since I get the best light. You’re giving me a bunch of great ideas! I can’t wait to see and touch your new cookbook, Jaden! Congrats!
Love you so much Jaden, you are a true friend. We had a wonderful time playing in the kitchen and studio with you. We’d do it all over again. And again.
I love seeing things like this! So much work goes into this – I don’t think most people realize it!
You guys are all so inspiring!! Looks like an awesome shoot!! Love your studio and “hero board”!! Can’t wait to see the final product!
I LOOOVE this! I can just imagine standing right there watching it all unfold.
I can’t wait for it to unfold next spring IN MY MOUTH.