
A recipe so easy, a 4-year old can make it! My son will show you how, step by step.
It’s been almost a year since NY Times unveiled the secret to the revolutionary No-Knead Bread. And while fads come and go, this certainly is a recipe that has transcended the fickleness of foodies. It’s time to revisit the bread…. as many of us have been brainwashed by this summer’s ice cream! We’ve made close to 60 loaves since last November and I’ve got to tell you, it is still one of our family’s favorite things to eat.
I firmly believe that every person should bake a loaf of bread at least once in their lifetime. Granted, it’s easy to just drive to your local bakery to pick up a loaf, but have you ever experienced the intense joy of smelling freshly baked bread coming from your very own oven?! Foodgasmic, eyes-roll-to-back-of-head, soul softly moaning as you tug a piece of warm, pillowy mound gently with your teeth. In case you’ve not heard of No Knead Bread….let me tell you about it. Baking bread does sound intimidating…all that kneading and loaf-shaping business is best left to pros. But what if I told you that you don’t even have to knead or shape, that it is so easy my little son makes it.
No Knead Bread recipe so insanely brilliant – no sticky fingers, no doughy mess, no intricate measuring, no complicated kneading. Totally hands-off. The crust is thin, crisp and snaps as you cut into the loaf. The interior of the bread holey, chewy, airy and light. If bread could sing, this would be an angelic choir. In Dolby digital surround sound. Now, with that, how could you not try No Knead Bread? It only takes 3 minutes to mix and a wooden spoon. You can’t even boil spaghetti in 3 minutes!
So, without further blabbering, I’ve pimped out my son to demonstrate that baking No Knead Bread is so simple a 4-year old can do it.

Of course I had to bribe him with 2 temporary tattoos. Cheap labor. 10 cents apiece. There is nothing that says, “I’m a kick-ass no knead bread baker” more than a tattoo of a killer whale. Move over Bourdain, here comes someone cuter…
So, let’s start. 3 cups of bread flour in a big bowl.
secret: I sometimes use 1/2c whole wheat flour + 2 1/2c bread flour

1/4 teaspoon of instant yeast:

1 teaspoon of table salt
(secret: I use 3/4 tablespoon of kosher salt. Why the difference?)

Add 1-1/2 cups of lukewarm water. Sorry no pic – he dumped water before I could pick up camera. But you know what “dumping water” looks like! Stir. Use those muscles, boy. Stir like a badass-baker with whale tattoos would stir!

See? This is what it is supposed to look like…a shaggy, goopy mess.

Wrap up the no knead bread dough

Give it a kiss good night and let the no knead bread dough sleep for 12-20 hours on counter or in a nice, warm, cozy place.

secret: I’ve let it sit for as little as 8 hours and it still tastes great! I did knead with wet hands just a little tiny bit to make up for the time OR you can add a touch more yeast.
After sleeping, the no knead bread dough should look like this: (better than what I look like in the morning.)

Dump out on floured surface:

Wet your hands. This will prevent the very sticky dough from sticking to your hands. If you find dough sticking to your hands, wet again. Why not flour your hands? You could, but you want to keep the flour: water ratio pretty even. Since we are adding flour to the surface, I balance it out by wetting my hands. It is the high water content that makes this bread so deliciously light and the crust very crisp. With wet hands, grab the dough and fold over all ends towards the middle. Turn dough blob over so that you get a nice, smooth, tight surface. Try to tuck the dough ends under to get that taut surface.
Gently move dough onto a piece of parchment paper (I used a floured towel, but it can stick to the towel easily, so I recommend parchment.) Cover. Let nap for 2 hours. It should puff up nicely and double in size.
secret: When I run out of time, I sometimes let it sit only for 1 hour! If you let it nap in a tall, narrow bowl (pictured below), the dough rises nice and tall, about 6″ high. If you leave it out on the counter – that is fine too, the dough will rise up and also out….making a flatter No Knead Bread loaf, about 3″-4″ high.They will both taste the same, just looks a little different.

A half hour before the nap ends, we will need to begin preheating your baking vessel. Slip a covered pot into the oven. Crank up the heat to 450F. Let it pre-heat for 30 minutes or longer.
The perfect pot for No Knead Bread
Let’s talk about the pot. So, you know you’re going to put the pot into a very very hot oven. Make sure that the pot can withstand 450F. Generally, if the pot is cheap, flimsy, has plastic handles and a remnant from your poor college days, it’s probably not going to be safe to use in that hot of an oven. Use a 5-qt or larger cast iron, ceramic, Pyrex, stainless steel or enamel pot.
Just check your pot collection – look for large, heavy, no plastic.
Round, oblong – doesn’t matter. Should be at least 4″ tall. I use my Le Creuset emameled cast-iron. Yes, my cover has a thick plastic knob – but I did call Le Creuset’s customer service and they said while their literature says safe to 400F, it is still fine at 450F. Now, I don’t know whether the gal who talked with me really had the authority to tell me such a thing….but after over 30 loaves, my pot is still unblemished. After pre-heating, remove the hot pot from oven.
Time to bake No Knead Bread
If you’re using parchment, just lift the entire parchment with dough and place into the pot with the parchment paper on bottom.
If you’re using a floured towel, place a piece of parchment paper at the bottom of your pot. This prevents the dough from sticking to the pot. Lift the towel, turn it over and just plop this wobbly dough into the hot pot. Doesn’t matter how it lands – actually, the messier it lands, the more “rustic” it looks. Shake pot a bit to even out the dough.

“It looks like a belly button!“ ~Andrew
Cover and put back into the oven. Bake covered for 30 minutes. Photo below is peeking through oven door after 30 minutes. Then uncover and bake further for 15-20 minutes. To check – you can either tap the bread (should sound low, hollow, like a drum) or take its temperature (should be 210F in middle).

Here is No Knead Bread just after baking. See? I told you that “messy” turns out “rustic!” Kids- don’t you DARE tell me that your toy room looks “rustic!!!” GO CLEAN YOUR ROOM!

Remove and let cool. The No Knead Bread really does sing – the crust crackles as it cools. Listen to it!
secret: Because the bread has such high water content- the crust will not stay crisp forever. If you aren’t eating soon, you can re-crisp the crust by re-heating it in a 350F oven for 10 minutes.
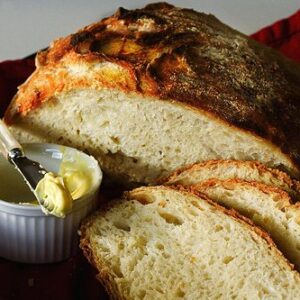
Thats it! You will be rewarded with a thin, crunchy brown crust, large, open holes. The bread is slightly chewy, flavorful and perfect texture. Making your own bread is deeply soul satisfying, it makes me feel like I am so close to the earth. Eat with good butter – like Kerrygold or Lurpak – splurge on your butter for this loaf!

Just a little story for you: The first time Andrew and I made this bread together, I let him mix all the ingredients together the night before. We watched it bake together. When it came out of the oven, Andrew wanted to cut into it immediately. But we had to wait until it cooled. Then it was time. As I placed the tip of my knife into the bread and moved down through the crust, the snap and crunch of the crust gave way to tender, spongy body. I knew even without tasting it, that it was the most perfect loaf of bread that I have ever made. Andrew and I slathered butter on our slices. We sat on the kitchen floor, my hands still with traces of flour, and had a wonderful moment of just enjoying bread that we made together. Just like his Po-Po, Andrew loves bread. Each time, he would come ask, More bread please with arms outstretched. I would place a warm buttered slice in his small hands – he cradled it so gently, carefully ran to the stairs, never taking his eyes off the prize. He sat on the third step and ate his bread, wiggling his toes between bites. Three times he did this. Yes, this is my son. Perhaps one day when he is older, he will read this recipe and story and remember how his Mommy taught him how to eat homemade bread – with lots of butter and with eyes closed, totally savoring every single bite.
Recommended Equipment for No Knead Bread
See the kids make German Oven Pancakes 
Also try:  Dip bread in Olive Oil and Dukkah
 Dip in Bagna Cauda
 Sop up juices in Killer Cajun Shrimp
No Knead Bread Recipe
Ingredients
- 3 cups bread flour (I like Harvest King bread flour)
- 1/4 teaspoon instant yeast
- 1 teaspoon fine table salt (or 3/4 tablespoon of kosher salt)
- 1 1/2 cups warm water
- Covered pot (five-quart or larger cast iron, Pyrex, ceramic, enamel...something that can go into a 450F oven.)
Instructions
- Mix dough: The night before, combine all ingredients in a big bowl with a wooden spoon until the dough just comes together. It will be a shaggy, doughy mess. Cover with plastic wrap and let sit 12-20 hours on countertop.
- Shape & preheat: The dough will now be wet, sticky and bubbly. With a wet spatula, dump the dough on a floured surface. Fold ends of dough over a few times with the spatula and nudge it into a ball shape. You can use your hands if you like, just keep your hands wet so that the dough does not stick. Place a large sheet of parchment paper on counter. Plop your dough onto parchment paper. Lift parchment paper up with dough and place into a large bowl. Cover bowl with a towel. Let it nap for 2 hours. When you've got about a half hour left, slip your covered pot into the oven and preheat to 450F.
- Bake: Your dough should have doubled in size. Remove pot from oven. Grab the ends of the parchment paper and lift entire wobbly dough blob out of bowl into pot. Doesn't matter which way it lands. Shake to even dough out. Cover. Bake 30 minutes. Uncover, bake another 15-20 minutes or until the crust is beautifully golden and middle of loaf is 210F. Remove and let cool on wired rack. If not eating right away, you can re-crisp crust in 350F oven for 10 minutes. Best way to eat it? Smear a warm slice with some good butter (Kerrygold and Lurpac are both found in your grocery stores, usually on top shelf)


Thanks a bunch for sharing with us your webpage.
Very nice good work thanks for sharing information
February 1984. My now husband takes me home to meet his parents for dinner at their home. I asked if I could bring something, and I was instructed to bring dessert. I am 22 years old. I found a pretty cinnamon roll wreath in a magazine. Followed the directions. We go to cut it for dessert, and it was hard as a rock. Over the years, I have tried several more times to make what everyone says is a foolproof bread recipe and they never turn out. My two girlfriends visited last month, and one gave me this link. She made it and I watched. It was great. The next night I made a loaf all by myself and it was AWESOME! I have used this recipe 3 more times and they all turned out just as great as the first one. Tonight, I made the recipe but in the last stage where you pat out the dough and then fold it, I added some drained, sliced kalamata olives (I also wrapped them in paper towel to get as much liquid out) and 2 bulbs of roasted garlic pieces and then let it rise the last 2 hrs. The bread tasted great but even though the olives and garlic were folded in they all ended up at the bottom of the loaf and not spread out evenly. I’m wondering if I can mix them into the dough at the beginning.
Your site is very good, I liked the information. Grateful. 69434472
Thank you, we wish you continued success on the subject.
thanks you very much post!
thankssss
tesekurler kocam
Outstanding recipe!! I’m not that good at baking but let me tell you something this bread tasted amazing!! My family asks for it all the time and now i can say i make one of the best No-Knead Bread in town!! Thank you so much for this post.
radyo sohbet odalarımız canlı müzik imkanı sunmaktadır.
thanksss
Thank you.
Bu harika siteyi her zaman ziyaret etmekten memnun oldum.
Been lurking and sending your site to all my friends!!! You are the next Paula Deen, I am predicting. I hope that Gordon Elliott is checking out this site. He discovered Paula. That demo of the No Knead Bread with your 4 year old is simply the best. Love it and plan to make it!!!
Remember the No-Knead Bread… Filed under: Grains , Recipes , Baking , Newspapers , On the Blogs , Rea
Nice, thanks
bedava kamerlaı görüntülü sohbet odaları hizmeti
RAWAHA provides you one of the best perfumes in Pakistan. We are committed to sale 100% authentic product whether you are looking for yourself or finding perfect gift for others we are here offering you a huge range of product. you may probably found all type off fragrances here.
soru sor fikir paylaş konu aç
thansk.
polyester pet çember üretici firma
ankara acil diş kliniği
plastik çember üretici firma
etanj armatür çeşitleri üretici firma
So if a 4 year old can do this, you’re saying I can? Oh the pressure. I have to actually bake a loaf of bread for once in my life? Deep breath…bookmarking…maybe next month…I can I can I can.
tesekurler hocam super olmus
thankss
tesekurler harıka
Thank you site
Wow Superr!! looks absolutely amazing.. beautiful pictures too.. thanks for sharing..
Literally an amazing information is shared here and really useful for the people like me who work day and night to themselves eat and not get leisure time to do these stuff at home.
Amazing! what a great recipe to share soon I will try it home and will share the experience.
very easy and cook recipe. I will definitely try it at home even my son can also make it so easy thanks for sharing
mayor
i really like thanks for sharing information with us glad to know that
faydalı bilgi
This sounds amazing!! I was actually sent this link by 2 different friends when I mentioned I have had no luck baking bread. Bread has always been my nemesis which is extra embarrassing because I’m actually a personal chef for a family. I’ve mastered all my pastry skills but yeast bread continues to haunt me… I was wanting to add dried figs, gorgonzola and walnuts and was wondering when you thought that was best to do so. Congratulations on creating something that is clearly wonderful and has made so many people happy!! This is exactly what we need at this time.
Thanks for sharing.looks nice recipee.
good recipe like it…. thanks for sharing
You had me at Popo!
I’m totally not a cook (typical old man who has spent his life buying bread products) but I’ve made bread and buns repeatedly because of the covid crisis. My son loves the dense objects I’ve been making, but I yearn for the fluffy airy sorts of bread I would normally buy. This was the first recipe that didn’t make dense bread. I have the added problem of having to use whole wheat flour because I have a mass of Wheat berries and can grind it at will, not so of white flour which is a difficult commodity to come by. I used 1 cup of whole wheat as a result and will increase that to even more next time. But this bread was superb, the first bread I’ve made that I would eat to enjoy rather than eat to not lose weight. It also is good enough it doesn’t have to be covered up by jam, peanut butter, or even butter. It tastes good just as a snack all on it’s own.
I can’t figure out why? All the recipes are similar, maybe it’s the 20 hours sitting and additional 2 resting, maybe cooking it at a hot temperature… maybe cooking it covered… I have no clue? I made it in a pyrex baking dish with a lid, put tin foil under the parchment since parchment really hates 450 degrees. If only I could get it to work with all whole wheat and still have it develop enough gluten to rise and be airy, it would be perfect for my situation. But, since it is possible to get white flour again, it’s still pretty darned perfect. Thanks for the recipe. About to start my second loaf today.
You are precisely the first personality to ever motivate me to make bread myself! That seems so doable and great that I will have to go purchase yeast and bread flour. I’ve always hesitated touching flour for any reason so I may have to grit my teeth a bit.
Love this recipe and as you know it’s not easy to find yeast these days 🙁 I have active dry yeast and was wondering how much you would use of that to equal 1/4 tsp instant yeast? I googled it and it says to use active dry yeast instead of instant (bread machine) yeast in a recipe, multiply the amount of yeast by 1.25. So would that be just a little bit more of the active dry yeast? 1/4 tsp of a 1/4 tsp?
Hi! I would just use the same amount. I’ve interchanged active and instant many times in this recipe!
The crumb structure looks tighter that other no-knead breads, I like that, thank you, for sharing, Jaden.
I was wondering if it is possible to leave the dough out for longer than 20 hours (no more than 24) would this stil be ok
I have….it’s fine.
What gift to share with your son. I love that he learned how to make bread which must of made him feel fantastic and you had the joy of doing it together and sharing it together. Those are some of the best memories. Just sharing a moment of satisfaction. Also, so glad your son was able to convince me that maybe I could give it a try too!
My dough was made last night. It rested for 14 hours. When I turned it on a floured surface, it came out so sticky that I wasn’t able to even touch it. It stuck to my wet hands, to the surface and the dough scraper. I finally flipped the blob on a piece of parchment paper and let it rise for 2 more hours. It turned out ok but i’ve watched numerous video on different websites to see how the dough is turned and none of them had such a sticky dough. What did I do wrong?
Love this bread, I used all purpose flour as this is what my Mom used when she bake d bread & buns . I also have always used all purpose flour. Love your recipes.
Thanks so much Patricia! Jaden
I love this recipe and the bread came out perfect! I want to make these into individual rolls..any recommendations on how to go about doing this as far as weight/size per roll, covered uncovered in a cookie sheet and for how long? Thank you so much. Either way I’m going to experiment!
Thank you!! jaden
Thanks for sharing this recipe and for all your tips. Can’t wait to slather it in good New Zealand butter!
Great recipe, and so easy that I want to get at it again! I reviewed in more detail on Yummly!
I made this tonight. First time I ever attempted to bake bread. I missed the fact that it said Bread Flour, so I used white all purpose flour and it came out amazing! Followed all the other directions exactly, including the baking time and after 45 minutes in the oven it was exactly 210 degrees. It even made those crackling noises while cooling. Thank you. Thank you. Thank you!
That’s great Marian! Thanks so much Jaden
This bread came out great, I’ve been cooking bread for 30 years, this is a really good recipe.
I tried this bread from yesterday (mixture) and did the baking today. Followed your instructions step by step. After the 20 hour period there was no bubbly or water.The dough did not rise properly. After the 30+15 minutes baking the iside was very leathery and did not cook.
Hi Bangar – if the mixture did not bubble, and the dough did not rise, then your yeast was probably bad. Try again, with new yeast! Jaden
Thank you. Will try again with new yeast.
Wow, this recipe is indeed very easy! No wonder a 4-year old kid can do it. Keep this up, I will be anticipating your other recipes as well! Thank you!
So… I just realised that I didn’t use instant yeast. I just used the regular one…. Will it make a difference????? . I mixed the ingredients and left for work and hoped to make bake it after work for super… Now not sure if it will rise lollol.
It should be fine!
You are officially the first person to ever inspire me to make bread myself! That looks so doable and good that I will have to go buy yeast and bread flour. I’ve always hated touching flour for some reason so I may have to grit me teeth a bit. 🙂
I have a 5 quart crock pot that the insert is able to come out. Can I use this and cover with aluminum foil as my cover ?
Yes!
Didn’t work at all for me, and sadly, I think I’m done with no-knead recipes… maybe it’s my kitchen/ambient temperature (runs pretty warm I guess?), maybe it’s my flour (local, organic, amazing, can’t be that), maybe it’s something else, but I’ve been baking bread (inc. sourdough) for years with amazing results, and never ever had success with a no-knead recipe. WHYYYYY??? It’s driving me nuts! Complete waste of ingredients every time. 🙁 I’m at the post-overnight fermentation stage and have total goop on my hands, there’s no way in Hades I could get this mess shaped into anything! It’s like wetting my hands in an effort to shape pancake batter. There’s simply no structure to it at all, and I’ve already added an additional two cups (if not more) of flour just so it’s not plastered in a goopy sheet to my counter. Sighhhhhh…. I would highly recommend anyone trying a no-knead recipe to at least go by a recipe that uses weights rather than cups (though I failed at those too). :(((((((((
Hi there, don’t give up! Try adding 1 cup extra of flour, and do not try to give to it a shape before baking. The result is really yummy.
Strange. It’s the only bread I can make and have been doing so for several years now.
Mine did exactly the same thing. But it came out great!!! From now on, I’ll just turn the dough from one bowl to another, let it rise 1-2 more hours, then scrape it on parchment paper and let it bake.
I was wondering if you cook this seam side up but rise it seam side down. The original recipe has you rise the ball seam side down then flop it over into the pan. Like you I have better success with parchment, bit was wondering about the flipping issue vs just setting the parchment into the pot.
Flipping so that the seam side is “up” when cooking actually has a purpose. The seam allows the steam to escape evenly (thats why you see artisan bread with slashes on top of loaf)
I have made this bread with great success several times and have been asked the recipe a lot too
I want to make 7 loafs this year for gifts. I made 4 of the dough batches today and am hoping to cook tomorrow morning. If it naps more than 2 hours the second time around, will that be okay?
Sommer – yes it should be fine!
Okay, so I haven’t been successful with using bread flour or all purpose flour for rustic bread. I’ve been successful using Bob’s Redmill Artisan flour though. I decided to give this recipe a try and am so glad I did! This is fantastic. Thank you!
Thanks so much Lilian!
That is just about the most precious thing I have ever seen.
Don’t forget that you can make up a bunch of this dough and keep it in the fridge in a sealed bucket or air tight container. I make a triple batch, right in the container and then we add fresh garlic, Parmesan, and herbs. It’s sits overnight on the counter nothing different, but when I’m ready around 9 am, I take out a softball shape to have for lunch. The rest go into the fridge, it’s as simple as that, it can stay for two weeks. After the week and 5 days it lasts in my home I mix up a new batch with whatever little bits are left. The dough is again made into the same container and has a bit deeper flavor, a bit like sourdough. You can clean out the container if you want to in between every new batch, I’ve only ever cleaned the container I use every 3 months I find it keeps very clean and I just quickly scrape everything out into another bowl to wash with soap every three months or just rinse if I can tell it really doesn’t need it. The remaining dough goes back in before I make more. I know some people may just toss the old, but it’s usually a baseball size or less and I’d rather fold it in to the new.
Hi! Does that mean that you make rolls from the recipe? I wanted to try that but thought it might not be a good idea because of the crust being so crispy.
You can certainly make rolls, just shorten the bake time.
Thank you for sharing this !
Thank you so much, both for the recipe and your words. We loved the bread, and my wife actually started crying when I read what her what you wrote about savoring the bread with your precious Andrew. Thank you so much.
I love the taste of this bread!! Thank you for sharing. I have made this loaf 4 times now and run into the same problem every time.
When I initially stir the ingredients together, the dough looks perfect. After letting it sit overnight and I dump it on a well floured surface the dough it very wet with water sitting in the bottom of the bowl. Any suggestions??
My dough turned out the same way…very wet. I live in a really hot and humid climate so I was wondering if it’s because of the humidity and temperature that’s causing the dough to be this way.
Can someone help?
Hi Amanda – you can add more flour to adjust for your climate and flour. After making the dough, have a 1/4 cup of flour nearby. Dust the surface of the dough on all sides, just enough to help you handle the dough. Wet hands will help you shape and prevent sticking. The dough should be sticky and a bit saggy – it’s ok!
Hi Jaden, Thanks for replying. I actually did try adding more flour, but I just couldn’t get the dough to firm up enough into a ball…it just kinda ended up as one gloopy “gel”. After I baked it..it didn’t rise and ended up tasting like british crumpets instead of bread. Ah well, still delicious though. I think I’ll just reduce the water and probably not let it the dough sit for 20 hours the first time around.
Had the same issue, so the next time I reduced the water by 1/4 c. and used Hard White flour from the bulk store. The results were really noticeable. Much easier to manage the dough after rising (18 hrs.) No pouring batter like the first try with all purpose batter.
Cute I might try this with my 9year old shes been wanting to learn how to bake. and thank for the idea of using a regular pan i never thought of that. Were I was wasting money on baking pans.
What does heating the pot first do? My first loaf is in the oven now.. Smells wonderful.
How can i keep the crust. Crispy?
You said to cover the pot while the bread is baking inside. What exactly am I using as a cover? Thanks!
The pot’s lid.
Consider putting dough bowl in a cabinet with under cabinet lighting. I notice our dishes are slightly warm in those areas.
Hi,
Have just made no kneed loaf, crust perfect, inside the loaf very stodgy and felt wet, any help appreciated
Thanks
Have you tried freezing and reheating this bread? How does it work out?
Love it! Can you follow up to the recipe with additional ingredients ideas, techniques? Roasted garlic, olives, cheeses, herbs, etc. Can you just fold them in when initially mixing?
Hi Greg – yes, you can all fun ingredients. Here’s the recipe – for No Knead Baguette, topped with tomatoes, olives or garlic.
Am I better off using bottom heat only or fan oven?
I put cheddar cheese and diced jalapeno in a loaf. It was great!
I was just thinking of doing the same thing!
My family loved the bread. I let my my dough rise for 15 hrs. I did wish I had paid closer attention to the bread after I took the lid off b/c 15 min. was too long and my crust was a bit too hard and dark but the inside was perfect and tasty. I’ll make again soon.
I have tried this recipe twice with ordinary flour and found that it is sticky but does not rise to twice its size so remains like a flatter loaf – I have followed every other step of the process and just saw on your recipe that bread flour is preferred – do you think that ordinary flour made my bread not rise substantially?
I bake in a cake pan, lightly oiled with olive oil, which adds to the taste and crispiness. I bake with it fully uncovered and the secret of the crust is moisture. I place a metal pan in the oven beneath the bread and put in a litre of water. Some use ice, but I have found that if I put the water in when I heat theoven, then by the time the bread goes in it is very steamy. That does the trick. My cat iron pot sits idle since I found out that this works as well.
Hi. Can I use plain flour instead of bread flour?
I highly suggest bread flour!
Hello there,
Just found you by accident for the first time and will definitely try this recipe! What sort of width pot do you use to bake the bread in please?
Are you in Cork, Ireland?
Cheers,
Hilly in Norfolk, England.
Do you have a half white/half whole wheat version?
Sorry I don’t!
I have made her recipe with 2 cups of white and one cup of whole wheat and it was delicious!!!
Hi! So I made this at 9am. I’m trying to figure out if I should start the second step at 7pm or at 7am…. I don’t really want to be baking bread in the middle of the night so it’s either before or after bed time… 🙂 If I waited till the next day the bread would have been sitting for 22 hours… is that too long? (It’s winter and my kitchen is quite cold…)
Your bread will be just fine! You can warm up your bread again when ready to eat – heat oven to 300F, wrap bread in tin foil and warm bread for 10 minutes. Sometimes I’ll do this with half loaf in my toaster oven if we are only planning to eat a few slices.
i made this in a large toaster oven using a rectangular pyrex dish with foil for a cover.
also halved the dough and made two loaves.
still turned out great!
Thank you for sharing !
We had that problem, too. Turns out the oven rack was too low, too close to the bottom of the oven.
I have a similar problem – Crust is too tough and inner core a bit more wet and dense.
How far the rack needs to be from bottom? Or are there any other suggestions?
Hi there – middle of oven is best. Check your oven temperature with an oven thermometer. If the temp is spot on, try lowering the temperature by 10 degrees and use 10% less water than in the recipe.
Can I use another kind of container like a round shape baking pan?
Yes, you can!
your son is infinitisimally more cuter than Bourdain!! i come back to this page every so often such as today after using Breadtopia’s no knead sourdough (just as easy, sub 1/4 c sourdough starter for 1/4 t yeast) recipe cuz their page had so many variables i decided to look you up again! Anyway, always wanted to tell you how much confidence your picture story with your son making this bread gave me to ‘just do it’! i’m sure your son is almost grown up by now! thanks again.
This was super easy to make, however my end product had a seriously hard bottom crust. Any suggestions on why? (This is also my first time making bread)
Is there a way to make this loaf gluten-free?
I always put mine to rise in the oven with just the light on . Takes about 5-6 hours, give or take.
Ah, great idea.
Do you know if a non-stick pot would yield the same results?
Hi Vanessa – I wouldn’t do this in a nonstick pot. The temperature in oven gets too high for nonstick to be safe.
Hi I think the recipe is great! But can I know why the bread has to be baked using a cast iron pot? Can it be bake in a cake pan and cover with the aluminium foil?
Yes, you can! The cast iron or enamaled cast iron retains heat better, so it cooks more evenly. But you can use any pot.
Hello,
On your pictures, I see that you are actually baking the bread in your pot, with no parchment paper. I tried to do the same thing today, but the bread was stuck to my pot 🙁 Any recommendations to avoid this again? I did put flour at the bottom of my pan… Thanks!
Hi Caroline – The bread doesn’t stick to my pot (my pot is very well seasoned) but I recommend in the recipe as well as in the post to use parchment paper!
Dust liberally with cornmeal to prevent sticking. Parchment paper can burn at high temperatures.
does it need to be warm/summer to do this? It’s winter her and about 10degrees most of the day especially at night. Will it still work if I leave overnight?
Yes, it does need to be warm inside the house. Try placing the bowl near a heater – that should do the trick!
Will this work if I divide the dough after mixing and bake in 2 glass covered casserole dishes? Do I need to adjust the temp?
Same temperature, but timing will change. Bake covered for 20 minutes, then uncover and go another 12 minutes. Take temp of bread (it should be around 210F in middle of loaf). You’ll have to adjust timing based on temperature of bread.
Your story at the end of the photo instructions (Andrew savoring his efforts) brought tears to my eyes. Thank you for sharing ; beautiful memories for you both!
Thanks! The recipe and the pics of the chef making this have really inspired me!
Haha, that little dude has some sweet temporary tattoos. Also, if this little guy can make it, I should be able to pull this off without breaking the kitchen. Thanks for the recipe, hello awesome homemade bread!
this is not a recipe for the impatient. From when I made the dough last night until it was baked all I heard was “is it ready yet”. It taste good, and was really easy. It was half gone in a matter of minutes, and they want another.
Just made this for the first time and it’s delicious! My son is 13 months old and I can’t wait for him to get older so we can make this together! 🙂
Will this no knead bread work in high attitude I live in
denver colorado …. do i need to add more flour?thank you
I love this bread recipe! I have been making it for a few years now and it is always a hit. My oven just conked out and I was wondering if you think this could be cooked in the crock pot. Might be a great idea for those hot summer days when you don’t want your oven on. Thanks! 🙂
Made this yesterday, baked this morning. So. Delicious. It’s the perfect bread. Crisp edges and soft chewy center.
i made this bread tester date for the first time. It’s also my first go at no-knead bread. The results are wonderful! I ate a quarter of it last night with butter, and made a sandwich with breakfast sausage this morning. I reheated it in foil at 400 F for about 8 minutes, then opened the foil for another two minutes. It was at least at good as last night. I’ve put a quarter of the loaf in the freezer, wrapped in foil expecting it will do just fine. This will be a go-to recipe, and I will try some of the additions suggested above. Thank you.
How many grams is one cup of flour? and how many ml is one cup of water?
We have been making this recipe for over a year. It’s known in my house as Four Year Old Bread… I wish I could post a picture of my son, who just turned four, and insisted today was the day he could make bread all by himself! 🙂
oh, Betsy, I’d love to see a pic if your son! And, if it was okay, with you, I would be happy to post his photo in the post, too! I love when kids bake! mail@steamykitchen.com is my email address. Tell him we said hi!!
I have made this twice now and am amazed at how easy and delicious it is! The one problem I have is that I put the dough on a floured dishtowel for the last two hour rest period and it seems that no matter how much flour I cover the towel with the dough sticks. I guess this is why it is easier to use parchment?
Yes, parchment is much easier to use!
We absolutely love your bread! I am German, but I live in D.C. with my family and really good bread is probably at the top of our list of things we miss from Germany. Not anymore! 🙂 I baked 12 loaves in the first week alone! I use 2 cups bread flour and 1 cup whole wheat flour and it comes out tasting just like the bread from our local bakery back home. I can’t wait for my mom to visit this spring so i can impress her with my German-Bread baking skills!
Thank you Gabi! Let me know what your mom thinks after trying your bread! 🙂
Have you tried freezing this bread? I like to bake several batches of bread, muffins, etc. and freeze the surplus for later.
Claire – we’ve never been able to have leftovers to freeze! Fresh bread gets gobbled up so fast, even if I bake an extra loaf.
Hi, first attempt a smashing success! This is not gonna last long, this loaf…Thanks!
Tom – Great!!! I love bread….next time try the “No Knead Stecca” that’s on my site. You’ll love that too.
I didn’t have a Dutch oven so I baked it on my pizza stone and put a metal bowl over it. Problem solved.
Ah – fantastic tip!
It looks so good! My question-I have quick rise yeast, not instant, will that require different timing? I make traditional bread often but I love trying new recipes and this one looks tasty.
Karey – that yeast should be fine!
Excellent! Thank you
Fab recipe 🙂
But now the tears are flowing down my face.
I will teach my to Young girls this and also hope they 2 will be as inspired as your Son.
TY
Hi, bread was great but my parchment paper completely stuck to the bread? Am I completely losing it? I think I would like to try it without the parchment… Do you think that would work?
Clara – Not sure why your bread stuck, but next time try spraying the parchment with a little cooking spray. If you don’t use paper, then the bread will stick to the pot!
Hi I don’t have a pot at all could I use a loaf tin and pointed tin foil for lid and just rub the inside with oil as I don’t have parchment paper either
Hello from Norway! Wonderful recipe, I’ve made it five times now and it’s perfect every time. But it disappears so fast! Have you tried to double it in size? Does it twice as long in oven?
Hi Jorgen! Rather than doubling the size (which would change the baking time, but not twice as long) – I will make 2 batches, back to back.
My first attempt has not been very successful. I followed instructions faithfully except that the “nap” time was 2.5 hrs instead of 2 hrs. Oven is a fan oven set at 280 centigrade.
The resultant loaf has a hard surface, slightly separated with the inside being rather gelatinous (Or gloopy). Not a perfect loaf by any means.
Any suggestions for second attempt?
Hi Bab – your “nap” time (rising time ) is fine. Have you checked your oven temperature accuracy? You can do this with an inexpensive oven thermometer.
Started making this last year. Oh my word! Best bread ever! No substitution necessary. It stands alone. My husband ate half a loaf for lunch the first day I made it!
Thanks Pam! So happy you loved it.
This easy recipe produces a miracle loaf of artisan bread. Thank you for not only sharing the recipe but for the delightful photos of your son and baking tips along the way.
I forgot to mention a slight modification. I like to activate the yeast in 1/4 cup warm (100F) water with a pinch of sugar for a few minutes before adding it to the flour mixture. I then add 1 and 1/4 cup water warm water figuring I’ve already added 1/4 cup with my yeast. This addition of the pinch of sugar seems to make the yeast extra happy 🙂
Why do you use kosher salt rather than regular salt?
Hi Lois – you can use either, but I stock my kitchen with kosher or sea salt. So, all my recipes use kosher or sea salt measurement. The granules of regular table salt is too fine and too salty for my taste.
However, for bread or pastries, table salt is probably better – it dissolves easier than kosher or sea salt. I don’t bake much, other than this bread, so I just use what I have on hand.
I find it still comes out fine to bake bread, especially this bread, with much less salt than this or even no salt. I’m not keen on too much sodium for health reasons. Salt retards yeast growth so in the end it mostly affects rise time. It may be different for a genuine sourdough because you’d want to control the mico-flora top get a good leaven, but it certainly doesn’t seem to be an issue for dry/fresh commercial yeasts in my experience.
There a many traditional ancient breads that don ‘t use salt (traditionally) because it was an expensive ingredient. Depending on the bread recipe, I may or may not make also some adjustment to the sugar level and/or amount of yeast to adjust for less/no salt- but this is usually based on intuition as I have been baking for over 40 years. Unless the saltiness is what you crave, you will still get a good product.
This looks like a great recipe. I have never made bread before and am itching to try it. Unfortunately I don’t really have any big, heavy, good quality pots. The only one I have is a Le Creuset 3 1/2 QT pot. Can I divide the dough and bake two small loaves?
Thank you!
Yes you can, just decrease the baking time to 20 minutes. Check temp of bread and adjust with more baking if necessary.
Hi, this recipe couldn’t be easier.The final product is amazing, i accidentally came across this website and it sounded super easy, it is, my husband and I have made 3 loaves in 2 days and keep eating just that:)Thanks for this beautiful thing.
I have been making this bread for a few years now and just love it.
A year ago I took a class on making a cob oven which was used in the local Eat Real Festival sponsored by King Arthur flour. On a whim I brought over some prepared dough (3X the recipe) and asked if i could bake it in the hot oven. The guy manning the oven was one of the instructors in class and allowed me to put put the dough (still on parchment) on the peel and placed it in the back of the oven ( i think the oven temp was around 500) we let it bake for around 30 minutes and then opened the oven door to discover that the dough had puffed up like a basketball!!
Once it was pulled out everyone in the booth went crazy and a couple of people ran to other booths and brought back olive oil and fresh made jam. It was an amazing sharing moment that everyone got to enjoy!
I just received a Romertopf glazed clay pot for my birthday and it made the bread rise just like the cob oven!!
Also I would recommend adding a little Community Grains whole grain whole milled Hard Red Winter wheat if you can find it!
Thanks for your postings.
I love this bread!! I made one modification, I mixed poppy seeds, sunflower seeds, dried onion flakes, and sesame seeds to coat the top of the bun. I love love love this recipe and the bread is delicious and super easy!
Hi Jaden,
Thanks for sharing. I was surfing for more bread recipe and chance upon your blog. My husband found the almost-same recipe and I have been baking it for the past 6 months now and it’s great.
However, I bake it after I let it rest for 12 hours. I simply floured it a little and using the spatula to get the dough together in the same bowl where I let it rest for 12 hours.
I tweaked the recipe as well, here is my personal recipe :
1.5 cup of bread flour
1.5 cup of Top flour ( Prima brand – local brand I got here in singapore )
2 tsp of salt
1 tsp of instant yeast
1.5 cup of water
I mixed all the dry ingredients together, and added handful of Sunflower seeds, Golden Flaxseed, some oat ( optional ) , some wheat germ ( optional), and pour in the water and mix them well.
After that, I added a handful of dried cranberries and tear 2 slices of cheddar cheese and mix them again. Cover it and let it rest for 12 hours.
Then flour the sticky dough with spatula while heating up my Le Creuset pot in oven for 30 mins, and then pour the dough into the pot and bake for 30 mins with cover and remove cover and bake for 5-10 mins for browning.
Ps. Your son is so adorable !
Thanks
Hi Sarah! Thank you so much! I’ll let Andrew read your kind note.
Thank you so much for this recipe!!!! My bread is just out of the oven and it looks BEAUTIFUL! I will never again buy a bread from a store!
upon reading your post, I felt challenged. Yeah you are right, when I like to eat a bread I just run to a bakery to buy it, but I’ve never tried in my life to bake a bread.
But I just found it. I’m waiting to put the dough in the oven. My dough doesn’t look as firm as yours but we’ll see what comes out.
Let me know how it turns out!
Hi! I have never baked before and will try this this week. What do you suggest if I want a rustic, separated, or uneven look on top of the bread?
Hi Chelsea – the “sloppier” the bread, the more “rustic” it will look. For your first loaf, just try the recipe as-is. Experiment with it after your first loaf! You’ll have fun with baking bread, I promise.
Holy Crap! This bread is GOOOD! I don’t think I’ve ever made bread before and it turned out perfect. Just follow the directions. I didn’t have a proper pot for the oven so I had to use a shallow dish pan and fashioned a tent like lid out of foil, still turned out great.
Thanks so much Bunny!
Can I use a 6-QT All Clad Stainless Steel Stock Pot (lined with parchment paper, of course) to bake this? I’ve made it in a Lodge Enameled 6 QT before, but don’t have it with me at the house I’m at now… Thanks!
Yes! I’ve used my stainless steel pot 🙂
Hi Jaden,
I tried your no knead recipe and nailed it. It’s so easy and the clean up is the best part. I upped the yeast and added 1/4 tsp of sugar to feed them. I also added a smidge of cinnamon for flavor. This rose in 8 hours, folded out and proofed and baked in parchment… Here’s a pin showing the slam dunk rustic loaf I got: goo.gl/23iBZH
Keep em coming,
Jason
Beautiful! Next, try the no knead baguette and if you love sweets, there’s No Knead Sticky Buns!
Yum-oh-lah!!! I made it tonight and the bread came out perfect! It was nice and crusty!
It’s fun to watch a 4 year kid preparing a dish. After seeing this, I realised that the recipe is very easy to cook.
This sounds great. I love making bread, but often don’t have time for the ‘traditional’ kind. We are going camping next weekend, so I am planning on doing a test run this week and then mix up a batch to ‘sleep’ while we’re travelling and bake it in my camp oven on the fire. Mmm, nothing better than freshly baked bread for breakfast while camping.
I’ve made this recipe and others almost identical to it many times. I have made the recipe with all bread flour, with all unbleached AP flour, with 1/2 bread, 1/2 unbleached AP flour, and have found so far, the all bread flour is producing a nicer loaf. That being said, although my bread has been turning out great ( the all AP flour experiment not so much though) we are finding the finished crust on the boule almost impossible to cut.
I should add, upon measuring the flour called for, I have used the spoon and sweep method ( what I was taught in home Ec years ago) I have used the scoop and sweep method (recommended & used by the authors of Artisan bread in 5 minutes a day) which for me was not at all good advice as scooped flour tends to get too compacted thus weighing more than is should. I have also weighed all ingredients needed including the flour ( advice from Jim Lahey the creator of the no knead bread recipe & found weighing the flour to be the best for a consistently good loaf. ( For me, I should add.)
It is the texture of the finished crust on the NK recipe that is perplexing. The almost breaking my bread knife blade that I’m not understanding? I have always strived to have a nice crispy crust on my breads, but this one, the crust is too crispy, as in just too darn hard and I have no idea as to the answer why?
I use my oblong or round heavy duty enamel cast iron pots with tight fitting lids to bake the NK bread, my oven temperature is spot on, it’s checked every day as I do a lot of baking. My yeast is fresh and is also tested regularly to avoid any yeast failure. The water needed is tested for the correct temperature ( via JLs book) or it is measured in a standard glass measuring that’s needed if one is going to bake by volume.
I have been baking yeast breads & my trusty sourdough bread (no yeast) for a good many years so I am not a novice ( although not an expert either) to the world of bread baking. That being said, this no knead bread recipe although a very tasty loaf if one can get through the crust, has me stumped as too why the crust could quite easily break a persons tooth if they are not careful.
Hi Joycelyn (I love your name)
For a less crust, try less steam (even omit it if you want). The high moisture content is what creates the super crusty crust.
Hi! I have a sourdough starter ready to be used. How much of it do I use in place of the yeast?
thanks!
Hi Kate – I haven’t made this with a starter, but I would halve the yeast.
would this make decent rolls for thanksgiving? love the overnight easiness of it!!!
Hi Sheila – I think there are better recipes for dinner rolls – I’m thinking something softer for rolls. This will produce a hard, crunchy crust.
Curious if you need to use bread flour? Or can you sub with all purpose flour? This bread looks sooo yummy. I would to start making bread once an week with my boys.
Thank you!
I’ve used AP flour in a pinch, but bread flour produces the best results.
It’s much better to cook yourselves home-made bread! My kitchen never smells that delicious!
I made the bread and it looks great but the wax paper got all stuck to it! I was wondering if there was anything I should do differently to keep that from happening next time?
Hi Maura- use parchment paper, not wax paper. Wax paper cannot take high heat, the wax melts and sticks.
Bread Recipe from Phyl
Just wanted to thank you for the recipe and details instruction. I just baked a loaf that we made with Kamut wheat berries we ground in the Vitamix. It’s great!
Thanks for the recipe!
My husband just ate half the loaf, the kids love it, and I’m glad I at least took a picture of it because I don’t think it’s going to make the rest of the night!!!
YAY! So happy to hear that your family loves it! Next time, give “Stecca” bread a try.
Hey, two questions.
Can I use regular all purpose flour? I don’t have access to bread flour.
And also, what about using a bread pan instead of a pot to bake in?
The pot does make a difference! See the science behind it here: http://www.seriouseats.com/2011/06/the-food-lab-the-science-of-no-knead-dough.html
Do I need to grease the enamel in the pot? If I leave on the baking paper won’t it have crinkly edges?
No need to grease the pot! Once you bake with the parchment paper, it will soften up with all the moisture in the pot, so that the dough kind of spreads it out. No crinkles!
Hi,
Just to be clear, I keep the blob of dough on the parchment paper while baking, correct?
Thanks –
Jessica
Yes!
We love this recipe!!
Would you tell us how to add flavor such as rye, sesame, cinnamon?
Thank you!
LOVE this bread and your blog of it! I’ve been making it for years (with my kids!) and it always turns out great … even when it is a bit Frisbee shaped. 🙂 I’ll be saving your recipe, though, because it’s adorable. Your son is a lucky man! xoxox
Hi! Thanks for posting such an intriguing recipe! We tried it yesterday with the plan of baking it this morning (20hours) but it was really wet and just slopped out like sticky paste onto our floured surface. We used quick rise yeast – do you think that is why it didn’t work? Thanks for any tips!
Hi Erin,
Either the yeast was bad (expired or just gone bad), too much water or too little flour — or a combination of those! Try new yeast.
Jaden
It sounds like your dough was too wet. I also had the same experience and have concluded that different kinds of flour used will require slightly different amounts of water. Therefore, use 1.5 cups of water as a rough guide.
For the flour I use, 65-70% hydration works.
Assuming 1 cup flour is 140 g, 3 cups flour = 420 g. 70% of 420 = 294 g water or 294 ml water. I would not pour all 294 ml but leave a bit, and add if necessary to achieve right consistency of dough. If it is still too dry after 70% hydration, add a tablespoon of water at a time. Good luck!
Aw, dang it. You made me cry. Reading that made me miss my little boys. My three sons are all grown up with their own kids. One is over 50, the youngest nearly 40, and I miss the children they were. I miss being a mom. Being a grandmother is second best; I don’t have much access to them, and when they come we can’t do things like this together. I miss those days so much.
I know this might be a silly question but when you put the dough in the pot do you use the parchment paper to cook with or are you letting it drop from the paper into the pot? I hope that made sense and i’ve baked this bread both ways and its fine… just different look and somewhat texture. thank you and this is a terrific recipe my family enjoys. My roots are lower Manhattan so this hits home sometimes.
I use the parchment paper in the pot! It will prevent the bread from sticking to the pot
Last year I found the NY Times recipe and made this bread several times. I told my relatives about it but they would never give try. Finally I decided to just show them. So we found your post and ejoyed reading it as much as we making the bread! There was a lot of “it’s so easy a 4-year old can do it!” going on before, during and after… of course it came out perfect, and of course they are now belivers. The only problem was we should have made two loaves because between the six of us it was enhaled within 15 minutes!
This is an awesome and THE BEST recipe i’ve ever used for bakin bread. It tastes just like the bread you buy at a local small town bakery in france!!.. thanks alot
This is one of my favourite breads recipes that I use ALL the time. I usually do a sped up version of this bread as I don’t usually realise I need fresh baked bread until its too late to make the 12 hr version. I use 4 Cups flour and 2tsp yeast….this works great and is usually ready to bake within 1 1/2 – 2hrs. (Depending on the temp of the environment) It looks and tastes just as fabulous as the original version:)
What an easy way to make such yummy bread! Once it’s done, slather it with butter and you’re good to go! Thank you for sharing!
Kerry’s gold is the best to use… umm…. salted of course. lol
Hello!
I tried your “no knead” recipe with my daughter and we love it! but I tried something a little different. I didn’t use yeast, I just added a little bit of sourdough starter (flour, water, a little salt, and let the natural yeast develop) which i usually make with wheat flour, and went 1 part wheat 2 parts white flour for the recipe. literally less than 1/2 a cup of starter. let it sit for 20 hrs. it turned out exactly as described in your article. I also didn’t have any parchment paper, ( the last batch of cookies got handed out on it) so I just floured the bottom of my Lodge enamel coated dutch oven, and it popped free with no issues. need to add just a bit more salt to the recipe next time for personal taste, and I think I am gonna try a cheese loaf out of it! great bread, and super easy!
Could you give weight of flour used and amount of water as in England we don’t use cups for measuring would be most grateful for this info thank you for sharing
Hi, I have tried this recipe multiple times with great results, except for one thing… The bottom of the bread has gotten stuck to whatever’s underneath it every time! A pre-heated flour pot has resulted in a bottom-less bread because it is burnt and adhered to the bottom of the pot. Floured parchment paper and cheese cloth stick to the bread and cook into it! I suspect my not cast iron pot is the problem but it’s stainless steel and should work. Very much appreciate this recipe but I am confounded!
Try using a silicon mat for baking. You can find at any kitchen supply store, just cut it to size.
I have never had trouble with the bread sticking to the pot. I do use a lot of flour to coat the loaf when its sitting in the tea towel, maybe this helps it to stop sticking, or maybe its the quality of the pot? I use Le cruset type ones(the cheaper version).
Hi,
Thanks for the recipe. It was my first time baking a bread. It was huge success. I let my 4 yrs old son make the dough. He had fun but it was very hard for him to wait for almost 12 hrs. Finally when bread came out of the oven, we could not wait to let it cool down. 😊 Me and my son ate half of it at the same time. 😳 I also made the Egyptian dip with slight changes. It tastes wonderful with this bread.
I did not have bread flour so I used regular all purpose flour. But I really liked the taste.
Thanks very much for such an easy and wonderful recipe.
Fantastic! Next time, try bread flour, I think you and your son be even more delighted with the results 🙂 Tell your son that I said “Hi! I’m so proud of you for helping your Mom make bread!”
Can I use a bread stone for this, or does it have to be a pot?
You can use a bread stone but the point of a covered pot is to intensify the heat and trap moisture.
I have made several no knead recipes and this one is the best. I would love to put this on Pinterest. Do you have a connection to Pinterest? This bread is awesome!!!!!
Hi! I just mixed the dough … but … the pot … it HAS to bem a covered pot? I dont have one … and usually I bake my breads in a normal baking sheet…
I have made several loaves and am practically addicted to making bread now. I am ready to try flavored breads. Have you tried adding any flavors to the bread? cheese, olives, basil leaves, garlic etc??? How has it worked? Do you know any websites where I can get ideas for flavored breads, I haven’t found much on the internet.
I tried olives and the bread was wonderful. Onion bits also work, as do herbs.
I think experimenting is great; I don’t think you can go wrong.
Joanna
Thanks Joanna!
Hi hi!
I tried the recipe twice but it turned out chewy. First time round I splashed too much water thus I reduced it the second time. It still turn out too chewy.
Could you advice what have possibly gone wrong?
I used Bruggeman instant yeast. Do I have to put in water?
I live in Singapore and room temp is 34 degrees celsius, is our room temp too hot?
Thank you for this recipe- and photos. I love the title- it gave me the courage that I can do it!!
Hello from the netherlands..just mixed the dough – using spelt flour – and the dough is really wet 🙁 I used 300 ml of water. I it supposed to be slushy?
Hi Helen – no not slushy. I’ve never used spelt flour before, it’s very different from the all-purpose or bread flour we use. You might want to ask the authors of the cookbook – head over to http://www.artisanin5.com
I used all purpose flour and bread flour, now I prefer the bread flour.
hi jaden- i had tried this no knead bread before but was on the compact side, but this round it came out “picture perfect” as in yours, tastes wonderful. my one negative is the difficulty in slicing this bread as with other two tries. i have a very sharp serrated bread knife and find it hard too slice-i was thinking of taking it to one of the local pastry shop here in cyprus and asking if they would slice it for me on their bread slicing machine but they slice too thin for me. for my level of energy which is low it is almost a work-out for me, there is a website for maltese bread which is similar(a little oil and sugar) but i have not been able to reproduce-much more open grain and holes-since my visit to malta. thanks for the receipe and pictures. bill
Hi Bill – it’s difficult for me to slice too! Try borrowing an electric knife from someone if you can. You know, the ones we used to use for ham and turkey!? I haven’t tried it yet – but I bet it would make it easier!
This one from Amazon is only $20 – good price and good reviews! http://www.amazon.com/gp/product/B00004X12T/ref=as_li_ss_tl?ie=UTF8&camp=1789&creative=390957&creativeASIN=B00004X12T&linkCode=as2&tag=steakitc-20
I just pulled my first attempt out of the oven and it’s perfect! This will be a daily thing for me from now on. I’m a stay at home Dad always looking for fun stuff like this for my family. I’m going to make a BLT for lunch 🙂
Thank you!
Love this recipe and made it a couple times… thanks so much!
I started a batch yesterday and went to the ‘dump out on a floured surface step’ but there was a problem: there was basically a floating island of the yeast and flour across the top of the bowl, but when I scooped it up there was standing water beneath. It smelled quite “yeasty” as well. Just curious if anybody knows what I did? I waited too long… in my head I thought the wait time was 12 – 24 hours, and now I see it is 12 – 20. I’m usually pushing to jam it in the oven asap, but it was busy this weekend and that stuff waited at least 24 hours. Was that stuff fermenting in there?
Thanks for any education I can get :o)
Thanks! I made this bread while writing a paper and it worked great!
This is so Adorable!!! I love it…and I will be making!
followed it closely
used 1.5 cup water
it came out so wet i could not form it, stuck to everything.
baked it anyway and came out flat brick-like,
please advise
I did it and it WORKED! It is delicious. And I am not the greatest in the kitchen, so if I did it anyone can. LOVE this bread.
Jaden! I have loved all of your recipes that I have tried, however, this bread recipe turned into a big flop for me! Following the recipe to the T, the dough was so tacky after letting it rise that the bread dough stuck to my work surface, even with a heavy dusting of flour. I ended up adding at least another 1/2 cup. Even after that, the dough absorbed through the heavily floured towel and stuck to hit horribly. I finally got it in the oven on the parchment paper, but after baking, it was basically glued to the parchment paper. I admit bread has never been my foray and I was hoping so much that this recipe would change that, but after this experience, I guess I will retire my bread hat and go back to store bought 🙁
Hi! I found this recipe last night and decided to make this with my 5yo. We loved making it and I will say this about the bread itself: DELICIOUS!!! We tweaked the salt and yeast (we love salty bread!) and dressed it up with an egg wash + sesame seeds + more salt in the final baking phase (again, love salt! and kiddos love sesame seeds!) and the final product looked and tasted amazing — we couldn’t be happier! Thank you very much for sharing this recipe. 🙂
Valerie Angell
This was so easy and it is so yummy! I will definitely be making this on a regular basis! Thank you 🙂
You can also wet your hands with olive oil. and you can put the dough in regular bread pans or for a more interesting shape, clay flour pots.: I have made this recipe for over 30 years with my sons, it is really really great, you can make a large batch and freeze it to take it camping, and it also makes great pizza dough with more flour. great crust for sure.
I made this bread yesterday – it tasted great BUT the bread stuck to the parchment paper and I couldn’t remove it. My question is – how to I avoid it sticking to the paper as its a pain? Was it due to not enough flour coating the base? Can I oil the paper a little?
Otherwise it taste fantastic.
Jo
Spray your parchment paper with some cooking spray – that should prevent the sticking.
Could i just spray the oil in the bottom of the pan? Is the parchment paper required?
yes you can, but you might run into the problem of the dough sticking to the pot.
Dont want to waste any of my bread lol so ill use the parchment, thanks
Love this bread. I bought active dry yeast instead by a mistake so had to convert it a little bit. I ussualy double the recipe to make it easier it is about .75 tsp of active dry yeast for a doubled recipe. I use up to a cup of whole wheat and add a bit of extra water. I really love that this is bread in stages so i can do things like attend to the needs of my two active toddlers and still have fabulous bread. I just use the pot from my slow cook croc pot and another corning wear lid from one of my other dishes and it works out great. Thanks for the recipe!
Love your description of your son making this bread. I know how important those tattoos are in blackmailing! Love it, and am defenitely going to make this bread, and what better way to eat it, with lots of real butter!
Well…it’s official, a 4 year old is a better cook than I am
Hello!
This might be a silly question, but can the ‘combining of ingredients’ be done with one of those electric mix masters? 🙂
Yes, you can use a mixer to combine the ingredients, but a fork will do. I just made a batch yesterday.
Trust me, I rely on my mixer for many things, but you can save yourself the trouble by using a fork or even a danish dough whisk – I love these.
http://www.amazon.com/Danish-Dough-Hand-Whisk-Mixer/dp/B002U88RQY/ref=sr_1_1?ie=UTF8&qid=1393793083&sr=8-1&keywords=danish+dough+whisk
This sounds so easy, I just might attempt my first bread ever! However, I don’t own a covered pot that can go in the oven. I do have a large cast iron skillet, and a couple deep dish stoneware pieces, any suggestions for a lid?? Can I just cover with foil?
Thanks for sharing.
Go for it! Make a triple thickness foil.
angela,
did u try this in your cast iron skillet yet? I am in the same boat..and dont own a covered pot but do own a cast iron skillet ( which I have never used cause this is the first recipe I have gotten & am unfamiliar with how to use it) and want to know if the bread came out good in it.
My friend made this the other night and it was delish. Now, I want to make , but only have rapid rise yeast..wondering if it would come out as good?
can this no knead bread recipe be used also for making pizza?
Hi! For pizza there is a slightly different ratio of flour and water. Do a search for no knead pizza dough recipe and you’ll find so many!
Yes it can! I will be doing that tomorrow, making two pizzas with dough I start today, and then freezing them for Sunday and doing the final baking on Sunday (Saturday I will be busy all day).
I’ll bake the crust for about 10 minutes (until its firm but not brown), then putting on the toppings, then freeze it. They will transport better that way and be defrosted by the time they arrive at their destination, for a quick bake on site (another 10-15 minutes – we like our crust crisp, so I err on the side of overcooked rather than undercooked). Just like the bread, this recipe makes the best pizza crust ever as well. All that slow rising develops the flavor and texture — mmm.
awesome! at last a recipie for easy bread that actually works. Deeply appreciate you sharing this
I folLowed your recipe, let it sleep 12 hours, dumped it out and folded it up per the recipe, placed in a bowl with a tea towel and waited 2 hours and nothing happened…it never puffed up or rose?? I used Saf-Instant brand yeast. I am going to try again with regular yeast that I have to proof. I also had to add extra water, maybe a 1/4c to get it into a ball….any advise?????
If it doesn’t rise, then it’s either:
1) too cold (like freezing temperature) in your house
2) yeast is dead 🙁
MAke sure to use active dried yeast not breadmaker yeast.
Wow! Amazing sight of the bread, looks delicious. I regularly bake at home using my MEC pure clay pot and every time it’s just perfect. It’s never been dry; it’s always moist and tastes fantastic. I have been looking for this one for some time now and is definitely going in my recipe book. Oh the pure clay pots are definitely an added benefit to bake these breads. I got mine from mecware.US (online)
I just bought a Pullman Pan to make bread. Can I use this type of pan for this bread recipe.?
I am sooo anxious to try this bread. But there is a problem. Le Creuset told me that I cannot preheat an EMPTY dutch oven. Do you know please of some work-around? Could I place some water in the pan for the pre-heating? If I donT pre-heat the dutch oven, will the recipe still work?
I bought the pan specifically for this purpose, so it would be so disappointing if I couldn’t use it.
Thanks in advance for your kind advice.
Jean
Hi, Jean!
Not sure about suggestions for your pan, but can tell you that a cast iron Dutch Oven works like a charm every time!! :)). You can use it without worry for your bread and anything else you cook or may need for high temps.
Jmho, but all my loafs of this bread have turned out perfect every time using a cast iron Dutch Oven. I use the name brand “Lodge” in case your interested. Good luck!!
I just found your bread recipe while looking for no-knead bread. I had to tell you, I love your great sense of of humor- I was laughing while reading! particularly with regards to your adorable son and his tatoo! So cute, that he is in all the pictures making the dough! I will assume that if he can do it, so can I ! Thanks, I will continue to read you – Linda
I’ve made this recipe probably a dozen times over the last year or two and it always comes out great. I don’t use parchment paper. I mix the dough in a large pyrex bowl, let it rise in the same bowl, just fold the edges in to center with a wet spatula still in the same bowl, let it sit another couple of hours, then just dump it out of the bowl into a hot dutch oven. Always works perfectly. I’ve used a 3 qt. dutch oven and a 5 qt. Both work great.
Just made my first loaf — the parchment paper is sticking to it! What went wrong??
It shouldn’t stick – but next time you can spray a little cooking spray on the paper if you’d like. Perhaps the dough was a little too wet.
I don’t know if you know this, but this recipe makes the most fabulous pizza crust ever. 🙂
I have been making this bread for about a year and I love it. Everyone I share it with loves it too! Thanks so much for the wonderful directions and pictures. I just wanted to add that I sprinkle fine corn meal on the towel before I add the dough. It adds to the artisan flavor. I just pick up the dough after it rises and plop it in the pan. Always delicious.
If it sticks like crazy to the WELL-floured cloth while rising for the 2 hours before baking, does that mean the dough was too wet? It ended up pretty tasty, but flatter than I wanted, I’m guessing because I broke the rise when i ripped it off the cloth. Any other tips for getting a taller loaf (for a better middle-to-crust ratio)?
I find it much easier to just put the dough on 12×12 piece of parchment paper an lower it into the preheated 6qt cast iron pot it the oven. Put the top on and slide the rack back in and close the oven. Then wait the 30 min and enjoy the smell!
-jeff
I WANT THE LITTLE BOY, THE HECK WITH THE BREAD. JUST KIDDING OF COURSE, MINE IS RISING AS WE SPEAK. I ADDED CRAISINS AND WALNUTS.
Boys stay little and cute for a short while, but this bread will fill my home with joy forever. My favorite aroma therapy, bread baking once or twice a week.
My wife and I take turns making this bread, sometimes by adding different additional ingredients (i.e. chopped and sauteed onions, sun-dried tomato bits, nuts, etc) for an absolutely delicious bread. After many years of bread-making using various kneading methods, this recipe has virtually replaced them all. So easy, so good, so much fun to make!
Loviing this recipe! However, the handle of my le creuset brooke off. I would suggest not using it at that high of a heat.
*broke*
Give yourself a gift of Lodge pre-seasoned cast iron. Great pots at excellent price, and their coated models come with stainless steel knobs. Even the edge of the lid is coated and needs no seasoning. I use their pre-seasoned double cooker for this baking, and a coated Dutch oven when I make a larger loaf.
or go to Walmart and get a Tramontina enamel-coated cast iron dutch oven for $40.
This is hands down my favourite bread recipe ever. I have made many alterations over the course of baking it dozens of times so now I have a variation that I can call “my own” but when all else fails, I stick with your original and send all the credit your way. Thank you for this recipe! It’s gorgeous!
Wow My son tryed that it came out soo good
Joanna–I made this yesterday, and it keeps very well in a large freezer storage bag.
Hi, im baking my bread at night right now. The rrason why is because I have no time whatsoever tomorrow to bake it and I want to eat the bread for breakfast. Will the bread harden overnight? And if it will, whats a good tip to keep bread soft and chewy and not hard and rocky through out time? Thank you! ^ ^
Thank you for sharing this recipe, I’ve become a hero in my family’s eyes. It’s easy, effortless, and beautiful creations every time you use different pot. I just wanna say, hey I appreciate it and thank you soooooo much, bless ya.
I have been making this read for years now. I guess ever since it was “invented”.
I once made if for a large group, some with cheese some walnut and olives etc. etc.
Everyone loved it. IN fact a visiting Pastor wanted me to make it for him. He wanted to pay me $6.00 a loaf. Although I was flattered that everyone loved it so much I passed on making it for a fee.
Tomorrow is Sunday and having a fresh loaf of bread ready to go in the oven on a nice chilly morning is heavenly… Pass the fresh strawberry jam…
Hi,How can you add cheese if it has to raise, like, 20 hours? The cheese will start to go bad. Please let me know how you did it because I am very interested in trying this bread with cheese.
Thank you!
I’m trying two loaves of this at once. Since we’ve moved to a northern community it’s hard to get a good crusty bread. I’m making one just as the recipe suggested and the other with a couple of tablespoons or carroway seeds added in. We’ll see how it turns out. 🙂
The bread was So easy to make! My boyfriend was like “it’s so hard to make a good French bread” and I was like “pffff” … I made this bread and he’s been kissing my feet ever since. Thank you so much!
Wondering… can you make something like this with sourdough starter?? I would love to combine sourdough with the no-knead idea…
Rachel, try this, I have made his read many times and it comes out fantastic.
Bread is very forgiving I have come to learn and if you want this plain white all purpsoe flour you can do that also. Enjoy…
http://www.breadtopia.com/sourdough-no-knead-method/
Any chance of British/European quantities (ounces/grams) please?
Wow! Those kids are going to become chefs! Wish I could get MY kids interested in baking. Would save me a lot of work! Good show!
I LOVE artisan bread but sometimes I like a high-rise bread that looks more like a store-bought loaf, so I’m wondering if I can just use a small diameter tall pan and get a higher risen bread? Sounds like it might work. I’ll have to try it and see.
I sometimes want a sandwich loaf, or a loaf that a whole slice fits into the toaster without needing to be cut in half. I use this same recipe only I bake it in a regular loaf pan, and it turns out perfect. A softer crust but the same great texture.
Love this bread! For a church project we would love to make lots of loaves and only pre bake them to freeze. Then we would finish the baking so we could give warm loaves as gifts to visitors. Anyone know of a way to do ths?
Thank you for this one! I loved it, so did the crew! I’ve never been successful making bread, unless grandma is right there with me 🙂 thank you!
i’ve made this a milion times. For those looking for a way to update the recipe, I often add a whole grain mix from King Arthur Flour to the mix. You have to increase the yeast to 1 TBS to offset all the heavy seeds and grains, but it is so delish! Give it a try! I bake mine in a stoneware covered casserole and it’s perfect. For the first rise, I put it on a piece of parchment in a oval pan. Then after it rises, and I’ve preheated my stoneware, I put the dough, parchment and all in the stoneware and bake it. Bake it for 30 mins. Take the top off, brush with butter, and bake 30 minutes more. Easy and sooooo yummy!
Hi. I do not have a cast iron pot but I do have the glass Pyrex brand pans. Will this work? Can I cover it with aluminum foil? It has a plastic cover so I won’t be able to use that while baking. I would love to get the dough ready tonight so I can make fresh bread for the family. Thank you for this recipe!
Hi Michelle – you can certainly give it a try! It won’t be the same of course, but you’ll still be able to make a good loaf of bread.
So i’m an adventurous male that recently discovered the joys of cooking with enameled cast iron and while Googling around came across this post and tried it! Disclaimer…this is my first time EVER trying to bake bread so I am a total newbie to this.
I am currently about 15 hours into letting the dough rise. I followed the instructions to the T but have to say my dough was more liquidy than expected. If I were to pour it out of the bowl I’m sure it wouldn’t be a lump of dough but would instead run (albeit slowly) over the counter-top. I used all purpose white flower and accidentally used Active Dry Yeast instead of the instant stuff but compensated accordingly based off of other blogs. Can anyone help me out? Where did I go wrong? I’m a total rookie at this so any help would be appreciated! Thanks!
Don’t give up! If you think it’s a little too liquidy, sprinkle a couple tablespoons of flour and mix very gently. But trust that the bread will work – use the Force, Mike!
🙂
Thanks! Will it still work if it is a little liquidy? I’d be scared of messing up the dough if I tried to put more flour in…should have done that prior to letting it set.
It will be fine 🙂 send me a pic of you want! Mail@steamykitchen.com
I just made this with gluten free flour…(made a few modifications suggested on the flour mix I had) WOW! This will be a regular in my house! Texture is perfect.
That’s awesome! What kind of GF flour did you use? Do you think Bob’s GF all purpose flour would work?
I’ve used Bob’s GF all purpose flour – works great!
You made it GF?????? *SQUEE!!!*. What modifications did you make (if any at all)? I wanted to make some for the farm this afternoon to bake tomorrow. :). And what is your preferred yeast brand?
I have made this bread several times, and it is WONDERFUL! My kids help and absolutely love it. Thank you so much for the great post, I love how you included tips, pictures, and such a great story 🙂 My family thanks you!
Just tried this and while I love this recipe, I would add more salt. 1 tsp was too less.
I made this bread today. I started it before bed last night and baked it this morning. It turned out great but it doesn’t look half as nice as yours. 🙂 Thanks for the recipe, I will be using it a lot!
hey there! I wanted to ask, do you think i could do it without getting a covered pot? like how would it turn out if i just did it the usual way of dumping it in a loaf pan?
loved the way you wrote the post btw! 😀
That is an awesome story to tell him when he’s grown!! What acute and love your recipe.
OMGoodness, it was capital D delish! Don’t think I will buy bread again…My bread didn’t rise much on the second rise, but it was outstanding nonetheless.
Sorry, was typing too fast as always…. Ment to say, “why mess with what, “I” would call “absolute perfection”!! 🙂
Just adore your site by the way, I don’t follow many foodie sites, but find we are similar in our tastes and love of food!! Great job, may you continue to have much success!!
Tracey
Just a little note: I did try this in a loaf tin and it came out great!
Does anyone know of any “spins” on this recipe, like adding herbs etc? Any suggestions?
Oroboros…….
“I” (just my humble little opinion lol), but why mess with what, I would absolute perfection!! :). Though, I’m sure you could.
Best of luck if you give this a whirl!
Tracey
For Pete’s sake, update this recipe! I am an experienced bread baker and know better, but am a rules girl, so yeah — I put this sticky mass of dough on parchment. When it came time to invert into the LeCruset, half the dough stayed with the parchment, the rise was destroyed. A greased bowl is fine–if you know better, follow your instinct, not directions……..
I’m sorry that your experience with this method did not work for you. But, it seems whether cloth or parchment it works out wonderfully for a lot of us.
Perhaps you are right with sticking to your experienced ways.
I just want to say, “thank you” to this blogger for taking the time to post this recipe and the beautiful photos that were attached. Since I am one of many that this has worked for time and time again, I will continue to bake this absolute delightful bread. 🙂
…whereas I wish I’d read this comment first. I just destroyed my ball of dough trying to scrape it off of the parchment paper. :-/ Came back here to see if I read the recipe wrong and was supposed to flour that as well. I’ve never had anything stick to parchment the way this did.
Hoping all is still well – the bread *smells* amazing!
Actually, the recipe does not say to invert the dough to get it into the dutch oven after rising if using parchment paper. It says to lift the bread with the parchment paper and put it all in to the pot together. Fantastic method – no sticking!! I actually cut out a circle the size of my dutch oven and then use a long rectangle as a “sling” – I put the sling then the round into the bowl I will use for rising before placing the dough in it. After rising, I simply use the sling to lift it all out of the rising bowl and plop it into the hot dutch oven. Sometimes I will make a few cuts in the top of the risen dough – it makes it rise a bit more in the oven and looks nice, too.
The only downside I see to this bread is that it is so delicious I eat too much of it!!!
If using parchment paper, DON’T invert, just lift and transfer, paper and all, into cooking pot. Only invert if using floured towel, and yes, I imagine that can be very tricky. It’s good to follow rules, but you have to read them accurately. I’m not being snarky, I made the same mistake myself the first time I tried this recipe. Just be sure you use a big enough piece of parchment paper that you can lift it out of the rising bowl by the ends.
No parchment paper is necessary. You just place the dough in the pre-heated pan. It doesn’t stick! (really, it doesn’t!)
I second that — no parchment is needed. But IF you do use parchment, lift the bread (parchment and all) and set it in your preheated dish. Leave it on the parchment. Bake the bread with the parchment under it. You can then use the parchment to lift it out of the dish after baking and the bread will come off the parchment easily, no sticking.
This recipe produced AWESOME bread, love it, so easy even I could cook like a 4 year old!
Try making small inserts into the dough before baking and adding garlic slivers and kalamata olives. I like both together or separate. Bon appetite!
Jo
I’ve heard of people mixing in olives, herbs, cheese and nuts – with great results!
Hi Erin,
Try again! I just made this for the first time today, I bought Lodge parchment from Amazon. just enter “Lodge Parchement” in search. I got in two days. After the dough has rested or slept for the 12 to 18 hours, I did 12 hrs. The dough has the tiny pin hole bubbles on the surface, I floured the counter and plopped out the dough onto counter using a fork to pull dough from edges, floured my hands, then started from the edge of the blob and folded over to center then again adding flour so my hands did not stick. Mind you Im a novice at this! I put alittle flour into the center of my parchment that I had put in a big bowl, ( the Parchment is round in shape and will fit any Cast Iron Dutch Oven, I used a 5 QT. Lodge Dutch Oven ( this was my choose of vessel to cook the bread in) and put the piece of parchment in pot before I pre-heated it and cut the parchment to fit this size of pot, the parchment is a one size fits all so Its pretty big, I had trimed the excess from around the top then I followed rest of directions. Put your loaf in parchment in bowl, Let rest for another 2 hours covered with cotton towel covering. I pre-heated the oven with the pot in the oven.
As Iam now ready to place the entire parchment and loaf, I pick it up and place it in the hot dutch oven that has been pre-heating, cover with lid and place in oven for 30 minutes. Then take the lid off to finish browning the loaf. 20 mins. more. Perfect!
What about using a loaf tin? Would this work, and if it absolutely needs to be covered use some aluminum foil?
I get the same as Erin. I think I was using parchment paper ( I am Brasilian, I´m not sure that your´s parchment paper is “papel manteiga”.)
See:
https://plus.google.com/103773258864007846871/posts/Yt3E7m323gz
To be clear, the RECIPE was not the failure – YOU were the failure b/c you did not follow the recipe correctly. Wax paper is horrible to use for. Try again.
this looks like great bread for a bread bowl. is it possible to divide that into two or three smaller loaves?
Awesome pics!! Such a little cutie of a helper you have, hope hes still your willing/cheap labor assistant!! lol
Sharma, I have been making this bread for a few years now and have found (this is just imho) that its best to just use two bowls. Perfect bread E.V.E.R.Y. time if “directions” are followed. 😉
You explained how to make this bread perfectly!! Bravo!!
Hi this looks wonderful, and easy to do,…I just wondered if I double the ingredients to make a bigger loaf will this effect the process in any way? Thanks again for the recipe xxx
I love this bread, works every time. I just tried it using all whole wheat pastry flour and almost 1/2 a teaspoon of yeast. It was, obviously, a little dense, but not as dense as I thought, I think with a little more yeast, the whole wheat pastry flour would turn out pretty well.
This is the greatest recipe ever , I have been baking this bread every week for about six months now , here’s a time saver that I adapted successfully to this.
Mix dough ,wait 18 hrs , turn onto floured surface , then I put it directly into a well seasoned cast aluminum pot that has been greased with coconut oil , put lid on pot , let rise two hours and put into 425 degree oven (60 minutes for a double sized loaf) .
This method works for me every time and never sticks , it eliminates the use of cornmeal or bran which I found very messy , and saves using the towel or burning yourself while trying to flip the soft dough into a super hot pan.
I make a double loaf once a week and it lasts all week for my wife and I , it is the greatest bread ever , I have two matching pots so I often do two loaves and give one away to friends , they all love it !
lovely… this bread has loveall over. your boy sure is lucky to have a mom like u
This recipe is so good you have to watch out not to overdose on carbs!
In 33 years I’ve never managed to make a successful loaf of bread – until now! It’s amazing, thank you for sharing the recipe. It’s so easy, my 2 year old so helped with it (sort of) and it’s so lovely. I only had one problem with it – it was so nice most of the loaf was devoured in 10 minutes!
I’m going to try using roofing paper, and also will flour my oven inside and out. I expect…a great mess.
Still laughing at your comments, Sarvi! 🙂
And I still don’t get the fuss over sticky dough. Yes the dough is sticky. I’ve perfected a technique for getting it out of the mixing bowl onto the floured bread board, and then from the board into my Pyrex casserole. It’s called wetting my hands with cold water (per the original instructions) and using my fingertips gently, lightly, and quickly.
I tip the bowl, leaning the edge on the cutting board next to the floured area, then as the dough starts to slide out of the bowl, I quickly and lightly use my wet fingers to scrape the dough away from the bowl. This whole process takes about 10 seconds at most. Maybe a little dough sticks to my fingers. I rinse it off.
Now I have this wet blob on my cutting board. Making sure my hands are sufficiently wet, I pick up an edge of the dough and stretch it over the blob. I repeat this three more times, pulling up from four different “sides” of the dough. Quickly, quickly. Then I turn it over, quickly, quickly, using the fingertips. The idea is to touch it as little as possible.
You are in control! Don’t be fussy, just do it fast. Very little mess. Then I cover it with the same piece of plastic wrap that was over the bowl while rising. Just lay it gently on top and push the edges gently around the dough. Let it rise, preheat the oven and the baking dish with cover.
When the dough has risen and the oven and baking dish are preheated, I carefully take the dish out of the oven, remove the lid, and set it on the bread board next to the dough. I take off the plastic wrap, wet my hands yet again, and quickly, gently pull up on the edges of the dough all the way around. Fast! you must be fast! Then in one fell swoop scoop up the dough with fairy fingers, lightly and lightening fast, and plop the dough into the bowl. Don’t hesitate, don’t fuss, be bold and confident. It may be lopsided, lumpy, or otherwise unsightly, it really doesn’t matter.
The point, in my mind, of not flouring things any more than absolutely necessary AND of wetting your hands, not oiling or flouring, is that it’s the high moisture content that makes this bread so delightful. I’m also convinced that “baking like a fairy”, moving quickly, confidently, and having the mindset of “I’m touching this dough but only for milliseconds” is what makes it work.
Use parchment if you must, but fairy bread baking works for me. Love the process, love the bread, love life with homemade bread!
Oops, was typing too fast and “sent” before proofreading. I set the casserole next to the dough, not the lid, and plop the dough into the casserole, not the bowl.
Wax paper vs parchment paper vs rolling paper vs construction paper vs whatever other paper you’re trying to use: use parchment paper (google [parchment paper baking] if you don’t know what the box looks like). Don’t use other papers. The whole point of the parchment paper is that it doesn’t matter if the dough sticks to it like crazy. You are using it as a sling to transfer from bowl to pot. After 45 min in a 450 oven, there will be nothing sticky. You can then use the parchment paper to lift the bread out. Clean pot, voila. You can oil/butter/flour everything to hell and back if you want to make a mess for no earthly reason or if you are superstitious. Why not flour the outside of your oven, while you’re pointlessly flouring things? Might want to sprinkle some fairy dust in there too. Joking! Just use parchment paper, life will be good. Enjoy your bread!
I love no-knead bread, have made it many times, but now that I’m living at 4400 feet, I’m finding that the altitude does terrible things to my bread dough. No suggestions I have yet encountered within the past year have allowed me to produce a decent boule or loaf. Hat tip to that little bread-making cutie though. 🙂
I’m making this for the second time as I’m writing this. This recipe is so easy – even a guy like me can make it. Perfect as written – I did flour my parchment paper – just makes it easier! Also made some homemade butter to go with this! Yah baby!
I have made this bread many times. My pot is an old cast-iron dutch oven. I preheat and when I’m ready to put the dough in pot I lightly oil and put the dough in immediately. Cover and return to oven. Bread never sticks.
Yummm! Thank you!
The bread is the best ever. And I make all our bread two times a week. Saying good bye to kneading 🙂
Instead of paper I used a Teflon cooking mat. Works well
Don’t you think it would have been smart of you to try again, Erin, before writing this note? I have heard from so many people how easy this bread is to make and how good it tastes. For me it turned out great the first time. You must have made some mistake or used the wrong paper or pot to end up with failure. Don’t give up that easily, give it another try and you will likely succeed.
Does this work using gluten-free flour?
Since you burned your pot, the recipe and instructions must be bad.
This bread is BEAUTIFUL! I didn’t have a dutch oven, but I did use my tall soup pot it worked great! I did unscrew the handle and flipped the lid inside out to get it off easier. I just rubbed some olive oil on the bottom with a paper towel to be on the safe side so it wouldn’t stick. I don’t think this bread is going to last past dinner!
My guess would be since it was sitting for a while the “seasoning” was gone from it. Try seasoning it first. I do believe seasoning is rubbing vegetable oil and heating it on your highest setting. I know there are tutorials. My grandma showed me once but how she did it is really fuzzy.
Oh boy this looks great!!! Going to go for it as I am a HEAVY BREAD addict.
If you don’t have a dutch oven style pot, I use the pot from my crockpot. Heat oven, stick pot in for a half hour, plop dough in and cover it with foil for the first 30 minutes and remove for 15. I’ve done this countless times and they come out delicious each time. I’ve added whole garlic cloves and cheddar cheese, parmesan cheese and oregano, orange zest and dried cranberries..the possibilities are endless 😀
I was so excited to try this. I don’t have a Le Crueset so I was going to use a cast iron pot that has been sitting in the cupboard forever. It started smoking an INSANE amount and I had to turn the oven off — first attempt at the bread is therefore a giant fail 🙁 I guess I just need to get a different type of pot.
You don’t need to remove it from the parchment paper before baking–just put it right in the pot on the paper. Parchment paper is used in baking so you don’t have to grease your pans. Just plop it in the bottom of the pan on the paper and you should be fine.
I do mine on a floured plastic grocery bag in my bowl so the dough doesn’t stick and when I’m ready to remove it I get my hands wet and turn the dough upside down in my hands and pull the bag away from the dough. Then I just plop it in the pan and shake a little to center it. Works every time and I make 3 or 4 loaves a week.
Wspanialy chleb. Mozna dodac mak albo cebule albo sezamki. Palce lizac!
I do flour the parchment a bit but the main thing is – PUT THE DOUGH IN THE POT WITH THE PARCHMENT!
It will come off easily once baked.
Also it allows you to handle the dough more easily.
I did everything exactly as it is written, but like Erin, the dough stuck to the parchment paper when trying to put it in the heated pot. It lost all its shape and went in the pot flat and messy. Did I do something wrong? I looked at other sites and they said to well flour the dough after shaping and tucking, but this recipe says not to do that, and to use only water. I feel like the water was the culprit. I hope someone replies and shares a solution.
Hi jaden…I wonder if I can make this into bread rolls and let it rise in like muffin pans? Or can I make it into a log and let it come out like mini baguettes?
Thanks
Chit
I went to my local Winco and in the ‘Bins’ got bread flour and instant yeast and have had great results with all the loafs I’ve made. I’m pretty sure there is one in you area and they should have both white and wheat flour. Great way to save some money on your supplies 🙂
.. wiesz, powiem ci, że to jest poezja… poznałem ten przepis kilka lat temu, robiłem ten chleb kilkanaście razy i zawsze mi wyszedł .. dzięki za ten przepis.. polecałem go wszystkim moim znajomym a dostałem go od mojego brata.. robiłem różne mieszanki ze słonecznikiem, z orzechami włoskimi nawet z otrębami.. ale dopiero dzisiaj przeczytałem co na samym końcu i to jest piękne… zrobić chleb wspólnie i cieszyć się razem.. chyba nikt w życiu nie doceni coś piękniejszego jak sobie sam nie upiecze chleba… pozdrawiam…
So I just made this recipe and it was a complete and utter failure. I got to the last step where you take the dough out of the bowl to place in the baking pot, and the dough was completely stuck to the wax paper in the bowl. I thought wax paper would work just as well as parchment paper, but apparently not. When trying to remove the dough from the paper, the paper just started disintegrating into the dough. It could not be recovered so the whole thing went into the trash.
well for my first time baking bread this was the easisest to make and the tastiest I must say Im going to continue making this bread. it can out awsome.
This clever presentation made me WANT to give this a try, had some time, so made two bowls, used tow different “pots” to bake and, excellent results. Now that the ice has been broken with artisan bread, I think my bread machine and I are going to have to break up.
Yummm!!!
Made this bread with my son. We wondered how it would turn out… we were thinking failure, but it was EXCELLENT!!! A fun, easy artisan bread, that we will make over and over. Thank you!
Devin & Easton
I did. It burnt the pot. Not recommended.
Very cool, thanks for sharing!
Have you ever oiled the pan before baking? If so, how did that work out?
This was absolutely delicious… thanks so much. This was my first time making any type of bread. I’ll be making more.
Finish baking my first loaf of this recipe today – came out perfectly!Thank you so much!
Question! After the 12 hours my dough rises a lot, but after I do the folding, it flattens (even though I am being gentle). In the end the bread tastes good and it does rise but nIs the folding phase required? Or can I just transfer my dough to the preheated pan without folding it? Thanks for your help!
I will buy a pot tomorrow – just for your recipe, and bake this bread with my 13 year old daughter; for 2 reasons:
-I love the smell and taste of fresh baked bread,
-And I loved the way you wrote how you baked it with your son, and especially the story of how he ate it the first time you baked it with him – I could almost see the little toes wiggling. As a mother of 3 who is absolutely addicted to her kids, I thank you for sharing such a sweet story 🙂
I baked mine in a Le Creuset casserole as well, but I unscrewed the knob because of the 400 deg issue. It was a little challenging to remove the hot lid without the knob, but pot holders on both hands worked fine. @Laura, your knob may have popped because your oven is slightly different in temperature. If it runs hot, it may be too much, where someone else’s runs a little cool and can survive.
My husband couldn’t believe that I made a perfect bakery style loaf. “Really?”
When the bread is on the floured surface, are you tucking the edges up towards the middle facing you (what I did) or down towards the floured surface? Then, when you transfer the bread to the “napping pot,” do you put it with the smooth surface facing up, or the more uneven surface with all the edges from the tucking facing up?
Please note that my LC knob popped at 450. So 450F is not safe unless you have Stainless Steel
Thanks, this was delicious! Can the dough be cut into dinner rolls? How should I adjust the baking time?
Everyone a Dutch oven works perfectly for this bread! Get one at Walmart for $35, just the basic cast iron one made by the Lodge Company always Made in the USA hooray! Makes an absolutely perfect loaf, when cooled somewhat I dump it out, peel off the parchment paper and put it right back in the pot. With the lid on it keeps perfectly for the 48 hours max it takes this family to scarf it down.
I use a Pyrex casserole with a Pyrex lid to bake my bread. One of my very few less than exceptional results I’ve gotten when making this bread is when I forgot to preheat the baking dish and lid. The result was that the bread stuck to the dish horribly.
I flour a cutting board and let the dough rise on that, covered with a piece of plastic. When it is time to move it into the preheated dish, I wet my hands as recommended. It’s stickier when I flour them, and I also like how moist the finished bread is.
When it’s time to put the bread in the bowl, I don’t use parchment. I work my wet fingers around the edge of the dough until I can lift it off the board. At this point I move very quickly. I lift the dough and plop it into the dish as fast as I can so I don’t either lose my grip or end up with it sticking to my hands.
“Plopping” means that it’s sloppy but it evens out a bit in the baking process. Any “wonkiness” gives it character, as Jade says. And nothing detracts from the deliciousness of the result.
I also usually just tip the bowl and the baked bread slides on out. Occasionally I have to loosen up a place where it stuck with a bread knife. And rarely does more than half a load make it to “completely cooled”, so forget about all that “cool completely before you slice” that so many bread recipes include as sage advice. It can be carefully sliced with a sharp bread knife while still warm. 🙂 At last I’m a successful bread maker every time!
Hi Miri- When I move the dough, some of the trapped gas does escape, so yes, but not much.
Yes, bake with parchment.
Yes, it will rise in the oven.
You cannot let it rise in the Le Creuset pot – the pot needs to preheat in the oven.
I let dough rise in a bowl, not in the pot that Im baking in
If the dough rises in the pot then how do you warm your pot for the half hour before baking?
Yes to parchment being left in the pot. It comes off easily after baking.
When you move the dough into the le Creuset does it go flat ? Do you bake it with the parchment paper? If the dough goes flat will it rise up when baking? Why not let it raise in the Le creuset and than bake it? I use a cast iron skillet and let the dough raise in there because when i move the dough it goes down being so fluffy and delicate. Please advice, thanks
Thanks for the recipe and it tasted good, but I didn’t understand the bit about ‘it will double in size’ after folding, shaping into a ball and putting on parchment. It’s already been left 12 hours or more, so why would folding it make it double in size? Mine certainly didn’t double in size on the parchment. Or do you mean it will double in size between the very start when the dough is first mixed and when it goes in the oven?
I do agree with all the ideas you have introduced to your post.
They’re really convincing and will definitely work. Nonetheless, the posts are too quick for novices. Could you please prolong them a little from next time? Thank you for the post.
I have made this three times now. I could not find “Instant Yeast”. What brand is it? Tried the Red Star Active Yeast and twice it made a nice dense crusty rustic bread. I did try the Fleishchmanns’s Rapid Rise (exp Sep 04 13) which in 2 stores that is all they had, and it did not rise as much as the Red Star. We live near Sea Level in the Palm Desert, CA area. Should I add more yeast, which one, and is there anything else I can do to help it rise more to give us a less dense loaf? Thanks! (P.S. NOT a baker so this is my 1st try baking bread).
Also using Bob’s Red Mill Organically Grown & Certified unbormated Unbleached White Flour which says Superb for Bread Baking by Hand or Machine on the label)
Hi Jillian
Yes 375 grams is equal to 375 mls approx
Sorry if it seemed a bit confusing
Regards
TonyB
Hi thanks for this Tony
406 grams of flour and ? 375 grams of water not mls? Never thought of weighing water always measure by volume that’s why American recipes always seem difficult.
Thanks. Jillian
Hi Jillian
I too am from the UK side of the pond, I usually use cup measures for US recipes, but this evening I weighed the flour and water,
The weights are as follows
406 grams of flour
375 grams flour
I hope this helps
If you would like to let me know how this recipe turns out for
you I would be interested to hear from you on my website email address tonysfoodblog.mail.com
Regards Tony B
Hi do you have this wonderful bread recipe with grams as I am unsure of weights we don’t use cups in England so hope you can help I would hate to make a mess of it.
Thanks. Jill
I have made this bread twice now, it is great so easy to do. I do have one question tho – I would like to make this bread out at the lake in the summer and don’t have a oven. Can it be done on a BBQ? If it can what temp would you keep the BBQ on – or would you do it on indirect heat (one side on – put the bread on the side that is off). Has anyone tried this? It would be great to make my own bread out there. Thanks
what can I say.? I have been trying for years off and on to make bread as good as the baker my mother used to send me to for his perfect., still slightly warm bread, she is now gone bless her as is the bakery but the desire for those shared moments has lingered… Just a crusty shard like crust as you cut into it and aereted perfect bread beneath, if you haven’t tried this recipie you must! Thank you, I never knew whether it was my kneeding, my mixture, my yeast or my oven… If like me, you wonder about no sugar, put your doubts aside, it just works!
I find it keeps up to a week but is by far the best on day 1. After that the crust is a little less crunchy.
Hi how long would this bread keep?
Thanks, Em.
my first loaf is in the oven. smells heavenly (i added some fresh chopped rosemary) the nap was strange, i wasnt sure what to cover it with, so i floured the bowl it slept in overnight and flipped it upside down over the napping loaf. it didnt rise, at all. but what the heck, i threw it in the crock pot insert and covered it with a glass lid and popped it in the oven anyways. i pretty much love ALL bread, so even if it isn’t as rustically beautiful as yours, i’m sure it will taste divine. thanks for the recipe, my 4yo will be trying it this weekend.
I love this bread! The very first time I made it was the first time I have ever made bread successfully! (and I have a bread machine! 😛 ) Mine did not rise much- I used active dry yeast. It was still about 4 inches high and beautiful. Delicious and easy. The ceramic coated cast iron pot was the way to go- I never would have thought of making bread in it. Thanks so much for sharing! Your sons are gorgeous.
wow! I try to always make my bread at home,this recipe amazed me,and the bread I made with this,made me jumping ups and down and dancing with song that the bread singing..thanks a lot a lot for sharing this..
I made this recipe last weekend and it turned out great!
Parchment works beautifully – never a sticky moment and the pot cleans up in no time.
Hey!!
I followed the directions and the recipe- all went fantastically!
Until I came to get it out of my pot – it was so stuck I had to pull it apart to get it out.
It tasted amazing but half of it was left in the pot and I had to soak it overnight to get the rest of the bread out!!
Help! What did I do wrong or what can I do to stop this happening again?
I tried making a couple loaves, and I think it was all purpose flour…they are sitting on the warm stove and didn’t rise a bit. I tested the water with a thermometer and did everything else…will they still be worth baking?
Lol I can’t believe a post about making bread made me cry! That story about your son enjoying the bread was super sweet and I can totally relate! Can’t wait to try this 🙂
OH YES, ALL PURPOSE FLOUR PRODUCES A BEAUTIFUL,ALTHOUGH SMALL (8″ ROUND AND 3″ TALL) LOAF, WITH A VERY NICE CRISPY CRUST AND LIGHT BUBBLEY INSIDE. LAST TIME I USED A FULL TEASPOON OF YEAST AND THE RESULT WAS THE SAME AS THE 1/4 TEASPOON VERSION.
Will this recipe work with all purpose flour or is there a modification required ?
MADE MY FIRST LOAF……..IT IS BEAUTIFUL AND DELICIOUS! HOWEVER, I THINK THE CRUST IS TOO CHRUNCHY FOR ANYONE WITH DENTURES! MAYBE AFTER IT COOLS SOME MORE….. I USED ALL-PURPOSE FLOUR AND IT HARDLY ROSE AT ALL; NOT NEARLY DOUBLE IN SIZE. SHOULD I DOUBLE OR TRIPLE THE YEAST? THANKS FOR THE KEEPER RECEIPE! WE EXPECT TO START ANOTHER LOAF THIS AFTERNOON.
HEY BRIAN!,
Hello Sarah how did it turn out for you, at this moment I have mine in the oven to cook. Will be nice to hear from you.Thank You. Bryan Mcnamara
did you cover the bread when you made it with the cookie sheet? since in directions it does state to leave the top on for 30 minutes. thanks
Bread looks great, I’m going to give it a try, but a couple of questions: I only have one of those big oval roasting pans with a cover, can I use that to bake the bread or is it too big and then the bread will spread out and not hold it’s shape? Cxn I double the recipe and bake two in that same roasting pan?
I suggest baking it in the pan, single recipe first – yes, it will spread out a bit, but it will also rise.
The red wine vinegar will help it rise? I’m from india and can’t find the any kind of yeast in stores. I tried making this with curd but in vain. We do have the vinegar you mentioned though. Are there any other ways to substitute yeast?
I have made this bread twice without modifications. I see from the comments there are some very imaginative bakers who tried some additions.I think I will try s few of them. Also please tell me if anyone has frozen the bread and reheated it. Does it still come out OK.
Whole wheat flour doesn’t have as much gluten, so it’s a lot harder to bake with. My solutions:
autolyse – mix the flour with the water before you add the yeast. Let it sit for at least 20 minutes.
slower rise – use less yeast and let the dough rise overnight in your fridge.
wetter is better – you want to dough to be as wet as possible while still maintaining it’s shape. This promotes those nice big, uneven bubbles.
I am in colorado. I followed every step but the dought did not rise at all. Do I need to do something different in the altitude?
Hi…will this bread recipe be good also if I shape them into small hard rolls? Thanks! Been looking for a good no knead recipe for hard rolls.
Hi, I’m Sonia, italian foodblogger sorry for my bad english, I want tell you that I have included the link of this recipe (which I liked very much) in the section on my blog dedicated to “10 ways to make” (“10 Modi di fare”) aromatic bread.
http://www.oggipanesalamedomani.it/2012/03/26/filoncini-al-cioccolato/
I hope not to bother you, have a nice day
Sonia
I bake it in the pot with the parchment. The paper comes out a bit burnt but no fire and not dangerous.
Do you bake it in the pot with the parchment paper? The parchment paper I have says not to go above 420 degrees but the recipe calls for 450 degrees. I don’t want to start a fire!
Looks Delicious!
To hobbiehobbie: Just bake it.It will be fine.
StumbledUpon this recipe and was inspired enough to finally conquer my fear of bread baking. I pulled my loaf out of the oven and couldn’t wait longer than maybe 10 minutes before tasting it. The crust is fantastic. The insides are amazing.
Thank you so much for this!
Oh my, I was so excited to try this recipe….but my dough seemed to have risen more than I expected after the first “nap” and not at all after the second “nap”….
Any suggestions?
I’ve used a few of your our recipes so far, all have been great. You also have a wonderful way with words. Keep it up! I love to read them.
what a wonderful story!!! what an adorable little boy you have 🙂 the whole thing is well written. i will be trying this recipe in the coming days as i live in france and even through i’m a graduate of ducasse ensp academy and a graduate of the cordon bleu, it’s kind of hard to bake in a tiny little kitchen and french bread always involves a massive headache 🙂
my mom loves bread with poppy seeds so i’m going to give it a go.
thank you for the humor..
Thank you for this! I have made it for every big holiday meal and my family thinks I am a baking god – but it’s all because of you 🙂
For my altitude – I needed 1/4 cup more flour – so I substituted with 1/4 cup grated parmesian cheese – same water, salt, yeast – plus the 1 tsp red wine vinegar to speed things up – let rise 4 hours – after I put it in the pan i sprinkle with same parmesian – MMMMmmmmmm good!!
Thank you for this great recipe. I am already on my second bath this weekend–the first was gobbled up in less than 24 hours. Delicious!
I roasted a garlic and put cut up pieces of it in the dough. Truly heavenly. Great recipe!!
Don’t take it off the parchment – bake it with the parchment. The paper will come off easily after baking. Also, as mentioned above, the paper provides “handles” for lifting the dough out of the napping bowl and placing it in the pot.
A little bit of flour on the parchment works well, too.
My bread sticks to the parchment paper after it’s nap. I don’t want to waste any dough. Could I flour the parchment paper to keep it from sticking?
Want to make a whole wheat loaf…. do I need to add more water or yeast?
Jaden, Thank you so much for this awesome recipe along with the adorable photos and story about your son. I made this bread for the first time today for Xmas and it was great. I used active dry yeast from a packet. And after the initial long nap I dumped it onto floured parchment paper and then put the whole thing in a high bowl to nap the second time. Instead of dumping into the pan I lifted the parchment paper with dough right from the bowl into the pot. Only one sheet of paper used and ZERO cleanup. Since I didn’t dump it over into the pan it stayed a perfect round ball. And all I had was an old stainless pasta pot that I used with a glass lid that didnt even go with it. After it was cooked I lifted the parchment paper and bread right onto a rack to cool. It was the most gorgeous round loaf ever! My friend and I were giddy and could barely wait 5 minutes before tearing into it and slathering it with butter. I will be making this weekly and trying all kinds of variations. Thanks again!!
Well, to the person who said that kneading bread is so good & a great thing to do, well, I agree! 39 months ago, I was in a crash that ripped the cartiledge & tore the tendons between my ribs – So I can’t knead bread! Was really wanting to bake bread & felt so frustrated. A friend of mine told me about No Knead Bread & I have made 2 loaves in two days! Love it with Kerry Gold! And I just recommended No Knead Bread to a friend who has torn his shoulder and loves to bake! This is wonderful!
can i bake this without a pot–shape it into a loaf and bake on a cookie sheet?
Yes you can – the bread will be flatter and you might not get the same crisp crust, but the bread will turn out amazingly tasty.
Thank you again for this recipe! I made it once years ago and then lost track of it and was reminded of it today, just in time to bring to a Christmas party! And thank you also for the parchment paper trick because I went out and bought a cast-iron dutch oven just so I could make this!
Yes, you can. Enjoy!
This tastes really well with wine!
lifting it up with the parchment paper and lowering it in the pan with that paperis exactly what I am doing because it sticks too much to the paper, trying to get it into a hot pan without th epaper is just too difficult and dangerous
Very Nice recipes. This weekend i will surely try this. Thanks for sharing.
I add dried onion and zatar (hyssp). Wonderful. Sesame seeds work well too.
Yes, it works well.
I just lift the dough out of the bowl right on the parchment and lower it into the preheated pot. It helps reduce the risk of burning your hands. Just leave enough extra paper as a “handle.” Has anyone added herbs to this? I love rosemary bread with almond butter. I have made several white and wheat loaves with this recipe and they are always the big hit of the meal. I almost feel bad for the rest of the food. 🙂 So much for my low carb lifestyle!
Can you just lift the parchment with the dough and just place the whole thing into the pot?
Tried this with sunflower seed in it.
Was really awesome
http://instagr.am/p/SsUpY6wPKt/
Thanks!!! Can’t wait to try it this weekend!
Can you use regular dry active yeast for this recipe?
Yes you can – same instructions.
Mine is a goopy mess too. I also flour my cutting board heavily. When it’s time to move it into the pan, I use cold water on my hands, also as suggested. Inevitably it ends up lopsided in the pan, but evens out somewhat in the baking. I love this recipe; I use it a couple times a week and it comes out homely but yummy each time, even when I forget a step, it’s somewhat forgiving (such as not preheating the pan in the oven). The consistency changes a little, it’s more dense, but still delicious.
It always ends up a goopy mess for me too. I just put a lot of flour on my board and as it absorbs the flour it becomes the right consistency. Comes out perfect every time.
Taste was good though. Trying a new batch with 1.25 cups of water
how about just taking half of all the prescrined ingredients?
that was a reply to Laura
Tried a variety of ‘no knead’ recipes without much success and sadly this was teh same: I get stuck with a shapeless blob of dough that in no way can be shaped in any form that looks only remote to a ball. It even sticks to the parchment paper. Too much water?? I followed the recupe to a T.
Well I guess I will just drop it a pan as described and see what I get.
Definitely not: “so easy even a four year old can make it”
Can you use regular yeast or does it have to be instant?
Stephanie, I used Fleischmann’s Rapid Rise Highly Active Yeast, in the little envelope. Bread came out perfect. Hope that helps.
Yum! I can’t wait to make this!
Jaden, do you have a recipe where it uses active yeast packets instead of instant yeast?
In my experience, it can wait another hour.
I use King Arthur organic bread flour and love it.
Joanna
can I use King arthur flour or does it have to be bread flour
It’s 930 and I am at the 2hr rising step. Can I let it sit until dinner?
Do not try to remove parchment paper from uncooked dough. Place the parchment paper with dough on it into the cast iron pot. Parchment paper is designed to release only with heat.
I have modified this recipe using 1 cup rye to 2 cups white and add 1 tbs caraway seeds and I love the flavor.
Thanks for posting this recipe. Will definitely try it, maybe even for Thanksgiving. I love your wonderful sense of humor as I read the step-by-step post.
Arlene, have you made the pumpernickel with this NO KNEAD recipe? My grandmother is coming for a visit soon and I’d love to make her some homemade pumpernickel.
Try craigslist. I”ve seen brand new pots for $50. Also, try Goodwill or Salvation Army.
I do not have a lid for my pan, is that an absolute requirement?
This is amazing!! Would this recipe work in a crockpot??
So glad I stumbled across this last night. I immediately made a batch and baked it this morning….Amazing! I sprinkled the top with a Kosher salt mixed with some herbs and spritzed it with water when I took off the lid. Enjoyed it with Kerrygold butter and Natures Hollow raspberry jam this morning and just had a late lunch and made a meatloaf sandwich with melted cheddar/mozzarella. This is my new Go To bread! Thank you.
I also found on another blog grain mixtures to use with this recipe:
Whole Wheat Bread
2 cups bread flour
2 cups whole wheat flour
2 tsp salt
3 Tbsp honey
1/2 tsp yeast
2 cups water
Rye Bread
2 cups bread flour
2 cups rye flour
2 tsp salt
1 Tbsp caraway seeds
1/2 tsp yeast
2 cups water
Pumpernickel Bread
2 cups bread flour
2 cups rye flour
2 tsp salt
3 Tbsp cocoa
3 Tbsp molasses
1/2 tsp yeast
2 cups water
Thanks so much for sharing the other recipes, Arlene. Your breakfast and lunch sound so good!
i’ve tried this for the first time and I’m overjoyed at how good it was. Going to make a bigger batch of dough and experiment with freezing some and refrigerating some. Any guidance on how long the dough will be good for in the fridge after the first rise?
Martin
Great recipe! Might have to have my son do it too!
Let me know how it goes for you!
Wow, this bread was phenomenal. I made it last week and did as you suggested, subbing 1/2 cup white flour for whole wheat. I also sprinkled cornmeal on the bottom of my dutch oven before baking. It was amazing. Tastes as good, if not better, than the bread I’ve gotten at fancy artisan bread shops around town! I have another batch of dough sitting in a warm spot to be made tomorrow. It’s definitely going to become a weekly thing!
PS, I also tried a different no knead recipe before trying this one. Major failure. Then a friend sent me yours and, wow. Just, wow. So easy!!
Yayyy – I am so glad it worked so well for you!
I agree with other people, that this recipe is a bit better somehow than other no-kneed ones. Thank you for sharing this! And I really love the little story at the end….. so cute!
You could also just plop the whole thing into the pot, parchment paper and all. I’ve done this and it makes a great loaf!
Does no knead work with other flours? Rye? Whole wheat? sprouted grains mixed in?
Everything went well until I tried to transfer the dough into a hot pot. It was a big sticky mass, I ended up baking it with bits and pieces of parchment paper in it. Next time, I am going to flour and grease the parchment paper.
Next time, just hold the parchment paper and place the dough + parchment into the pot (parchment on bottom) – then bake. The parchment will peel off the baked bread.
Wow! It’s addictingly wonderful!!! Make sure you have someone around to share it with because it will mysteriously disappear!!!
Wow! I just tried this recipe Monday and Tuesday riding out Hurricane Sandy. Made the dough on Monday and baked on Tuesday. I used 2 cups of white whole wheat and 1 cup of all purpose flour because that’s all I had on hand. Followed the directions and this is the best bread I have ever made! I used an old Graniteware roaster (small one) in a Black and Decker tabletop convection oven. I did use parchment paper with some flour on it, that made transferring it from the 2 hour rest period into the pot very easy.
The bread tasted great and looked like bread you would purchase from a good bakery! Thanks for this information, I’ll be doing this again soon…maybe today!
Jeanne, grease the parchment so the dough doesn’t stick to it.
You don’t need to transfer the dough from parchment to pot, just grab the paper with dough inside and plop it into the dutch oven (or whatever pot you use). Hope this helps.
Can’t wait to try!
I love this bread! I recently bought the 5-minute-a-day bread cookbook, liking the idea of mixing the dough once a week or so and just pulling a bit out of the fridge to bake every day. But after my first loaf with that recipe,, I really like the taste of this recipe better for some reason. Is it possible to make a lot of this recipe at once and then refrigerate the unbaked portion until I’m ready to bake? I’m assuming I would still let it sit out first and I would probably let the loaf sit a while after taking it out of the fridge before baking. Any thoughts?
You can refrigerate the dough at any point (generally I will refrigerate after its long nap), and yes, you need to let it sit out for second rise before baking.
Have made this often-got it on line from NYTimes. Your adaptations make it even easier. My friends still don’t beleive it’s really no kneed. I’ll send them this site with the adorable boy and his wondrous “tatooes”. Many thanks.
This is a wonderful recipe! I burnt the first breads I made (though they were still edible) and had to lower the oven temperature to 415 approximately and lower the baking time to 20 minutes. Also parchment at the bottom of the pot made a big difference to cleaning up afterwards – it makes it much easier! I have experimented with adding herbs to the bread and it’s always delicious. I do knead the dough a little before putting it in the bowl with a cloth. It doesn’t stick so much to the cloth if it has a little more flour added into the mix..
hi I was wondering can I use a cast aluminum pot/pan?
HOLY MOOLEY!!!! This is delicious. What a gorgeous crust. This has fantastic flavor as well.
I’ve been making this bread for years, and love it to death. I am also a chef, and this was slways a top seller at my restaurant.
i have mixed this up with different fruit and veg purée. You can add anything to it….seeds, nuts, herbs,fruit, veg ( one of my favs is caramelized onions and rosemary!)
Making a pumpkin purée batch right now…just remember if added more liquid like add ins, to adjust the water to flour ratio. Another good tip…if adding ‘heat spices’ like chile, garlic, etc wait until after the first rise.
Mmmmm!
Hi-
I was wondering if you could tell me how to cut this receipt down to make in the 3 quart dutch oven that I have? Looks amazing!
Thanks
Laura
This worked great! I’ve been trying to make bread like this for years. The one thing I did different was to leave the dough on the parchment as I moved it from second rise to pot. This made it easier to get in and out of the super-hot pot. Next I’m going to try half whole-wheat. Thanks for posting this!
This was the best discovery I have had on the web to date.
& to think I almost passed by it. I am a Chef and never thought to use a quickie bread because of pure arrogance. My mistake. Thought I would try it and its a hit with everyone here at the house. Now its time to play with it add some whole grains some raisins pumpkin seeds the skys the limit. So good with butter!
Love the little story. have been looking for a good bread recipe. Now I just need to go buy a cast iron pot $$$$ I’ll hit marshalls first Can’t wait to make this!!!
I’m wondering if I can bake this in my bread maker instead of an oven? (My oven doesn’t work properly and I haven’t used it in years) I’m going to try it following the directions all the way up to the baking part and see if it will bake in the machine.
Ladies,
Dust your parchment paper with a little flour, cornmeal or wheat germ, before you put the dough on it. Now it will be easy to remove.
Update: Shape notwithstanding (and even that was not as bad as I feared it would be), the bread is delicious! Thank you!
I think I know what Jeanne means. It is not the parchment paper sticking to the pot, it is the dough sticking to the parchment paper in this step:
“Gently move dough onto a floured towel or parchment paper (recommended).”
I am trying this recipe now for the first time (the bread is in the oven now) and had the same problem. I am guessing that the above instruction probably should say:
“Gently move dough onto a floured towel or FLOURED parchment paper (recommended).”
My bread is going to come out in a sad misshapen blob now but hopefully it will still taste great!
Let me say that I am not a baker. This is my second time to attempt baking bread. What temp is used for the water? Also, I used parchment paper and had a difficult time getting dough unstuck to put in my pot……any other suggestions? The bread smells amazing baking. Thanks for your time and the recipe.
The water is just regular cool tap water.
I’m surprised that parchment stuck to the pot – It shouldn’t stick at all! Next time, try 2 layers of parchment in the pot.
Wow it really looks amazing! I haven’t heard about it before and can’t wait to try it out! 😀
Just gotta transform the cups to dl (hehe, yeah we will see how it goes xD )
Such a sweet memory at the end! <3
Hope you all are in best of health 🙂
/Lollo
I am happy that I just found this recipe because I might finally have a bread that is easy to make, requires few ingredients, has no kneading, and looks and tastes great. I will make this when it gets a little cooler outside. Right now, we’re still having days in the 80s.
Hi. I live in the tropics with room temperature ranging from 84-86 F. Does this affect the amount of time the dough is required to rest? After 12 hours the dough doesn’t have the bubbly look like yours. Going to go ahead anyway but appreciate your feedback.
Spike: As with any recipe, you must tweak the recipe to suit your personal taste. It’s clear that you are not familiar with bread baking as the amount of yeast does not affect the flavor. In fact, the long fermentation adds quite a bit of yeasty flavor. What I suggest is looking up variations on no knead bread which include adding whole wheat flour or grains, fresh herbs, nuts, dried fruit, etc. Personally, I have adjusted the recipe to add 1.5 to 2 teaspoons of fine sea salt. Yes, that is almost double of the recipe here but I find the additional salt helps the flavor of the bread immensely. Sometimes I also coat the outside of the dough with a thin layer of extra virgin olive oil during it’s second rise, before I plop it into the hot pot. The olive oil gives the crust a distinctly different flavor and chewier texture. The point of this no knead bread recipe is not to please the masses with the flavor, but to teach you how to successfully make a beautiful and easy basic bread which you can then adjust to your own taste… like any other recipe. To call others “sheep” because they appreciate the recipe and are able to use it successfully is ignorant. Don’t insult others just because you can’t make it work for you.
Spyke, why the attitude and negative feedback? Don’t be so critical and envious of others that are positive, willing to share and above all, happy.
It’s easier to be positive than negative. You can do it, just relax and enjoy.
The flavor should have developed in the 12-20 hrs that you left it fermenting on the counter. The yeast grows inside the bread by consuming the starches in the bread. This means that they divide and multiply. The amount of yeast you put into the bread in the beginning is not what you end up with before you bake the bread. I love this recipe not only because it is super easy and time saving but also because it produces bread with very complex, delicate, very “breaddy” like flavor that grocery store bread (even those “baked fresh” from grocery bakeries) cannot even hope to compete with. I would advise you to try again and use a scale to weigh out all of your ingredients.
I made this today. I made it with wheat and it was wonderful. It was very easy and my son loves it.
I’m intrigued. Do you still need to form the loaf after the first rise, by tucking the ends under and back into the pot?
Thanks
It came out of the oven an hour ago, and half the loaf is already gone! It’s WONDERFUL, and I’ve already been told in no uncertain terms that this recipe is “a keeper!”
Hi Jaden, I read the book: Professional blogging for Dummies by Get Good. She mentioned you in her book as a successful bloger. So I come to your site and like to say Hi. I am fairly new to bloging. I still have a lot of room for improvement.
Once I am here and you guys are talking about no-knead bread. I have posted a blog of no-knead parmesan olive bread. Please check it out at http://www.saigoncook.com and let me know what you think.
Your pictures are very beautiful.
Hi Janie,
I want to make the one with olives….. when do you add 1 1/2 cups of olives: in the initial mixing (before the 12-20hour rise) or after (before the 2 hour rise)???
Thank you. Lana
I’d add it after the 12-20 hour rise and before the 2 hour rise.
My 12 year old daughter asked me yesterday if she could make bread. She found your website, found the ingredients and with no help from anyone else, made a delicious loaf of bread. She was very proud. I really enjoyed your story about your son enjoying the bread. Ah, the simple pleasures in life.
Hi, Best post i have seen in a long while.Your son is a star. Perhaps one day he will have his own bakery.
Homemade bread? And it can handle a small boy. Perfect!!
I’ve made this a couple of times now and love it, however, my bread is always kinda dense inside, any suggestions why? I have tried less liquid but it didn’t make a difference, do I need to leave it rest longer? Help cause I love this recipe, it’s so easy.
I never thought a bread recipe would make me all verklempt, but reading about you and your boy did it for me.
Just stumbled across this and can’t wait to give it a try, looks so easy!
For the last few years I’ve been trying to make some decent bread. Every single time, it comes out too dense, and I get mad and vow to never try again. I’m so glad I tried again! This recipe is amazing! The bread tastes (and smells!) incredible, and the crust is perfect. I can’t believe it’s possible to make something this awesome with zero effort. THANK YOU!
Im pleased u have so much time kelly , but like most people we have to work to pay the taxes & this is a fantastic recipie for time deprived people. A little more yeast and a little more salt works for me . They r lined up now waiting for it to come out of the oven. Love no knead bread. SOUNDS LIKE A SLOGAN DONT IT.YEastHA.
Jaden, last Friday I finally posted my version of no-knead bread that I came up with several years ago. Today I got the idea of googling the bread and seeing what other bloggers have done with it. Love your photos (AND your little sous chef)! The first change I made to the original recipe was getting rid of the messy floury towel thing (I see you did too) and the second was to increase the size from the tiny 3-cups-of-flour loaf of the original recipe. Of course, if you’re not a breadaholic like me, the regular size is probably fine!
In response to commenters who say ‘why not knead’–I agree that kneading is easy, and I love kneading, it’s very therapeutic. I make kneaded breads all the time. The reason I make this bread is not so that I don’t have to knead but because it produces an entirely different kind of loaf. Sometimes I want this rustic bread.
or better yet, how about just strolling down to your corner bakery to buy a loaf? You might as well it will certainly taste better.
I bake bread at least 3-4 times a week and I have always been intrigued by the no knead recipes. Well, I decided to try this one and I really do not think it tastes very good at all. Also, I just do not “get” what is so darn difficult about kneading bread and I find that the kneading is just so therapeutic and satisfying that to take out this step completely takes away the pleasure of making bread. Gordon Ramsey says something similar in one of his cookbooks and I completely agree that kneading your bread dough is what makes it so special.
But anyway… this bread is lacking in depth and character notes – SALT!!! It tastes flat and just would not past muster in a Paris bakery. But then again we are not in Paris, are we?
I find that making a simple poolish the night before and incorporating it in your dough and allowing the dough to sit for 15 to 20 minutes before you continue the kneading process allows for awesome gluten formation, and enables you to knead your dough properly with less flour so your finished loaf has a wonderful texture and chewy crust without being “gummy” and too dense. Crispiness in the crust can be obtained by simply tossing a cup of water into your oven a few times during the baking process or putting ice cubes on your oven floor.
I do not mean to sound negative about this recipe but I really cannot believe that anyone thinks this tastes very good, unless they just have not tasted really great bread before. IMO.
OK,
For the truly truly lazy, or wise, depending on your take on it, I am happy to report that you can skip the bowl completely. If you let the dough rise in the cook pot that you are going to bake it in, it never looses any of its fluffiness, ie it does not deflate the way it does when you try to transfer from the bowl to the pan. Just butter the pan well before you put the flour, yeast, etc into the cook pan, stir it up, cover it, and vola get ZERO cleaning and fluffier bread.
the secret is in the kiss!!
What about using freshly milled flour? I’ve got soft white & hard red or white. What combo of which wheat do you think would turn out best?
Tks!
I was directed here by Karen the blogger of The Art Of Doing Stuff. If it’s good enough for Karen, it’s good enough for me. I’m going to mix up a batch before going to bed so we can have it for lunch tomorrow. I love that you did this with your son. Hey, it worked for Paula Dean…..maybe we’ll see you on TV soon. You might want to be working on a cute southern accent……or maybe not. LOL I’ll be doing what mixing is necessary with my Kitchen Aid as I have fibromyalgia and it’s just too painful to try to stir with a spoon if a batter is thick. I hope that doesn’t ruin it although it seems from the comments that you have a lot of leeway on the prep. I’m excited as my last no knead bread recipe was not good at all. It seemed like it needed more salt. Thanks for posting this one.
My boy and I skipped the floured towel step, and just dumped the bread into a buttered cast iron pot. We also accidentally let it rise for 48 hours instead of 20, and we didn’t remember to cover the pot while it was in the oven. The bread was very forgiving of these “errors” and delicious, full of air holes. Because it came out so well despite these deviations from the above recipe, I am no trying to do it EXACTLY as described above to see what the differences might be.
Science I like. Cleaning up flour and washing counters and bowls, I don’t like. This should be interesting.
Every time I make this bread (and my friends and family rave, btw) the dough sticks horribly to the towel during the second rise regardless of what I do! It’s ruining my towels! Tips?
Use parchment paper instead (no need to lift it OFF the parchment, just lift entire paper with dough out and into the pot.
I found somewhere else this recipe, I made the dough yesterday, only that it said to use all purpose flour and to keep the dough in the fridge over night!.I hope it will turn out ok, now I am getting worried. I will repost later today and tell you how bread came out.
Spike: The amount of yeast used has nothing to do with the flavour of the loaf. The very small amount used replicates over the much longer fermenting period than is usual these days in bread making. By the time it goes in the oven, there will be as much yeast in the dough as there is in a dough made with more yeast but left to ferment for less time.
Are you used to eating sourdough bread, perhaps? If so, any non-sourdough loaf will seem bland to you. Get a sourdough starter and experiment with using that instead of instant yeast.
But maybe you just have a jaded palate from eating highly spiced foods all the time or smoking tobacco. Please consider the possibility that it’s you who’s having the problem, not everyone else being ‘sheep’.
Oh my goodness – this is so delicious!!! I made mine in a Romertopf Clay Pot… perfect. Thank you!
This is a little late, but I have one answer for you, Sandi.
I bake our bread every day during the week. The actual work involved is minimal (10 minutes of kneading by hand) but it requires that I be home in time to knead, to fold, then shape, then get it in the oven. The recipe we prefer takes about 3.5 hours from start to finish. I can do this because I currently stay at home with my toddler. If I was working outside the home there is no way I could have the 3+ hours of wait time for our regular bread and feed my family at a decent hour. Not to mention hanging around or near the house all morning is not feasible on the weekends; we like to go out and do things. A recipe that allows me to have an entire day out of the house and STILL have fresh baked bread is awesome. So maybe instead of getting down on the people who eat “dreck” you could share some tips for getting other bread recipes in the oven for the folks who are not home at ALL during the day.
I have been making this bread for a few week now, and to the other comment about yeast – i use 3/4 of a teaspoon and more salt… i also use part whole wheat flour… I’ve also throw in wheat bran, oat bran, quinoa, and for tonight – 1 1/2 cups of kalamata olives (no salt then), or raisin and pecans another night. delicious!!
Thank you for sharing this recipe with us. I made this bread yesterday, and I am making one today. I think there is nothing else to say but thank you.
I finally made this bread after all the rage about. It looked beautful but absolutely had no flavor (probably because of the minimal about of yeast). People are sheep.
I found your website when I was looking for an easy bread recipe. I wasn’t sure how well it would turn out, so I made it in advance before serving to company. WOW I cant believe first of all how few ingredients it required and then how easy it was. I made it before I went to bed and honestly it took all of 2 minutes and then when I got home from work I finished it.
The crust is beautiful and the bread is so soft inside. This will become my go to recipe always. I even passed it along to my family members and I am sure they will love it as much as I did. Thank you!
Hello, I am absolutely fascinated by this recipe and can’t wait to try it out. I don’t bake and have never even considered trying to, till now. Thanks for sharing, the South African bakeries will now have a new brand of bread to compete with, the homemade no-knead-bread.
Hello there! I came along this website really looking for an easy bread recipe that I could not mess up. I have to be honest and say that when I read about the 12-20hour wait to rise I kind of felt like moving on to another recipe, but THANK GOODNESS I did not!! I made the dough last night, it did not even take 3 minutes to get it done. We baked the dough today and it was a GREAT success!!! This made my whole family very happy, as the bread came out EXACTLY the same as the national bread from our native country Malta (in the middle of the Meditterranean sea). Needless to say I will be doing this again! And from the bottom of my heart, Thank you for helping me bring a little of HOME to our new “Home’ in the USA. Thanks.
I’ve made this a few times now – outstanding! I raise my bread in a warm oven since my kitchen is rarely warm here in the Pacific NW. Hazards of doing this – my partner was cooking dinner last night and forgot the bread was in the oven – he turned on the broiler. The melted plastic was easily to remove while still warm. I started over. Now I put a note on top of the stove – BREAD IN OVEN!! 🙂 I can’t wait to make this with my grandson, he’ll love it!
Is it possible to add extras? I just had the most amazing raisin & walnut bread that my father bought for me at a farmer’s market. Could I add raisins and walnuts to this bread and still follow the rest of the instructions as printed?
I just made it this morning. It was way too wet…couldn’t do much except sprinkle some more flour on it and try to maneuver it. I plopped it on the floured towel but had a horrible time getting it into the SS pot. I baked the required time. Is the inside of the bread supposed to be real moist? Can I just put it in a bread pan to rise the 2nd time and then bake rather than doing the towel thing? I’m soaking it in cold water to get the goop off. The bread tastes wonderful in spite of the mess but is not very high due to spreading out in the 5 qt SS pot I used. I’m pleasantly surprised that the crust isn’t super hard, either. Would like to try again if I can use a bread pan, instead. Please let me know!!
You think like I do. I haven’t been able to set up my kitchen entirely like yours, but I do more than most people and even though it drives my husband a little nutty, he always appreciates and loves everything I make. Question to you, at what point, exactly, do you add in herbs/seeds/additions to your breads? Also, any suggestions for additional reading on cooking in this more ‘homegrown’ science-like fashion? I’ve cultured yogurt as well and am currently trying to figure out how to properly make kombucha, but haven’t been successful yet. I’m curious as to your thoughts. Thank you in advance 🙂
Thank you for this recipe — it came out great! I used a loaf pan so baked it uncovered. The crust is delicious and crisp and chewy and the inside is wonderful. The only drawback is that the recipe makes only one loaf! Does it double?
It is rising as I speak: I’ll let you know how it turns out. (I couldn’t find anything labeled “instant yeast” so I used Fleischmann’s yeast from a jar.)
That’s perfect.
Tony,
I just measured:
1 cup all-purpose flour = 145g
1 cup water = 8 fl oz = 250ml
good luck!
Steve
I made this today and it turned out fabulous! I really liked the texture of the bread and the crust was perfect. I tried the digital thermometer with the probe and the bread did not go above 202, but I baked it for the 30 minutes covered and 20 minutes uncovered and it was spot on. I have tried several different recipes and had my friends and family try each of them. They liked this recipe the best. I did not do the floured towel but did the parchment paper for the 2nd rise, then transferred the parchment paper with the dough directly into the preheated cast iron pot.
Hi from across the pond, I would love to try this recipe but we work in metric (grams) or imperial lbs and ozs, would I be right in assuming that a cup of flour is 115 grams and a cup of water is 275 ml, there seems to be a lot of variation from one
conversion chart to the next.
Thank you in anticipation of your advice.
Tony
Great pics and insx for this recipe, and your son’s first time eating bread…oh so sweet. 🙂 Thanks for sharing!!!
About 20 minutes. I have made this recipe two times now and love it. I have used this dough for pizza crust and cooked mini rolls in cupcake tins. Thanks for sharing. You have changed my life!
If I make this into small loaves such as 6 x 3, what is baking time on a cookie sheet?
I honestly don’t know without testing myself!
This recipe is basically a sourdough bread. I love having healthful and helpful organisms dominating the micro-ecology of my kitchen, particularly in my fridge – so I keep a mother soughdough; make a fresh batch of yoghurt every day or two (and drink the whey); and brew three or four batches of beer and/or ginger beer each year. I use vinegar in water to clean around the kitchen and inside the fridge and to rinse hot-washed utensils for ‘sufficient’ sterilization.
I reckon that disease-causing pathogens can’t compete in a thriving micro-environment of healthy biota. Also, it stimulates and develops the human immune system, minimizing allergy reactions, asthma, irritable bowel, acid stomach and many other manifestations of an unhealthy gut. Remember, your kitchen is an extension of your digestive system and, just like your gut, it needs a healthy micro-biosphere for you to flourish.
With this no-knead bread recipe, instead of using all of the dough at once I just use however much I need, add some more flour and water to the bowl, cover it with a cloth bound with an elastic band and leave it on the bench for a while. Later I put it back in the fridge. This slows down the yeast growth but it still bubbles happily along – forever. It’s a soughdough yeast plant.
I just pull off bits of dough whenever I want a pizza base, or tortilla or naan or flatbread or whatever you call your local pan-cooked bread. I work the bit of dough between the thumb and first two fingers of each hand, sort of stretching it and slapping it back together. I use a bit of wholemeal flour, or fine cornmeal or oatmeal on the board as I work and stretch the dough ball into shape (sorry, that’s kneading isn’t it?) These flours keep the dough from sticking, adjust the texture, and add different tastes and textures. You can also work in herbs or seeds (dill, fennel, sesame etc) at this time.
Then I slap the round sheet of dough onto a pre-heated griddle. It’s not so hot that I can’t still do a bit of stretching and shaping of the dough with my fingers before it sets. I use my 9 inch cast iron frypan to cook the bread, it’s well-used and never scoured, so it’s kinda ‘non-stick’ minus the pseudo-estrogens.
I set the heat according to the thickness of the bread I am making – not so hot with longer cooking time for thicker, rising breads, hot and quick for the really thin ones – just so long as you don’t scorch or burn the bread before it’s cooked through. Thin breads only take like 30 seconds or a minute each side.
This is fresh food that is quick and easy once it is preped and practiced at a little. It makes people happy and it keeps you healthy.
can’t wait to try it! I wish you had pinterest embedded in your site so I could pin it!
First time making this load and it came out beautifully. Only problem was I had a lot of trouble getting it out of my enamel pot in one piece. Any suggestions?
Thanks!
Line bottom of pot with parchment paper!
The only thing that you did was stray from the procedure a little bit. You do not have to let it rise in a bowl.
After 12+ hours just fold it and toss it in the pot.. done.
I have never let it rise like traditional bread and it has always turned out perfectly.
I would like to make 6 x 3 loafs (or around that size). Can I put in the small load pans or just put on a baking sheet? Do I need to cover? What suggested adjustments to time? Thanks.
I’ve made this bread several times & I must say- I adore it!
As a student I need all the extra time I can get- this is SO EASY! I’ve even got my family hooked on it 😀 My last batch was done with Jalapenos, finely chopped (white)onion & some cheese. Yum! A spicy Mexican treat!
I’m the only one eating the bread I sometimes can’t finish it all before it goes bad. I noticed a few homeless people hanging out down the street from my church. I’d love to bake a bit of extra bread and share it with them. I’m looking for a [cheap] way to raise the calorie content for them [if I can]- can I add [unsalted] butter? Or will this change the consistency of the bread too much? What else can I add?
Yay! I can’t wait to make this.. I have been itching to make home made bread.. Can things be added to the bread, like, olives or garlic cloves or whole wheat flour? It’s not that important, just wondering.. Thanks for posting!
I tried it using 1/2 whole wheat flour and 1/2 bread flour, plus about 1/4 cup oatmeal. It makes the loaf a little more dense, but still VERY successful and delicious!
I tried this recipe with no bread experience whatsoever, other than loving to eat it. It turned out so well that I’ve started making it for friends and relatives. People have told me their family fights over the last piece! I’ve since delved into making the French bread too. It is so satisfying to bake bread, and I’m so happy you introduced me to it. I’m actually baking some right now, so I gotta go.
Talk about coincidences! I jus watched French Food at Home and Laura Calder did this very recipes. Now I’m itching to get my hands flour covered trying this, looked good
I Tried it, liked it, and it has become a regular part of my weekly bread baking experience in Vicenza, Italy
Super cute model! I’m convinced this is so easy I can make it…I mean a 4-year old could make it. Thanks for making me smile and sharing a terrific recipe.
Greetings from north of the Arctic Circle.
This is the best recipe! this is my 3rd time making it and it has turned out perfect every time. Its so easy and with my busy schedule, its perfect! Thanks!!
Can’t wait to make this bread! In your Dukkah post, you mention that you divided the dough in half and put the rest in the freezer. What is the process to bake a frozen loaf (from when to freeze through finished product)? Thank you!!!
I thaw it completely before letting it rise again and bake.
Hi! I just started my very FIRST batch of homemade bread with this recipe! I am so excited. The only question I have is, do I need to cook this bread in a covered pot? I don’t have anything that would go into the oven at 450 degrees and I can’t really go out and get one right now. Would it be okay if I cooked it on a parchment covered cookie sheet and covered the entire thing in a loose aluminum foil? If not, I’m not sure what I’m going to do with the bread dough tomorrow when it is ready. Any help you can give will be GREATLY APPRECIATED!! Thanks so much, LOVE YOUR SITE!
Yes absolutely! No need to cover with foil if you aren’t baking in a pot.
I ended up with a very runny dough, TWICE! Cant even lift it up. Don’t know what went wrong.. So frustrating. But that doesn’t stop me to keep on trying. I’m gonna try again later today, fingers crossed. ; )
It’s a very forgiving recipe – add less water next time until you feel like you’re getting a consistency that you can handle.
Bread and I haven’t gotten along in ages. Every time I try to get yeast to do it’s business; I lose. I cannot wait to make this! I’m hitting the store tomorrow. I do have on question though: Can you use mutli-grain/whole wheat type flours or do you have to adjust for their “heft”?
YUP – New fav way of making bread! Though I didn’t have an adorable kid to “model” for me! Instead of a covered pot.. I just used a cookie sheet and placed a loaf pan 1/2 full of water on lower rack. YUM YUM
Hi Jaden
GREAT set of photographs and text. I have been baking bread with the no knead method for several years. My problem was the dough sticking to the cloth after the second rise. Also, the dough would spread out too much in the baking pot. You have suggested a solution to my second problem by rising the dough on the cloth in a restricting container. I like the idea. My solution to both problems has been to decrease the water to flour ratio. You use 3 cups flour with 1.5 cups of water. I have been using 3.5 cups flour with 1.25 cups water. I love thinking of the technical issues of bread baking. Any thoughts on decreasing the hydration of the flour.
Bernie
** I meant I’ll keep you all posted…..sorry lol
I was looking for a very simple bread recipe when I came across this site. Needless to say, I had all the basic ingredients, but like many, I have the active dry yeast and not the instant…. so, I added just a tad bit more of the yeast. Right now it’s covered and resting for its 20 hour slumber….I can’t wait until tomorrow after work for me to bake this bread. Both my fiance and doggy can’t wait either. (^_^) I’ll keep you all! Aloha….
Bill, you may have to adjust the flour/water ratio based on the humidity and water content of your flour. I live outside Portland OR and I routinely cut my water by 10% or more because of our humidity. You should be shooting for a consistency of a very soft dough. I also left mine in the refrigerator overnight and on the counter all the next day.
I make this recipe at least one a week nowadays, always with the picture of the adorable little tatooed dude in my head.
Try this- instead of butter, try dipping it in extra virgin olive oil (Trader Joe’s garlic oil if there’s one near you) with plain ol’ dried Italian herbs added while the bread is baking. With a little wine and salad….
Best,
Jeff
I just made this and it came out perfectly on my first try!!! Even my DH enjoyed it and he very picky. I added dried herbs and it came out full of flavor. By the way, I have a Le Creust Dutch oven as well and I removed the top knob so i didn’t have to worry about it melting. 🙂 thanks for posting this!!
It was wonderful and perfect! My daughter loved listening to the bread “crackle” when it first came out of the oven! lol My hubby said, “this is JUST like the Bread Company bread”! 🙂
Thanks again!
I have one hour left until my first batch of this will go into the oven. 🙂
I just realized “I” made a mistake…. Jaden, I used active “dry” yeast, do you think this make for a flatter bread and have you used the active dry before and did you do anything different when you did? All steps up till now (I have about another hour of the second rise to go) including first raise after 14 hrs. or so, transferring, etc. all look JUST like your pictures! Was just curious about the yeast question.
I’ve been baking our own sandwhich bread for a long time now and a rustic crunchy artisan bread was lacking, I think this will fit the bill nicely though.!
I’ll let you know how it turns out using the yeast that I did.
Thank You for a great recipe!
Tracey
I think you’ll be just fine! let me know!
Thanks a lot for the recipe. Yesterday I was looking for a simple recipe for bread and I immediately tried yours. As I don’t have an oven, I baked it in a pan. I miss the crunchy crust yet the structure is still great.
I’m sure this is a tasty loaf of bread, but why all the wailing and teeth gnashing about the ‘difficulties’ of kneading and shaping the loaf? That’s the most ridiculous thing I ever heard. I can have half a dozen different breads out of the oven in the 20 hours you wait on this stuff, and that includes all my regular tasks getting done and a good night’s sleep. No, I am not a pro, the only training I’ve every had was 9th grade home ec. If you quit making real, homemade food sound SO HARD, maybe more people would quit eating processed dreck and try real food.
I can’t wait to try the recipe, but I have a question: could I use a loaf pan?
WOW.
thank you thank you thank you THANK YOU!!!!!!!
i have enjoyed your blog for awhile now. my husband and i have been wanting to try making bread forever, and after coming across this recipe, the pictures sold me. we followed your directions to the letter, and it came out FLAWLESS.
we just made 3 loaves, have decided there is basically no reason to buy bread again.
seriously. it’s that good.
we also splurged on the butter, as directed.
amazing.
thanks again!! 😀
– rachel & rené
The crust is actually crackling!
I have 5 minutes left on my first attempt. It smells so good. Is it suppose to smell like sourdough?
Just had to say, the photo of your son giving the bread a goodnight kiss is just so cute!~
By the way, great recipe…always good with a lot of butter. 😀
I’ve used with wheat flour only, all-purpose flour, and mixed. I’ve added slice garlic stuffed olives and sliced jalepeno olives. I’ve let it rise 8 – 24 hours. I’ve learned to add more yeast…up to 2 tsp. Fresh Rosemary is waiting for the next batch. This is a very forgiving recipe. Even mistakes taste good with butter!
Hello… thanks so much for this wonderful recipe…and the visual presentation…
we made this bread last night…and it turned out amazing…
Bill, mine vas very runny too – when cooked it resembled foccacia (flat and dense)and was not cooked properly inside, still doughy. My mistake was the yeast – after I’d mixed it all I realised it had expired, so the next day I went and bought more fresh instant dried yeast, added it to the re-warmed the dough and left for another 18 hours, so really my dough sat for 2 days with the two attempts! It bubbled up nicely, but was very runny when I tried to put it in the teatowel – no way I could make a ball shape. It didn’t smell yummy while it was cooking. A disappointment, but wholly my mistake. I will keep trying this until I get it as I really want to make a simple home made bread!
LOL! I DID remove the loaf from the towel before I baked it! I was simply referring to the gooey mess that is left in the towel after it has risen a second time. The bread turned out fantastic, thanks.
not sure if you are serious or not, but if you are, please re-read the directions. you take it out of the towel BEFORE you bake it. It’s the pot that must be covered (for the first 30 min) because you need the 70% humidity to get the steam moving.
Maybe you should go watch the youtube videos so you see exactly what to do. look up no-knead bread. there are lots of videos to watch.
good luck!!! it is worth trying again!
Oh my goodness! I am in love. I don’t know if I should know how easy this is, because I would weight 300 lbs if this was on regular rotation in my kitchen. Thank you for making this failed bread baker a super star. Now help me pay for the personal trainer to work this bread off! ;D
p.s. Also, how DOES one clean the tea towel after baking the bread? I am tempted to throw it out, it is such a mess.
I have a non-bread baking question ….
how do i clean the tea towel after baking the bread ?
Just soak and then scrub in water. Next time, you can use parchment paper.
Bread flour has more gluten in it like wheat flour, but not as much as wheat flour. It makes the bread more stretchy than all purpose flour and helps hold the bread in shape. Give it a go!
this is the best loaf I have ever made! My husband and I ate way too much bread when it was finally cool enough to cut. The waiting was torture.
My husband is a potter who makes functional pieces, and I used a covered casserole dish that he makes. It worked beautifully. I was a little afraid when the parchment paper slipped a bit when I put in the dough, but it did not stick at all to the crock.
Thanks so much for the easy and enjoyable recipe!
Your pottery is absolutely stunning!
mine tasted great except the interior of the bread seems raw -put it back in the oven(after it cooled and we cut it to find the rawish center)for 5 minutes….doing it again. anyone find the baking time for this is too short?
Add a few minutes to your baking time.
Tried this yesterday, it was so easy and turned out great! we loved it, so tasty, will make again.
I’m looking to try this out, but I don’t have something like that to bake it in. Could I use 2 loaf pans and not cover them?
I don’t know what I’m doing wrong. My second attempt ended up with runny dough too. I carefully measured 3 cups flour and 1 1/2 cups water… I’m thinking for my next try I’ll only use one cup of water.. or maybe 1 1/4….
It’s baking now but I’m sure it will be very similar to the first one: foccacia bread.
The one major learning I’ve taken from this is that in order to get the nice bubbles in French bread, I need to work with dough that is much wetter than I normally use…. but finding that happy medium of the right “wet” still eludes me.
Well, I ended up with a foccacia-like loaf that was incredibly crunchy and chewy. It had great flavor and the kids managed to make it disappear quickly. They are still asking for a loaf that’s “more like french bread” though.
So I’m giving it another go.
Great recipe, making it for the second time right now. I just put it in the oven.
Bread was great last time (If a bit overcooked, but that’s not the recipe’s fault.) Despite a few burnt bits on the bottom everyone loved it. (Even my little sister: “It tastes like /real/ bread!”)
This time the dough was wetter, but I’m hoping that doesn’t make too big a difference.
The only change I made was to substitute Traditional Active Dry Yeast instead of instant. 1/4 tsp still works, but you need to change the steps a bit. Instead of mixing the ingredients together at once, mix the water (maybe about 105F, slightly warm) and yeast together and let sit for 10 minutes before adding the other ingredients.
Has anyone tried this recipe with whole wheat bread flour, quinoa flour or any other non-refined whole grain flour??
Maybe a 4 yr old can do it but when one attains age 58, obviously other issues enter in!
I ended up after 24 hours with a runny mess. No way could I make it into a blob to be moved to a floured towel… it was the consistency of shampoo.
I’m thinking my troubles began when I used 1/4 tsp of Fleischmann’s active dry yeast rather than 1/4 tsp of instant yeast. I’m not sure I even know what “instant” yeast is…
So, my solution was to incorporate a little more flour (maybe 1/4 cup) along with another heaping 1/4 tsp of active dry yeast. It’s now back in the warm place where, if it’s going to do something, it should now.
I think there was some yeast-action – there were small bubbles – just not enough.
We’ll see what happens next!
come back and let me know!
Wonderful bread! I have made it many times. I am visiting my in laws and want to make it for them but they only have regular flour not bread flour. Will the recipe still work? Thanks!!
No Maria, remove from towel b4 baking. 😉
I have made this recipe 3 times and thankfully it is very forgiving on the rising time. My family loves this recipe though my end result comes out flatter like focaccia. I cannot not get the dough into a nice smooth ball like your pictures. I used all purpose flour instead of bread flour, as I have seen many of the same recipe w/this being the only difference. Will using bread flour fix the problem?
Maria, you are suppose to dump the dough into the pot without the towel. (see the beginning of step 3) I had trouble with some of the dough sticking to the towel on this step. I will try to flour the towel even more next time. However, the dough washed out with just water. I did that right away. Good luck on your next try.
🙂
i haven’t made this yet, but i cant wait to try! I need to borrow a pot though because i dont have anything big enough. Maria–dump it from the towel into the heated pan. do NOT put the towel in the oven. Bake it with the cover, then take the cover off so the top greats crisp.
The dough stuck in the towl when I was cooking it. I supposed to cook it in the pot with the towel covered, right? Then uncover, remove it from the towel turn it upside down and cook it uncovered.
What did I do wrong?
My husband was born in Europe and for 20+ years has complained about American bread. When we lived in the city getting crusty bread was not an issue, now that we have moved to a very small rural town to retire, 27 miles to the nearest grocery store, bread has been a real problem.
I started making this recipe a few weeks ago and we haven’t bought a loaf of American “cake” bread since. Thank you for sharing this simple, crusty loaf recipe.
ps. I keep my floured towel in a ziplock bag in the freezer so I don’t have to keep washing the towel. My black cast iron dutch oven is wiped out and sitting ready for the next loaf.
This is the perfect bread to make if you are going on the low iodine diet required before an I-131 radioactive scan for thyroid cancer. Just be sure to use non-iodized salt and you are set!
Wow. I’ve never read such an easy recipe!
I literally just whipped up 4 loaves. Added some poppy seeds, thyme, and rosemary. Thanks!!
I haven’t tried this recipe yet,but I had a kick looking at the pics. Job well done!
Good stuff
Thanks for this amazing bread recipe! This is definitely my new go-to bread! I didn’t have the covered pot, and when I told my cousin the only reason I wanted it was to make this bread, she bought me one for my birthday, yay! Now my family and I enjoy this loaf at least once a week! Thanks!
Hi. I’d love to bake this bread and I’m in the market for a LeCreuset french oven. How large is the one you used in this recipe? 5 1/2 or 3 1/2 quarts?
This is a great recipe, thanks for posting it, the taste is fantastic, with the most minimal effort required. Try this today!
I need to convert the recipe to metric and I normally use fresh yeast. Can you please tell me how much fresh yeast i will need for this recipe? Thanks.
Quick question: did you use a baking stone in the oven? Thanks!
No I didn’t use a baking stone….but you certainly can!
This looks pretty great. I’m giving it a test run today using whole spelt flour, since I have a wheat-allergic relative coming over for Thanksgiving. Since spelt is really sensitive to over-kneading, this might be perfect.
Hi! I looove this bread, one of my friends makes it regularly and it has always been great. I have made it 3 times now. The first time it was tall and fluffy. However, the last two times it has not plumped up and ends up pretty flate and dense. I am following the recipe exactly. I have added rosemary the last two times, but my friend assures me that this should not effect the outcome of the bread. Please advise!
I tried this last night/this morning with great success! It was so easy and delicious that I kicking myself for waiting so long to try it. I halved the recipe, only let it rise for about 12 hours, eyeballed the yeast and the flour and it still turned out wonderfully. I also skipped the second rise and used non-stick mini-loaf pans. The recipe, halved, was perfect for three of these pans. Thanks to the author and everyone else for sharing their experiences! I make many things from scratch but had yet to try bread. Now I feel empowered to continue making more things on my own!!
Thank you so much!
I’m a guy who can’t boil water without a few practice runs and I make this when I’m broke and need a protein rich sugarless fat free source of nutrition. I use whole wheat flour, mix a scoop of brown rice protein powder in with just a bit of cocoa. Don’t expect it to rise the same but twenty hours later I do all the recipe requires. It turns out a rich dense flavorful loaf which I cut up and put on my George Foreman grill the next day. It’s the best bread I’ve ever eaten. Next time I will mix in raisens, walnuts and maybe some natural honey and let you know. Try it. Just don’t be depressed when the blob doesn’t get real big. I double the recipe and cook it in a big white pyrex thing that my ex left me with bless her lyin coniven heart. Forget the butter – use natural peanut butter not the sugary hydrogenated crap – just slather it on and snarf with a bit of natural honey or fruit preserves if you can find some in the back of your fridge.
I have been trying to make bread and not buy it, any time saving tips is appreciated! I can’t wait to try, thanks.
We are at 6300′ and no change to the recipe. All other bread recipes fail in one respect or another – I had given up. This one works every time.
Try the beer/wheat recipe at “Breadtopia” – thought it would be a brick, but what a taste!
Thanks! There was no instant yeast at my store either! I’ll add 25% more of the active dry yeast I bought.
Hi there!
Thanks for the recipe! I’ve made it 3 times the past 3 weeks, twice with 1/2 whole wheat 1/2 white flour, and once with just white bread flour. All 3 times it turned out delicious but it would not hold the boulé shape at all and spread out into a flat loaf. I’ve tried pulling corners underneath to create surface tension on all 3 loaves. Any advice?
Hey Joseph, if your dough was to moist from the beginning, then the measurements have to be off. If it didn’t bubble up or just went flat, you may have a water problem. Too much chlorine in your water may kill the yeast. Try purified bottled water. I have made this bread for three years now and usually make a double batch. I’ve had two flops, both when I was distracted and messed up the amount of flower.
Thanks SteamyKitchen, lots and lots! As my little girl used to say 20 years ago when she was little.
Thanks lots and lots to you too Greg! 🙂
Loooove this recipe and have been making for a year now and was wondering if anyone has tried adding flax and/wheat germ to this recipe???
No they are not the same. Use 25% more active dry yeast when substituting for instant and vica versa.
Any suggestions for baking this bread at altitude? 5000ft seems to throw of all baking recipes.
If you consistently get sticky, soupy dough, or bubbles but no volume, or a moist, dense, gray loaf, my bet is that the yeast has died. I recently bought two new jars of yeast and neither of them produced edible results. I returned them and bought a different brand, and now my bread turns out like normal. The box of yeast must have encountered poor conditions before being stocked in the store, or it was a bum batch.
I didn’t have a pot either. I used a cast iron pan and made an aluminum foil tent to cover it. The bread still came out great!
Perfect solution!
Well count me as one of the few out of THOUSANDS as mine turned out to be a watery mess also. I will need to add a minimum of 1/4 to 1/2 cup flour if I was to attempt again. I live at sea level – no altitude problem or anything like that. I triple checked my measurements, used quality King Arthur’s bread flour, etc… it didn’t come anywhere near the last step of holding a shape. More like a thick bread batter requiring a mold.
Go figure!
My daughter discovered your site and now we are both hooked! We’ve tried your no knead and we love it!
Btw, have you tried the modified version (Mark Bittman and Jim Lahey) to cut down on the “nap” time? Mine was 6hrs instead of their 4.5. I also added the red wine vinegar – the bread’s pretty good. Oh and I used my tagine to bake the bread.
No I haven’t seen version w/vinegar – will def have to check it out.
I don’t have a pot. HELP!!!! What about a regular dish with high sides and a cookie sheet lid?
The “no knead bread” dough is very different from “regular bread” dough. It is very loose and sticky. That extra liquid is what makes it great. After the 12-20 period it should look unhandleable, but it should have enough structure to hold itself in a loose blob after you pull the ends in. Just try it, the proof is in the end product. The recipe is in US measurements.
I think there is something wrong with the quantity. I used your measurement, and it turned out very liquid! it can’t even sit on my table without flowing.
You might want to try the recipe again, the quantities are correct, as this recipe has been made by thousands of readers.
came across your website, its great!
want to sk a question, I use imperial metric measurmnt, may I know what system did you use to measure the ingredients?
Gluten free bread is such a finicky thing to get right. I’ve been trying to make a good loaf for my daughter for over a year and have had only random success. I believe the trick is to find the right combo of flours: Brown Rice, White Rice, Bean Flour, Sorghum, Potato Starch and Xantham Gum. Unfortunately these ingredients aren’t cheap and it gets expensive trying to experiment all the time….Trader Joes has wonderful GF mixes for pancakes/waffles and brownies.
How does this recipe work with at least one half whole wheat four?
Anyone tried that yet?
I thought it was all wrong- dough seemed watery in the morning. I threw a bit of extra flour and continued to follow the recipe. It is delicious- thanks!
Is there a difference between “active dry yeast” and “instant yeast”? If so, can they be used interchangeably? Thank you
I loved this bread and have been making it a while. Now I have to go gluten free and found nothing that even looks that good! Boring! Any ideas? —anything bread tastes like cardboard!
I made this (my second loaf of homemade bread ever) with my 2-year-old son yesterday. He eagerly waited for the timer for me to take off the lid, then eagerly waited again for me to take it out of the oven. He kept peeking through the window to check on it. He was amazed that we made bread from dough.
As for the bread itself, it was fantastic! I couldn’t believe I had just made bread that yummy. Maybe baking bread is not as intimidating as I thought it was. I loved it. My son loved it. My husband loved it. I am making it again ASAP 🙂
Thanks for posting this, I have the perfect recipe for chicken soup & I was hoping to make a nice easy rustic loaf of bread. Turns out most of the bread recipes in a cooking website don’t have a recipe with such simple ingredients. I’m going to do this with my 2yr old for a quick project & I’ll add some rosemary for good measure (& cause it goes so well with chicken).
While the recipe does take time which takes away from the whole quick part (I’m kind of low on the patience for eating stuff I’m trying) I am looking forward to spending quality time with my daughter teaching her how to cook something she loves eating & sharing the joy of baking which my mom did with me.
THANK YOU!
My bread lurks, and I cannot wait to try it! Thanks for the recipe!
I have to thank you, I first discovered your website looking for an easy way to pull moisture from steak and found your whole thing about salting steak and this recipe was at the bottom of the page and I was intrigued by a no knead bread. I love playing around with recipes and finding something new, but I also had to thank you for the footnote, if you will, about your son…I’m not a mother, I’m still slightly young, but if anything were to ever change my mind about having kids it would be the moment I read that — it honestly brought me to tears thinking I could share a moment like that with a child of my own, so thank you again…I’m glad I discovered your treasure trove of culinary wonders mixed in with family bliss…
Can I substitute ap flour for the bread flour and combine it with wheat flour? Or should I stop being lazy and just go buy real bread flour? The bread looks amazing! My compliments to the little chef!
I’ve made it with both AP and bread flour – use what you have!
I made this for the kids, and it worked out great! Followed the directions to a T…Let it sit for 20 hours, and then nap for 2 hours :-). I used very basic all purpose flour and will try again with some fancy bread flour next.
I found the crust to be very thick, but overall very tasty.
I’ve waited far too long to make this. It was so simple and is so delicious. Can it be done with whole wheat flour? If so, I may never buy bread again!
Thanks!
P.S. The pictures are very helpful 🙂
If I make a gluten free version of this will it explode and be awful? I miss eating delicious bread, and this recipe looks so fabulous I’m tempted to try it with gluten free flour.
Kristin
Nothing makes friends better than warm bread and butter. My roommates now call me master chef (thanks to you) and I have now met so many people. Thanks a bunch and look forward to making this special treat again soon. Also in the picture your bread looked shiny. How did you get such a beautiful crust? Mine looks more rustic with flower on it.
Instead of parchment paper, is it okay to spray a little nonstick cooking spray in the bottom of my dutch oven?
WoW!, Thanks for the recipe. The bread is awesome and so easy to make. It’s wonderful toasted too.
Can you bake it without a covered pot????
Thank you.
what is the best way to store this bread?
I normally put in a resealable plastic bag, squeeze all air out it.
Thanks much for posting the step-by-step! It definitely helped this novice baker to know how the dough should look. Currently munching on a successful loaf!
Can’t remember the last time reading a recipe made me weep. If the bread is half as good as the story, we are in for a treat!
It’s wonderful! You’ll have to let me know if you make it 🙂
OMG is all i have to say about this bread;-) Yummy Yum Yum!!!i am on my second loaf,my family and i just love this Bread…and it’s so easy mix late evening put on counter till lunch the next day..Mmmmm…Pure Perfection!!!
Thank you so much Maraya!
I can’t wait to try this. As a Bosnian girl who never learned how to make a decent bread and therefore somewhat of a disgrace to my country I see this is my chance to redeem myself 🙂
Thank you for the beautiful story it was touching and warming.
This is a tradition our children will remember and hopefully carry on with their children.
I would like to know if I could add garlic, onions, peppers, seeds, or any other type of seasoning to flavor the bread.
Any suggestions?
Thank you!
Barbara
Oh absolutely! Also check out the No Knead Stecca on my site (just search for it in the search box) – we used olives, tomatoes and garlic.
Maam,
could you please let me know whether this bread can be baked in an aluminium vessel also. Can steel utensils be used in oven?
please do help me out as I am just looking around for the perfect bread recipe and can use some help.
Thanks and warm regards,
Anju
dont kil me ladies but i love hunt fish and camp and every year spend several weeks in the mountains and cook ALOT with dutch ovens in camp (anything you can make in your stove at home) I realy needed this no knead bread thank you and your family so much. everyone down wind will be in my camp for sure
Hi! I am glad you tried it first- my Le Creuset has the plastic knob, too, and know that I know the 450° did not do yours any harm, I will give it a try!
Yesterday night I baked a loaf in Pyrex and the 450° where way too hot! The whole curst burned black, the fumes even went inside the loaf, you van still taste the fume even when you cut off the crust. So I will go for 420° the next time.
About your tip with the parchment paper: this also burns at 450° and gets black and crumbles to pieces.
This was the first bread I’ve ever tried to bake and Wow! That was fun to make, easy and it turned out nicely! Thanks for the how-to photos (your son totally earned those tattoos!), very helpful!!
Hi there! A search for no-knead breads landed me here! The bread looks just awesome and I will surely bake this sometime! What I loved even more is your story at the end. I sincerely hope our kids someday read our blogs and dabble at baking and eating home made breads and bakes among other things. As you said few things match the satisfaction of baking your own bread.. Whoa! That was a lengthy comment!!
You should add home made butter to this project. It is delicous and the kids have a blast. Just fill a mason jar 3/4 full with heavy cream let sit at room temp for 8-12 hours (not necessary just adds to flavor) drop in a clean marble (also not necessary just speeds up process), then shake shake shake. and when it breaks to buttermilk and curde there you have your own homemade butter. Season to taste, I recomend salt and fresh herbs for bread like this. You and your kids will be so proud of what you have made. Enjoy
I too had this problem and just accepted I would lose a little dough to the towel. I was ably to get the ‘torn’ side down in the pot and didn’t notice a problem with the finished loaf though. Since it’s a wet dough maybe using a silpat or even parchment paper to put it on would keep this from happening though.
This bread is incredible!! I enjoyed it with my freshly made barley, bacon and vege soup. Best ever bread to try as your first ever bread making experience! Don’t think I’ll ever have to try another recipe ever!!
Hello! My bread didn’t rise very well…can anyone advise the difference between instant dry yeast and Rapid rise yeast? I didn’t have instant, so I used 1 tsp of Fleischmann’s Rapid Rise instead… thanks!!
Made me teary eyed too! I am trying it today with my son.
I never got a nice tight surface, just a gloopy mess that went flat 🙁 what did I do wrong?
bad yeast?
Is the dutch oven to hold the dough together in a ball shape or is it strictly just for steaming??
Yes to all – It’s the perfect size for baking and steaming and the bread will bake to the size of the diameter of the pot.
My husband (who LOVES freshly baked bread but never baked his own) discovered the no-knead bread recipe yesterday and now I’m waiting for the oven to heat up (with the dutch oven inside) before putting the dough (still rising beneath the towel – I hope!) inside the dutch oven. Did a search on no knead breads and came across your recipe. Yes, it’s an easy recipe but oh, so satisfying too. Love it! And I just loved your story about your son. I actually went “ohhh” inside as I read towards the end. Thank you for a lovely read whilst waiting for my dough and hopefully it will look and taste as good as yours.
I guess I’m comment #681 but putting your cute little son in there is genius and you gave me a chuckle. I really want to make this bread now. Bookmarking this for the next cool day, even if that’s September!
Your story of your “little chef” made me laugh out loud! He is adorable! And you are a saint because I would NEVER let my four year old in the living room, around the good furniture, with a bowl full of flour! haha! Looks like you two had a great time! : )
hello everybody,
I’am searching for chocolate almond bread recipe. if anybody knows please share. PS. very good photos and the recipe looks delicious, i will try it this weekend
Hi,
Can you do this recipe with whole wheat flour?? Thanks! Paula
I absolutely love this bread and so do my kids, 7 and 5 years old. However, I can’t seem to get the flour on the towel right, either I have too much flour and it seems to burn when I cook the bread or the dough sticks to the towel and I can’t get it off of the towel. Please help!
hello Jaden, little boy is lovely!
I’ve seen a few no knead bread recipe but i noticed one thing in common. All of it used a covered pot. If i have a loaf pan which is unconvered, can get the same results? What about all purpose flour, can it be used to replace bread flour in your recipe? Thanks Jaden
Yes, you can use all purpose flour (I’ve done so many times)
As for uncovered vs covered – yes, please try it. Your timing may be a little different once in the oven.
Can one add other ingredients like garlic, olives, cheese or other such things, and when would you add ’em?
I’m so happy to have found this post. It was informative, endearing and very helpful. You are giving your son a beautiful gift by showing him how to cook and create–such love!
This looks fabulous! Will definitely have to try it with my two year old – anything to keep her out of mischief! 😀
I just made this bread for the first time ever last night and it was soooo good.
I made a couple changes to it and it was still great.
http://scrimpulous.blogspot.com/2011/06/no-knead-bread.html
Ii am sure the bread will be womdeful when I make it. But the story of you and your son enjoying the finished product almost made me cry.
It’s been awhile since I’ve made no knead bread and your post was such a pleasure to read and follow. I currently have two shaggy, goopy messes sleeping in bowls, waiting to be turned into lovely loaves tomorrow. Thank you!
I so loved this story. My little halper is now 13 and he has also spent manyu hours in the kitchen with me. Can’t wait to try the bread. I finally got the right pot. Thank you again for a lovely story.
You’re very welcome!
Looks fantastic! I’m giving it a try today. Thanks for reminding me to make this bread. I had it on my list for quite a while and seeing your write-up was just the nudge I needed!
This reminds me of the homemade rolls we used to make with my grandmother. So good and so many memories 🙂 thanks for sharing.
Great description of making this great bread. (Your son is adorable!) This is our favorite bread to make, and we make it almost exactly the same. It always turns out amazing. We frequently use a portion of beer instead of all water. And we measure the flour and water using a scale instead of volume measures which is super easy and more precise. The other thing that I do that helps transfer the loaf to the hot dutch oven is I set it on a piece of parchment in a skillet for the 2-hr rise. Spray the top with some Pam and cover with plastic wrap. When it comes time to put it in the dutch oven, (remove the plastic wrap), and I just pick up the parchment like a sling, and put it all in the pot. I hope everyone makes this bread! Fresh, homemade bread is amazing.
Great post!
I’m wondering if I would have to adapt the recipe a bit if I use whole wheat flour. Would it require the same amount of water, yeast and salt or would that need to be modified?
Also, if I use coarse sea salt, does the amount need to be modified?
Found your blog when searching for how people have made out with the no knead method. Thanks for sharing thoughts and pics. You are much braver than me having your son help with the ingredients near your couch! He’s a good sport.
Success! Phew! Yum.
Just thought of something else, maybe a metal pot would be better for me, pyrex takes longer to heat I think and then doesn’t conduct it through as fast so that could be holding it up as well. Getting there…
Oh no! 10 pounds … maybe I shouldn’t keep trying!
But thanks for the time / temp check. I swear I think mine takes most of the 30. Or maybe it goes up and down with the thermo control. Fan forcing make a diff too. The air is drier in a fan oven. Crispy loaves like french require steam, and a wet loaf like this generates its own, – why the lid I gather. So maybe I’ll try putting a bath in the bottom to compensate. And maybe preheat say … 8.5 mins tehe. I figure if mine is at least only half as fast as yours then if I minus that time out of the oven, then add it back after it’s in… then … oh no that doesn’t work. My brain hurts. I’ll just try a little preheat and directly cover the bread with a cartouchey sort of thing as well as the lid to start.
Got one ready to go in any mo. I’ll let you know. Darn, poet didn’t knowit.
Sorry it didn’t work for you Lisa! It did not occur to me that different ovens could make or break the method. I was just so excited to find a way to do this faster and neater that I wanted to share. I’m sure everyone in my family has gained 10 pounds since I have been making bread every day. 🙂 I just put a loaf in and timed it…my oven takes 8.5 minutes to reach 450, FWIW.
Just an FYI. I used warm tap water heated to approx. 110 degrees F. I did not mix yeast into water 1st, but will try that next time -good idea. I also used ‘bread flour’. I let the initial dough rise for 12 hours. Then let the dough ‘nap’ for 2 hours wrapped in flour sprinkled towel. Yes, a little bit of dough left on towel afterwards, but I peeled it off easily. Baked at 450 degrees F for approx. 30 minutes, until thermometer registered approx. 210 degrees F in center (used my meat thermometer).
Wow – what a great recipe! I just made a loaf, only my 2nd attempt at bread from scratch too. I didn’t have appropriate pot to bake in, so instead plopped it on my pizza stone, on some corn meal. This worked wonderfully. Bake time was about 30 minutes. I made the mistake of covering in plastic after 1 hour of cooling. Next morning, bread crust was a bit soft. So I popped it into the oven at 300 degrees for 10 minutes, and it came back to life. But the real pleasure of this bread is the taste and texture of the inside – soft, tasty, not too chewy. And the crust is a perfect texture as well, not too hard or chewy. Thanks for what will soon be a family favorite!
Beautiful bread! What a great recipe and story to share. I remember my dad making homemade bread and slathering on the butter when I was your son’s age ofcourse we didn’t have killer whale tattoos (just shrinky dink smurfettes LOL), one of my best memories. Still can’t replicate that bread he made but I’m having fun tasting my way through each recipe. Thanks so much for sharing this!
Beautiful bread! What a great recipe and story to share. I remember my dad making homemade bread and slathering on the butter when I was your son’s age (ofcourse we didn’t have killer whale tattoos (just shrinky dink smurfettes LOL), one of my best memories. Still can’t replicate that bread he made but I’m having fun tasting my way through each recipe. Thanks so much for sharing this!
Tricia,
It may be perfect for you every time, (you lucky duck) but I don’t have your oven. My attempts were a Yeeeck loaf EVERY time. ;(
The problem with your method is that every oven takes a different time to reach 450. When I put it cold in my slow to heat oven, who’s to say what stage it would be at after 30 mins. It didn’t work for me until I realised this was the problem, and I couldn’t seem to make any adjustment to compensate. 4 loaves later I gave up. The outside ‘dried’ and shrunk before any real cooking started.
On the other hand, I tried in my mother’s super duper oven which reaches top temp in seconds, and it had cooked well and truly before 30 mins so there was not much ‘uncovered’ time left before it was a coal coated nugget. Had to pull out early. This lead to a very odd texture and a terrible crust.
It definitely is much less messy and more easy than the original method so anyone who has the right oven will be mighty grateful for this even simpler method.
George,
the mix probably had a bit too much water for the amount of flour. I had a similar problem with my first attempt.
Lev
I have found that a few simple changes make a perfect loaf EVERY time.
1. When I add the 1 1/2 cups water, I use very warm water which I measure with an instant read thermometer. (~120 deg.)
2. I let it rise for 18 hours
3. I sprinkle a little bit of flour over the dough, then fold the sides over a few times in the BOWL using a silicone spatula
4. I let it rest for 10 minutes.
5. I use a 2 or 2 1/2 qt. pyrex bowl, sprayed with pam and dusted with corn meal.
6. Plop the dough in, sprinkle a little cornmeal on top.
7. Put into COLD oven. set oven to 450 deg. and cook 30 minutes covered, 30 minutes uncovered. Check internal temp. make sure 200 – 210 deg.
8. Let sit out of oven in bowl for 10 minutes, then cool on cooling rack.
Perfect every time and virtually NO mess.
My dough never became a shaggy mess… it wouldn’t even all clump together with the cup and 1/2 of water so I ended up adding another half cup just to get everything to stick together… we will see what it does in the morning.
I cannot wait to try this recipe today! My fiance and I have been looking for ways to cut costs and I decided to start trying to make all our breads! They taste better that way anyways! However, I do not have a pot or dutch oven like it suggests to cook it in. Is there a way that maybe I could be it on a cookie sheet and cover it with aluminum foil for the covered baking stage? Or anyother options? Any answers would be greatly appreciated! Thanks!
Also…when I dumped it back in the bowl and covered it with the towel it did not puff up anymore at all…
I just baked the bread too and I ended up having the exact same problem as george. Everything was fine (had a dough with a lot of bubbles after 20 hours of letting it sit), but I could not pick it up with my hands and it was not really a dough you could form. It would just lay flat on the floured sheet. So I tried to roll it around in the flour a little bit and baked it. It is very flat. Maybe cuz I just dumped the active dry yeast in it? I also skipped the part with the towel (since it would just stick to the towel) and put it in a bowl covered with a towel. Any suggestions?
@George: you did use Bread Flour? I asked because I almost used the wrong flour until I woke up while measuring the last cup of white flour (I have a 2 yrs old toddler and I am lacking sleep). I tried the recipe today and it turned out all right despite that I had missed read the recipe for 15 minutes cooking time with lid on (lack of sleep). As a result, I had it cooked an additional 15 minutes more with the lid off. The crust was a bit hard but inside was moist (husband was impressed). BTW, I used 1 tsp of Active Yeast instead. I had it rest for 18 hours.
Did you use too much table salt? The recipe called for 1 tsp but you wrote 1 1/2 tsp. Not sure if that would be the problem.
I will attempt to make the bread again this week with the proper cooking time!
Thanks for the response !
Also, Id like to do some baguette but the dow is to soft
to hold the shape of a baguette.
Any tips for that ? Should I put a little bit less water ?
Hi,
Instead of the instant yeast, can I use conventional non instant dry yeast ? I am thinking of the Fleischman Traditional Active dry Yeast.
What would be the amount to use if using the later ?
Thanks
I’ve used both kinds of yeast with success. Dissolve the Active Dry Yeast in a little warm water first – there’s no need to “proof” the Active Dry Yeast, but it does work better if you dissolve in water first (just a couple tablespoons of water is fine. subtract this from the water you’ll use in the recipe)
Would baking time be the same for the mini loaves?
Mini loaves bake faster. You’ll just have to experiment as I don’t know what size your loaves are. Best bet is to use a thermometer to check internal temp of bread.
This is so great, especially the pics of your son making it! I am thinking about how fun it would be to teach my daughter’s preschool class how to make this bread and have them each bring home a loaf of bread they made to share with their family. But need some help/guidance from you (or anyone else!). Is it okay to divide up the dough before it goes into the pot so I get some mini loaves? And any suggestion on another baking vessel where I can bake a number of mini loaves at a time? Looking forward to my daughter being the Rockstar of her class! Thanks — LOVE your recipes!
Yes you can do that divide up dough for the kids (how fun!)
If you’re making many loaves, try a large roasting pan (you can even use the tin foil ones – invert one as the cover.
The bread tasted great just wasn’t very high at all. Thanks, I’ll try it tonight/tomorrow with more yeast!
I have made this 2x now and I’m having issues-mostly with it not being as lovely looking as yours. The first issue is that mine does not even come close to going into a ball when I dump it on the floured surface and try to tuck the ends under. I let it sit on the counter for 12-16 hrs and have even decreased the water down to 1 cup. Still winds up being more liquid than dough. Despite that, I have pressed on and baked it. Neither time did it rise nearly as high as yours. I tried putting in a bowl with higher sides and that halped but it didn’t rise much beyond what it started with. I’m going to try it with 1/2 tsp yeast instead of the 1/4 tsp. But any advice you can give would be greatly appreciated since I’m hoping to try this again this weekend. Thanks a bunch!
yes, definitely try using more yeast. How does the bread taste?
I just took my bread out of the oven!!! Woooo Hoooo… I was alittle scared when I put it in the oven though. Mine was really sticky. I put it on parchment paper because I had read all the comments before I got to the second day process. It is still cooling but looks wonderful! Thanks for sharing such a great recipe!
My niece tried to do it but she still needed my help 😉 The young boy on the pics might be a great cook in the future 😀
To Jay and any others who wish to help, I tried the 12 hour wait. I had dough with those fine bubbles all over it. The dough was workable with a little extra flour added. However. I did not attempt an other 2 hour rest or rise period. I watched the Sullivan Street Bakery “you tube” clip and no additional period is called for. Well, I did have better results, a smaller loaf then I expected, great crust. However, the bread itself was grey and damp. While we have eaten it, we still would not serve it to guests. When I made this a few years ago I remember the bread being white and light. Now it is grey and damp (heavy). Suggestions please?
Hi, I have tried this recipe twice… both times were great!! One quick question: After the ‘nap’ phase, the dough is nearly impossible to get of of the towel. I do ‘generously flour’ the towel prior to placing the dough on it, but the dough still sticks to the towel. It seems easier to just throw the towel out, than to clean it.
Thoughts?
Thanks
Try using parchment paper instead of a kitchen towel – then when you’re ready to bake, just lift the whole thing up and put it inside your pot.
Oops. meant to say Hello Jay.
Hell, Jay. Thanks for the advice. Probably by saturday I will try again and incorporate your suggestions,
all the no-knead recipes have about 1 tsp salt in them… but I also like more salt-flavor to my bread, so I add about 1 1/2 tsp.
Just did the no knead bread this morning and it failed. Was feeling so bad since everyone keep saying it is so easy a 4 year old can do it. sigh… But, after reading your post, I realized some steps which I didn’t follow. So, I am going to give it another try. 🙂
Thanks again for the great step by step and pictures !! 🙂
It’s starting to sound like there might be something about the conditions of your kitchen (humidity, warmth, etc.) that might be affecting it.
Try adding a bit more flour at the initial stage if you find it too goopy and wet during the fold stage, and you can also consider adding a little bit more flour to the bread during that first fold, and pat it down. Knead it a bit if you have to.
The other idea that occurred to me last night is that you might possibly be OVER proofing during that first rise, depending on the humidity and other conditions in your kitchen. Try instead 12-14 hours. Sometimes when dough proofs too long the gluten breaks down and it can get soupy, so don’t feel like you have to let it proof 18-24.
Thank you Jay. You know. 3 cups of flour, 1/4 tsp of yeast and 1 1/2 tsp of salt mixed together is child’s play. Then 1 1/2 cups of tepid water mixed into the dry so that there is no more dry is further child’s play. At this point one has a sticky mess. Then covered and a wait of several hours (12-24) is very simple. For me, now the hard part begins. That mess of flour should have somewhat more body then it did several hours ago. Yes, it has bubbles, but it is formless. After putting it on the floured counter one can not pick up any side of the dough. When I attempt to do this I just get some of the dough in my fingers. There is no side to fold over. If you try to grab a side of it, all you get is a lump of dough in your hand, it just breaks away from the body. There is practically no place to make a change in this simple recipe. I will try the extra 2n hour rise you mentioned. Thanks
George, the main question as to the effectiveness of the yeast is whether the dough as doubled in size or not after the 12 hours. Also, make sure there are lots of bubbles all over the surface. If it has, then the yeast has done it’s job – the yeast won’t make the dough non-sticky.
After 12 hours, dump it out on a floured surface. Flour your hands and pick at the edges of the dough to encourage it out if you need to. Then, on the floured surface, pat your floured hands on top of it to flatten it out a bit (and make it a little less sticky), and it should have picked up enough flour on the bottom side to let you pick up a side and gently fold it over towards the center.
Then flour (or cornmeal) a towel, flip the dough onto the towel, flour the top a bit, cover with the towel, and let it rise again for another 2 hours. After two hours, flip it over directly into a scorching hot pot out of the oven.
Lisa, thanks for the suggestions. I used instant yeast the last time. Also, I have used rapid rise yeast and active dry yeast, all with the same disappointing results. I have even set aside a small amount of the 1 1/2 cups of water and proofed the yeast. The expiration on the yeast is 2012. “Sticky” does not seem to be the problem. The dough after the several hour wait period is formless. By this I mean when you go to pick it up, it falls through your fingers. It can’t be formed and thus the idea of folding it twice before being put in the pot just can’t be done. However, I have thrown it in the pot and I get about half the rise and a damp, gray interior, really not presentable. This most frustrating since I have made this loaf last year and it was just as seen on TV demo. So, I still need some help!
One other thought– your yeast could be old.
Great recipe! I used active dry yeast instead of instant. I let the yeast sit in the warm water for a minute before mixing it in and it turned out great. I also doubled the recipe and baked it in my huge Le Creuset soup pot. Perfect!
George– mine is very sticky after the 12 hour rest, also. I let mine sit overnight in the oven (turned off) with the light on. The warmth from the light bulb helps it rise. Is your house warm enough during the second rest?
I now have trouble with this recipe. It is simple and I follow the directions exactly. However, after 12-24 hour rest period I still have a loose sticky mass. It can’t be patted and folded over for the oven. When you pick up this dough it still falls through your fingers. Even so, I get it into the pot and bake it. When complete it has a small rise, crust looks good but the bread is damp. Any help?
I have followed the directions.
I’ve made this twice, the first time I let it rise 20-22ish hours and it was amazing! The second time I only let it rise 12 hours, and although it had a wonderful texture the flavor was just incredibly bland. I would recommend erring on the longer side of the 12-20 hour time period, especially if you have a colder house.
This bread is great with blue cheese smeared on it.
Yours is my go-to version of no knead bread. Thank you!
Seems like everyone has a post about this No-Knead Bread, but hey, when you have a post that even a 4-year old can do it, well, that means, I can do it too! But had to get the instant yeast first, only had active dry yeast at home! Finally had the nerve to try it….. WINNER! Hubby says it’s the best bread he’s ever eaten. Kids devoured slices and slices of this. We’ll be making this again and again and again. Your detailed instructions, even regarding the LeCreuset Pot and using kosher salt were very helpful. I have one, and one only LeCreuset Pot, so I didn’t want to ruin in. It’s awesome. Thank you!
my friends loved this bread… it did not last past 2 hours in the house… loaf is crispy texture outside and airy inside… and was chewy due to the less amount of salt i used. also let it rise for 20 hours… FANTASTIC. i am on my second batch today!
I love this recipe. The New York Times had it, but your explanation is better. As a savory variation, I make sure my water is warm and I add in 3-4 tbl of HONEY. Mix well, and THEN dump it into the flour. You won’t be sorry!
Either way, I promise you will love the crispy crust and moist inside of this bread.
By all means, eat it WARM.
Thank you so much for such a great recipe. My four year old son and I made it, and I baked the bread today. I did not have a cast iron pot so we just plopped the prepared dough onto a preheated cookie sheet and covered it with a foil “tent.” It did not come out as pretty as yours, a bit flatter and darker in color, but still extremely delicious, crunchy on the outside and rich and chewy on the inside. Thank you once again!
Just made this in 3.5qt LC pot. Took the knob out for safety and used a tin foil plug… easy enough, 15 seconds to take of and 15 seconds to put back. Used 1/2 cup of wheat, rye, oat grain mix, otherwise exactly as above. Turned out fantastic.
Guess I didn’t use enough flours though, since it really did stick to the baking sheet… had to scrape it down to the pan.
Nevertheless… the outcome was great. Thanks for the easy to follow instructions.
Wow, this is a lovely website 🙂
I will definately try this.
Pls do visit my blog if time permits
I just made this recipe for the first time.. it is delicious. Everything ran smoothly, except the dough stuck to the towel, even though the towel was floured. Psyched to make this again!!
Unfortunately, my le creuset pot knob exploded in the 450 degree oven. I’m on the phone with them right now. *sigh*
also, was the mie part of the bread supposed to be dampish. I have made no knead bread before.. and that was the same case
if you click on my name.. i have a picture I just posted. I think the meat part of my bread is more… wet than yours?
Thank you so much for sharing the recipe. I just made mine but added a two day BS recipe of starter. They came out great!
Thank you for your quick response! Just read Susanl’s response to Anna’s post, & maybe moisture in my flour is a factor (I live in WA!). I tried to measure all ingredients accurately, & in baking with the “Artisan Bread in 5 Min. a Day” books, I know this isn’t exactly ‘rocket science’ – I’m just puzzled. Oh, well, back to my bread bowl!
Hi Anna, I used to live in Alberta, Canada – very dry like Texas – and I moved 3 years ago to Nova Scotia, which is humid like Georgia. I’d say there’s a good chance that your flour is already holding a lot more moisture because of the humidity in the air and you’ll need to add less water as a result.
I think your idea of adding water until you get the right consistency should work just fine. I’m going to try it that way, too!
I’m so bummed about my bread – had it ready to go for when we got back home from church today & everything looked great when we left this a.m. By the time I was ready to ‘shape’ it & put it in the bowl, it was RUNNY – not at all like any bread I’ve ever made (& I’ve made lots of other bread recipes, but never this one). I just noticed the post from anna on 3/18; I’m more than willing to give it another go, but I’m thinking I should wait for advice. (My yeast is good, my bread flour is not Harvest King – haven’t located any yet – but works well in other recipes, I’ve double-checked everything I can think of!). ANY help is much appreciated!!!
This recipe is no different than the original No Knead Bread that people have been successfully making. The only reason it could be runny is either too much water or not enough flour. The brand of flour really doesn’t matter. I’d suggest trying again!
I made this bread lots of times when I lived in texas but since I moved back to georgia it hasn’t worked once! every time I attempt, the dough turns out really runny, not the sticky shaggy mess I was able to create before. anyone else have this problem? could it just be that I need to add water gradually until I have the right consistency? I even tried buying new yeast, I NEED to have a loaf of this stuff ASAP! 🙂
Omg, BEAUTIFUL. I wanna make my own now!!!!
flavor and texture was good – very crunchy – always good to find an easy recipe.
Just made this bread and i’m going to have some for my lunch. I can’t wait to try it out 🙂
just mixed this up – on the counter now – i’ll be back tomorrow – fun discussion ya got going here!!
steamykitchen.com
You can certainly use any bowl to let it rise.
I made this today and I’m in love!! I subbed out a 1/2 cup of wheat flour and oh mama was it good! I’m going to do it again tomorrow :D!!
Thanks.
Hi, Jaden. I’m having some problems, I think, with my rise on this recipe. On your most successful loaves, what is the width of the bread when cut in half (at highest point in middle)? Thanks.
You can try buying new yeast or letting it rest in a warmer location at home. The bread shape totally depends on my baking vessel. Smaller width, tall pots will give me taller bread. Wide pots will make flat-ish bread. Try using a different pot!
I tried this recipe a few times before with middling success. I’m trying yours because it has a new step I haven’t used before: give it a kiss goodnight! That’s important! I just now did that. Looking forward to lovely bread tomorrow.
I love to make this bread. I have made many many times. Each time it turns out perfect. I take it to dinner, potlucks, work and my g’kids love it. Just follow the directions you cannot go wrong!!! Yummy!!
Re bread rising: The good temperature maintaining technique is to stick to the bread into an oven with the oven light on – I also do that when I make yogurt. LIGHT ON, OVEN OFF. I say somewhere like 80 F, but it should also rise at 70.
Do you guys know how to check yeast for freshness? You dissolve a little yeast in water b/w 110 and 115 F (which, by the way, the temp it should be as you add it to your dough), and if in ten minutes it’s not looking bubbly, it might be old and won’t let the bread rise. It’s important to have all of your water WARM AT 110 degrees min as you are mixing your dough.
Here’s another tip along time lines of removal from the pot – you know what else happens to me since I bake it nearly every day – sometimes if I don’t remove when I need to (like when the timer goes off) right away, it sticks to the bottom!! So in that case I let it cool in the pan and it pops out at that point.
It does not matter whatsoever to me what size pot it rises in because I don’t spend any time shaping – just dump the risen dough directly into the hot dutch oven, hence the diameter is not important.
Cook’s illustrated suggested to let it rise in the skillet for the second rise, by the way, like a 10-inch skillet. I don’t do that step though like I said, but a friend of mine does, that’s how I know.
I am enjoying this discussion too much!!! I am sort of an expert on this one.
what is the ideal diameter of the pot and the temperature during the overnight rise as well as the two hour second rise?
Sorry to cut in on all of your questions, Jaden, I hope this is not getting annoying – my experience with a lot of bread is that I don’t really cut it until it’s fully cooled because otherwise it ends up being a little moist inside as bread continues to cook in its shell of a crust. But I don’t think most people mind. My husband is very sensitive to that though.
Uno question — your instructions do not mention how long to let cool in the pan, and then cool on the rack. Any suggestions.
I’m letting cool about 25 min in the pan, but wondered what you did? Ciao, Dominick
Once bread is done baking, you’ll remove from the pot and transfer to a cooling rack to cool for a bit, 20 min or so. But it doesn’t really matter. Sometimes I am too impatient to let it cool at all 😉
Jaden, I tried this one today as promised. OMG so good! I love how crunchy the crust is. I made one larger boule and two smaller. I am one person and am actually trying to cut back on my carb eating. I will partially bake my other two and freeze as you suggested in your baguette recipe.
Also I did the part whole wheat flour.
It was fun how the crust made crackly noises. Woke my youngest cat up from her nap to listen.
Thanks for the great recipe!
Karen
Thanks so much Karen!
When I made this, I let rise as the instructions state but with a little more yeast. Then I split in two after the 24 hrs rising time……I made a ciabatta type loaf, and one loaf baked in a dutch oven. It is beautiful bread~! Came out great! Next time I’m going to experiment with rosemary bread, sundried tomoatos and cheese bread. Great recipe. Thanks! Dominick
I tried this twice over the weekend. It seems to have great potential but I had a little trouble getting the dough to rise. The first I didn’t have the rapid rise yeast and used 1/2 tsp of active dry yeast. It didn’t rise much during the two hour second rise. Then I got some rapid rise yeast and tried again. It rose a little better but still not great. Other than that mine looked as yours in the pictures. I was using a pot that is aluminum and about 8.5″ wide. The loaf turned out about 3″ high in the middle. Is that about right or should it be higher? I’m wondering if my pot is too wide. Also, what is the ideal temperature for both the first 18 hour napping period as well as the second 2 hour nap? I had around 72 degrees for the 18 hour nap with about 5 hours in the middle in the low 60’s. The two hour second nap was done at 72 or so. – Thanks – Bob
Jaden – I believe you can too cut the yeast. In general my experience with bread is that it will rise with even a very tiny amount of yeast.
Donna, may I volunteer that I believe your dutch oven is much too big for this recipe, hence the flat loaf. To get a loaf as puffy as mine (the link is in the comment immediately above yours), I use a 5-qt dutch oven and my recipe is for 6 C of flour. But anyway, your pot is too big and the loaf spreads itself over wider surface area than is ideal for rising in the oven for this amount of flour, hence it doesn’t go as high up. Does this make sense? You say that it was flavorful and crusty and I think that it was not the problem of dough rising per se, just the pot size.
I juat baked this bread and followed to the letter, but my bread did not rise as much as the one shown. Although it taste great and is crusty, a little too crusty, I am not pleased with it not rising as it should have. Can anyone tell me what I could have possibly done wrong. Maybe it was the way that I shaped it afterwards or placing it in pot. Also, what is the best pot to use. I am using a 7 qt cast iron pot.
Gorgeous! But I do it easier yet – no shaping at all! And it still looks stunning and tastes fabulous. Here’s what it looks like:
http://girlsguidetobutter.com/2011/02/no-knead-bread-ii-no-shaping-no-dutch-oven/
Which is why I am able to bake it 5-6 times per week, ammounting to 100% of our bread consumption (which is with every bite of every meal). I haven’t bought bread for over two years now, instead I buy flour in 25-lb bags, since each of my loaves is made of 6 cups of flour.
My daughter is not 4, but 11,…and she REALLY has wanted to try and make bread. We tried it once and did not exactly turn out the best. She loves to collect cookbooks and try new things…WAY more adventuresome than me. I am going to show her this! thanks!
This bread is fantastic, thank you so much for sharing it!!! Though, word to the wise, when putting the dough on a towel to let it “nap” before baking, be sure to put PLENTY of flour down. I let mine sit for two hours this time instead of the one I let it sit last time (was waaaaaay too impatient) and I don’t think I had enough flour, and the dough stuck. So, just be sure to get plenty on! 🙂
I decided to try this recipe, but I halved it. Everything was looking great until I turned it onto a floured surface. I used a towel. I wet my hands and turned it into the center. I folded the towel over it to cover it. It just never rose again. It is on the cold side where I live…. could that be the problem? I placed it over a warm bowl of water and it is barely rising. Sounds like a great recipe, so I want to do it right.
thanks for your help!
If it doesn’t rise, it’s either because of yeast or temperature. If you halve the recipe, you cannot halve the yeast. Why don’t you try the recipe as-is first?
Jaden, I just made this today and it was terrific. My only quibble was that I used wet hands as instructed and the dough really stuck to the towel when putting it in the hot pan. So we will make adjustments next time…but the bread came out perfect. Whole Foods can’t touch this!
Can’t wait to buy some really good butter to go with. Thanks for the recipe.
First I have to say how much i loved the recipe, with one exception. I followed the recipe with the pictures, and I think that there is a typo in the amount of salt added. You have written that you should add 1 teaspoon table salt. I did this and the bread tasted like there was no salt at all. I think that the recipe should be 1 tablespoon table salt. Other than that, the bread was amazing. Thanks for a great recipe.
Hi Sam,
The original recipe called for about 1 teaspoon, the same amount as I have listed! But feel free to add more salt – you might want to try incorporating olives and cheese too. Check out this recipe:
Jim Lahey’s No Knead Baguette: https://steamykitchen.com/6795-no-knead-baguette-stecca.html
Jaden
I followed the recipe exactly and the bread was delicious! My husband loved it! My grandson mixed it the next day to take home with him to process with his Mom. I wonder if there are additional ingredients or herbs that can be added to the basic recipe. Rosemary and sharp cheddar cheese are just a couple that come to mind. Let us know!
I must respectfully point out what I believe to be an error in your basic recipe: the quantity of salt. You call for either a full teaspoon of “table” salt or 3/4 teaspoon of kosher salt. I think you have it backwards. The grains of table salt are much finer than those of the more coarse kosher salt, although they are nearly (notice I say “nearly”) identical in chemical composition and taste. Therefore, you can pack more “saltiness” in a given volume of table salt than in the same volume of kosher salt. Typically, a prudent cook would use 3/4 tablespoon of table salt vs. a full tablespoon of kosher salt in your bread recipe. (Of course, there are brand differences among kosher salts in grain size and flavor, but the basic principle remains the same: use a larger volume of kosher salt than table salt in your recipes.)
Aha! How did I miss that? Thanks for correcting.
I followed the directions to the letter. I noticed right off that the dough seemed very dry when I mixed it. It wasn’t a sticky mess. I went ahead anyway. I just took it out of the oven and it has a very thick HARD crust and the inside is undercooked. I wonder what I did wrong??? Any ideas?
Either too much flour or not enough water. You might have measured incorrectly – the dough is absolutely a sticky mess once you mix it up.
Hurray for this recipe!
The bread came out well. Well, better than I thought it might. Along the way I had a few issues, I think in hindsight my yeast wasn’t quite right and will try proofing it and maybe it wanted a wee bit more than the 13 and some hours I gave it. It came out as a sloppy ploppy soupy goopy mess!
I’m living abroad this year and don’t have all the amenities I desire. The pot wasn’t quite right, but neither is the oven. Nor was the flour (I picked it up at the only open shop on a Sunday. Give me back my city life, pleease).
Despite thinking it was all ‘going to pot’, when it popped out and I laid it on the dinner table with everything else, my flatmates gobbled it up and declared it the best loaf I’ve produced for them yet. They loved the crust and the fleshy middle bit. There’s still a bit left, (I really overstuffed them, despite the pot taking up so much space in the oven) so I’m looking forward to seeing how the crust behaves tomorrow. Although you say it doesn’t stay crisp, that’s not such a bad thing as the flatmates complain bread we buy out here goes all hard too soon.
I’m looking forward to trying this recipe again till I get it just right. Hurray!
LOL Izzy, I love that you make do with what you have!
I see a similar question already on the board but I will ask for clarification: Is rapid rise yeast the same as instant yeast? If not, can I still use it? I really want to try this recipe today but I don’t have “instant yeast” on hand. Thank you!!
You can use either! Rapid Rise yeast is same as instant yeast.
See here for more info: http://whatscookingamerica.net/Bread/yeastbreadtip.htm
I followed the recipe exactly and it more than doubled and became frothy and wiggly. I then put it in a tea towel to nap for a few hours and it never doubled in size – just a little. I did bake it my LeCruset pot and it stuck to the bottom and did not cook through in the middle.
Should the pot have been oiled?
Hi! I’m a college student, and I found your recipe after getting tired of walking thirty minutes to get decent bread every week. I don’t have any fancy kitchen supplies, so what would you recommend that I cook this bread in to prevent my pots from melting?
Head over to nearest Target or Walmart and get a cast iron pot – inexpensive and will work perfectly.
I just noticed the directions do actually say ‘the night before’, but this doesn’t add up 🙁 We eat at about 7, so the dough will have been sitting out for more than 20 hours. Is that OK?
Yes, you can do this night before. It’s a pretty forgiving recipe, lots wiggle room.
Dear Steamy,
I’ve aspired to make this for nearly a month now and feel quite pathetic whenever I think about it. I just don’t have the time to prepare it (though it’s super easy) 8-20 hours before dinnertime. Any way to prepare it the night before? <3 ty
Dear Steamy,
I love this recipe….thank you so much! This is probably a dumb question, but can you tell me the difference between “instant yeast”, “active dry yeast” and “highly active dry yeast”. I haven’t been able to find a product called instant yeast, so I’ve used both active dry yeast and highly active dry yeast (in the little Fleischmann’s packets) with varying degrees of success. It seems like I have to use 1/2 teaspoon of the yeast instead of 1/4 teaspoon. I am a complete novice baker, so any info. or insight you could give me would be most appreciated. Thank you!!!!
Hi Holli!
Instant yeast is ground more fine than active yeast and works much faster. You can use instant yeast without proofing in water/sugar first like you would for active yeast. However, with No Knead Bread, you can use either, and you are correct to double the amount of yeast (1/4 tsp instant yeast : 1/2 teaspoon active yeast)
Try proofing your active yeast first – in 1/4 cup warm water and pinches of sugar. Make sure you also subtract the 1/4 cup water from the recipe too.
Steamy,
I just wanted to say that I made this bread for the first time using your instructions. It was simply the most amazing bread I have ever made in my life, damn near the best bread I have ever eaten in my life. My daughter and son got a real kick out of listening to the bread “sing” after being pulled from the oven (took about a minute before it really started crackling). My children were doing their usual kid and teen stuff when the intoxicating smell of bread baking pulled them from their bedrooms (no small feat!) and into the kitchen where they refused to leave. My son (13) who has always refused to eat crust of any sort simply devoured this and couldn’t get enough. My daughter (6) didn’t eat the crust but hollowed out the loaf begging for more (her crust did not go to waste…lol)! We sat on the kitchen floor crunching and chewing our way to heaven, moments like that you cant put a price on. Thanks!
Hi Richard! Thanks so much for sharing!!! Melts my heart 🙂
You might want to add some vital wheat gluten when using the whole wheat…..it will help in the development of the gluten strands when working with wheat flour.
Thanks so much for a wonderful recipe!!! I was wondering if it’s possible to knead a bread instead of waiting for 8-12 hours? Thanks! 🙂
AMAZING!! thank you for this, perfect directions & great recipe (which I folloed to a “t”, sans the bread flour) http://ringr.wordpress.com/2011/01/15/no-knead-bread/ SUPER easy, thanks for this
I am trying your recipe out right now! I think I did a couple things wrong, but I’ll do better next time. I always have to do things a few times before I achieve perfection – lol! Your little guy is so cute, it’s great you are teaching him valuable skills when he is young and is having so much fun! Thanks again for the great recipe, I plan to make it over and over again!
This was the first time I had ever made any kind of bread.. my thought, if a four year old can do it, so can I!..I think it turned out ok, I did not have instant yeast so I used a 1/4 teaspoon of active dry yeast in 1/4 warm water and then omitted that much water from the recipe. I used a cast iron pot and the only other trouble I had was being sure the bread was done. The probe I use wont go past 200 degrees. I cooked it covered for 30 min and then only about another 10 min past that. (looked pretty brown) I think, it may have actually turned out ok! I wonder if maybe a little more yeast would have been better? But my three year old seems to think it turned out pretty tastey! Thanks for the great recipe! Lara
Just loving the image of your son sitting on the step eating his bread and wiggling his feet. My former foster son loved homemade bread; the heels are esp. good when they are teething! I can’t wait to try this.
Wow! Thank you so much for this recipe. I used to make bread all the time, but then my arthritis got so bad that kneading became too hard for me, and I went to store bought breads 🙁
I can make home made again!!! Thank you Thank you Thank you 😀
This is the best bread I have ever made– and it wasn’t even my own kitchen! We’re staying at my in-laws for the holiday so this really is a bread-for-dummies sort of recipe (and my own 4 year old helped!). It was everything I like in bread, and you even get props from my mother- and father-in-law!
I can’t wait to get to my own kitchen and try it again. If it turns out as well, I think it will be my ‘go to’ recipe to bring to parties.
Thanks for a *great* recipe and Happy New Year.
Thanks so much for your glowing review Elissabeth! Try the No Knead Cinnamon Rolls https://steamykitchen.com/248-caramelroll.html next. I think you’ll be in heaven!
I asked for the “Essential New York Times Cookbook” for Christmas. I noticed this recipe and then I found your instructions for the No-Knead Bread. I made it yesterday. For anyone who is confusing this recipe with another recipe from the 1970’s called Julian Street No Knead French Bread, this is totally not the same thing. This recipe far exceeded my hopes, which I admit weren’t very high. I think this is the best bread I have ever produced in my own kitchen. If I had been served this bread in a restaurant, I would go away saying the restaurant has great bread. It has everything I like, nice crackly crisp crust and a nice airy crumb with a nice chew. Mine looks even better than your picture. I’m going to try it with your suggestion for the Kosher salt. Do you have any other recipes you can recommend that are this mind-blowing? I like Asian (Chinese, Thai, Vietnamese etc) and also French & Italian, etc. etc.
Hi John – try the No Knead Cinnamon Rolls https://steamykitchen.com/248-caramelroll.html
Some of the other very popular posts on Steamy Kitchen:
Vietnamese Pho https://steamykitchen.com/271-vietnamese-beef-noodle-soup-pho.html
Hainanese Chicken Rice
https://steamykitchen.com/5068-hainanese-chicken-rice.html
Thanks, Don. I have some fennel seeds from my garden that I will try, and I won’t preheat the pan next time, because my husband doesn’t like all that crust either!!!
I grind some fennel or caraway seed or both, in the coffee grinder and mix it with the flour and it adds a nice flavor. This is my favorite bread recipe. My wife does not care for the heavy crust so I don’t preheat the iron pot and this gives a much thinner lighter crust, more like regular white bread crust. I prefer the darker crispy crust.
I grind some fennel or caraway seed or both, in the coffee grinder and mix it with the flour and it add a nice flavor. This is may favorite bread recipe. My wife does not care for the heavy crust so I don’t preheat the iron pot and this gives a much thinner lighter crust, more like regular white bread crust. I prefer the darker crispy crust.
I am a vegan; so that eliminates certain ingredients. I bake my no-knead bread in my iron skillet, with a lid, so that part is okay. I’m just looking for more flavor. I’ve tried adding 1/4 cup of rye flour, but get the same result; lackluster flavor. Like I said, the crust and texture are wonderful. Maybe I’ll try a longer rise and see if that helps. I’m “brewing” some of the ARTISAN BREAD IN FIVE MINUTES A DAY in my refrigerator right now, but haven’t made any yet. You use less salt and less water than I do, so I’ll try your recipe, and hope for the best! Thanks for your help, and your son is cutie-pie!!!
I use 1/4 cup of my homemade sourdough starter instead of the yeast. Even when I made this bread with yeast, it didn’t have much flavor. The texture and crunch are incredible, but it’s just not very yummy. I don’t use bread flour, but I’m not sure that would make much difference. Any suggestions?
Hi Barbara,
I wish I had an answer for you! You might want to experiment with your normal bread recipe, except add more water than normal and follow the baking instructions (i.e. using a pot)
It’s the water content + pot that creates the incredible crust. Let me know what results you get! jaden
I love this recipe but want to know if I can make rolls with this also. Please let me know as I want to make this for Xmas. TY
Try my friend’s recipe over at The Pioneer Woman for no-knead dinner rolls:
http://thepioneerwoman.com/cooking/2007/11/pw_dinner_rolls_-_no_kneading_required/
This looks so great! Loved the story about your son wiggling his toes in pure bread ecstasy, too!
I’m drooling sooooo much right now!!! Cant wait to try this. 🙂
I haven’t baked a good loaf of bread in months due to pregnancy and postpartum with my 6th child…but your posting gave me the confidence to try. I love this technique so much I think I will make this a part of our winter daily routine — although I think I will need to make a double batch so that everyone will have their fill. Loved it.
I love making bread and was so excited to come across this technique. However, I have failed 3 times now. My dough never gets to the “ball” stage! Remains a wet, gloppy mess. If I place in towel, sticks to towel, then won’t come out properly. Crust is lovely, but bread doesn’t rise more than an inch or so, what am I doing wrong ?
Thanks in advance
It sounds like your yeast has gone bad. If bread doesn’t rise, it’s because of the yeast. Also, now that it’s winter, try putting the dough in a warmer spot in your house.
Tried it with amazing results! Thank you so much for a well written article.
I used paper towels in place of the floured towel and it still came out perfect. No sticking and no mess. 🙂
Wonderful-looking recipe.
My wife has 30 preschoolers 3-6 who do a lot of cooking–this will be a good recipe to try.
HAS ANYONE TRIED THIS WITH WHOLE WHEAT FLOUR?
Or any other kind of flour?
Ed
Whole wheat flour is more dense than bread or all purpose flour – start with replacing 1/4 cup of the all purpose flour with wheat flour…and then gradually increase from that. That is what works best for me!
I tried this recipe with whole wheat, but the consistency seems off (it hardly bubbled). Do you recommend adding more yeast or water? Please let me know what success you’ve had with whole wheat with this recipe. Thanks!
Hi there! Whole wheat flour works differently — it’s much more dense and won’t rise like regular AP flour. Try thie recipe and substitute 1/4 cup of the AP flour for whole wheat flour.
Thank you, to more it more clear, my bread is almost ready, it smells in the house as good bakery.
The recipe is unclear in part of pre-heating oven. Maybe you can think I’m stupid, but I started to pre-heat my oven and slip my bowl with dough inside for half hour as it says in recipe. In half hour I was following recipe to start baking the bread, when my bowl with towel and dough come out, I got almost done bread. Please, make this part of recipe clear. I flopped my dough in baking bowl and center of the bread fall of. I don’t know what I’ll get here eventually, because my bread in oven right now, but I hope this mistake will not ruin my bread.
I see where you got confused. The recipe directions say to “slip a pot” into the oven (not the bowl) but I’ve added a sentence to make it more clear.
Thanks… Very easy and VERY GOOD! thanks again… 🙂
Super cute pictures! I use a much quicker and even less labor intensive version I found here:
http://theitaliandishblog.com/imported-20090913150324/2010/2/26/amazing-artisan-bread-for-40-cents-a-loaf-no-kneading-no-fus.html
Plus, you get multiple loaves so you’re only an hour away from fresh bread for several days!
I really enjoyed reading this post and it was so fun to watch your son making the dough
Mine is just sleeping till tomorrow morning to be baked!
thanks for the recipe, I´ll let you know how it was!
From Madrid,
Mararia
elguisodemararia
Your recipe was Foolproof!!! and the taste and texture was Superb!!!!!! best bread I have ever made….I am a former Chef and always wanted to do a no nonsense recipe for white bread …..this is Awesome and I have now so many Ideas to use this bread for Parties….Thanks a Million!!!!
I just tried this for the first time – haven’t baked bread since I was a kid!
It turned out great – fluffy on the inside and crunchy on the outside, but it doesn’t have a lot of flavor…what kind of things can I add to flavor it without messing it up? (I know nothing about baking!)
This type of recipe is NOT new….it was only re-found and given a new twist by a chef who was recognized in an article in the NY Times. They should have done some real research first. There were recipes like this decades ago and even called no-knead bread. I even have the recipes.
I love this bread. The first time I made it, it looked all bubbly after 16-20 hours, just like the picture. I’ve made it 3-4 times since and I’ve never gotten that wonderful bubbly dough like the first time. It still bakes great and tastes wonderful, but I wonder what I’m doing wrong.
It sounds like your yeast went bad. Try buying new yeast!
its in the oven right now! can’t wait to see how it comes out – i seem to ruin every other bread i’ve tried – hopefully this is my godsend! 🙂
ps- my favorite part is your note at the end… it made me almost cry… i love those beautiful simple moments with our kids. thanks for passing along the recipe and a piece of your heart!
I’m home with my four year old today and we are so doing this. Your post was engaging, witty, and also inspiring!
This is the best recipe for No Knead Bread. When I try to dump the dough into my cast iron pot after the 2 hour nap, the dough sticks to the cotton towel no matter how much flour I use to dust it. Is there a trick to getting the dough off the towel after it’s 2 hour nap? Can the dough nap in a pyrex bowl instead of a towel? Thank you for this wonderful recipe and your book.
430 posts later and it’s still so incredible-looking that people have to comment.
Thank you for this recipe for the everyday (lazy) man/woman. I have to ask though, did you ever try this recipe and bake it in a bread pan?
I wanted a loaf of bread without the kneading, heck I’d make Santa bake it if he wasn’t on vacation 😀
THANK YOU so much Jaden, and I appreciate your quick response to my questions! 🙂 Yes, the bread was fantastic, and since then I made two more. One with an assortment of dried herbs such as parsley, basil, garlic, etc., and then another with roasted garlic and cheddar cheese (cubed 1/2″). I stress to others how important it is to keep it wet; keeping a nice balance of dough-water ratio… as you suggested. Next one I will be using asiago cheese! I also tried your fried chicken recipe and the potato & leek rosti! Yummy….right up my alley! I will never again waste ingredients on attempts at fried chicken, as I am sticking to the recipe from your site! I think the thyme is a key ingredient in the breading; as far as the addition of herbs go. I used this on boneless/skinless chicken. Thanks again…and I love what you do! You’re the greatest and nothing short of a superwoman!! 🙂
I put the rack lower 1/3 part of the oven.
You don’t have to mix the dry ingredients – I just add water and start mixing.
Glad you like the recipe! Let me know how it tastes.
OMGosh! I’ve been checking this recipe out for days and finally decided to make it, it’s cooling down right now and it looks amazing! I read each and every one of the 426 viewable comments and I sit here wondering how anyone in the world could goof up this recipe! This was my first attempt ever at bread and it turned out exactly as you say. Though Jaden… I have two questions that I had not seen anyone else ask and they were my only 2 questions from the get-go; since you explained everything else is such awesome detail! First of all, what oven rack to you recommend…? I asked because I used the middle rack, and the top started to become “too dark”, so I used my best judgment and took it out 4 minutes early. (I’d send you a pic of this beauty if it was allowed in the thread). Secondly… is it recommended to mix the dry ingredients well, before adding the water? Also wanted to mention that I simply used a round 5 qt. Corningware casserole dish with glass lid, and parchment paper. No sticking whatsoever! Perfection! I will check back in probably to let you know how the texture and taste are, when the hour is up! This wait killing me!
Thank you! I get it now… 3/4 TABLESPOON. I read it wrong (tsp) and when I read the explanation I couldn’t figure out why you would use less! I have my LeCreuset ready to bake!
“Because of its fine grain a single teaspoon of table salt contains more salt than a tablespoon of kosher or sea salt”
Wouldn’t you use MORE Kosher salt than table salt, instead of less? Is that a typo? Is it supposed to be 1 3/4 tsp of Kosher instead of the 1 tsp salt?
I thought you always had to double the amount of Kosher salt because it’s not as salty as regular salt.
Looks delicious! I’m going to try.
The recipe is correct – it’s 3/4 TABLESPOON of kosher salt….or 1 TEASPOON of table salt.
Hello all, just wanted to say thank you for the wonderful bread! I made this for the first time today, well I started it yesterday and let it rest overnight. I didn’t have a cast iron pot, just a regular large non-stick with the holes in the top of the lid and Bakelite plastic handles. All I did was wrap the handles and the lid in foil, no problem.
Just wondering if this will harm the plastic knob on the Le Creuset pot that I have? I’ve really wanted to try this recipe for awhile but I don’t want to ruin my lid. Any recommendations?
Unscrew and remove the plastic knob. But I’ve used my Le Creuset pot and lid countless times with no damage. Plus, you can always buy new Le Creuset knobs at their stores.
your bread recipe is really great. I remember making bread and having to knead it for a very long time and by hand. This looks great. Have to try it. Btw. you have a very handsome little baker!
I think my only question is, can i use a plastic bowl instead of glass to mix the initial ingredients and have it rise?
yes you can! I use glass because the plastic cling wrap secures better on glass. though, nowadays, the wonderful Press & Seal plastic wrap product works on everything.
Got lost with the towel. I take it you do not put the towel along with the pot in the oven :), so I didnt do that. But if possible to list all of the steps NEEDED, in a 1, 2, 3 fashion. This would help the very novice. thank you
No, you do not put the towel in the oven! 😉
What a wonderful easy to follow recipe. My daughter sent me the repicep a few years ago but I never made a good job of it (cos I felt I HAD to knead bread for it to be good) now I can see just how easy it is to make and enjoyed the dialogue so much. I wonder how many loaves you and your son have made together since this was first posted.
Thank you both for this. Big fat grin! ! !
Perfection! Well, except for my stubby-3/4-sized-Harvest-Gold-oven’s (circa early 70s) tendency to start out on the cold side and finish on the too-hot end of the spectrum. *sigh* I have a couple of dark spots on both the top and the bottom but I don’t care! It tastes wonderful slathered with butter; I’ve the sticky keyboard to prove it. Definitely something I’ll be making over and over again. And I will overcome the funky oven issues to so that I end up with an evenly toasted top and bottom. =P
Looks like a great recipe – and obviously it works. To think that I’ve been kneading bread all this time! Perhaps a dumb question – but can the rising process be made any faster? I’d like to try this recipe out for a fancy team lunch at work tomorrow. Thanks for your advice.
I’ve doubled the yeast and let rise for 8 hrs but haven’t tried shortening time beyond that.
Great post. I have never tried no knead bread but I am going to give it a try. If is is so easy to make I might make bread more often.
Can I use a non-stick metal wok? It’s oven safe.
I really wouldn’t – that nonstick surface at *that* high of temp in the oven isn’t good (for you or for the pan – even if it is oven safe)
Great recipe, I’ve been making it for a couple years now and I love it! Maybe someone mentioned this previously (lots of comments), but sometimes I substitute a bottle (12 oz) of good beer for the water and mix in 1/2″ cubes of cheddar…makes for a great beer cheese bread.
Thanks so much for the recipe! I woke up at 6am to finish making it so my family can have it fresh for breakfast. It totally worth it! It’s the first time I heard the bread sing!
Now it’s time for me to go take a nap.
That is a cute boy! Great instructions too. I have now let my dough sleep for 24 hours. I hope longer rest time doesn’t ruin it like my daughter when she over-sleeps.
Made this today! It is sooo easy to make! Smells delicious. Mine is cooking right now, but I can’t wait to take a bite!
I have been making this bread about two times a week since I fist found the reciepe two months ago. I have a pyrex type class loaf pan with lid and have been using this. I put dough in a greased pan for second rise and then put in cold oven. Set oven to 450 and set timer for 48 minutes with lid off last 10 or 15 minutes. The bread turns out great every time. Sometimes I make rye, whole wheat or white. Love them all.
It tasted great in the end, and it rose just fine. The problem, I think, may be that our oven is likely cold. We’ve had problems with our oven being too cold in the past. The last time I made the bread, which was just after my post, I set the oven temp to about 470 or so, and it did much better. I’m thinking the oven may be 25 or 30 degrees cold.
But I’m glad that it doesn’t matter what surface it cures on. I’ve been looking around for just the right towel, and it worked really well when I used plastic wrap, lightly floured. Other than a couple hiccups here and there, it’s worked out really great. It usually doesn’t last more than a day before it’s all gone!
When preheating the pot in the oven, should it be covered? Should the cover be heated separately? Should it not be covered?
Another problem I’ve had:
The first time I made it, it worked wonderfully…
But the second time, it didn’t work out quite so well. The bread took FOREVER to bake and was absolutely pale white after the first 30 minutes. The only difference the second time was that during the second rising, when you let it rise on a flowered towel, I used a flowered sheet of plastic wrap instead of a towel. Would that explain why it took forever to bake?
When preheating, it shouldn’t matter if pot is covered or not – just preheat both pot and lid.
What surface you let it rise shouldn’t matter either. The bread taking longer to bake (and brown) has to do with oven temp…perhaps the oven for some reason fluctuated in temp? How did it taste? Did it rise properly?
thanks, started making no knead back in september of 2009 after seeing the NYtimes youtube video with Jim Lahey? from NYC.
I still had a few doubts and worries and your site basically told me to relax, not to worry and everything will come together anyway. At first i was worried about the shagginess. Then at times the dough would stick to my cloth after proofing, leaving the dough hanging as it plopped down into the dutch oven! I scrape it off, as it tends to happen every once in a while (it is a poolsh/ very wet dough anyway) and it never affects the quality of the bread, it just adds to the rustic flare!
Any tips on preventing sticking to the cloth?
Tip: When using the dutch ovens with the synthetic handles/black knobs, you can just wrap them with some tinfoil. My first time baking with the dutch oven, my handle popped and exploded (nothing too serious), which was fine because i started using a smaller one and getting a nicer shaped bread. I have been baking with the same dutch oven (le creusset – white fromthe 80s?) and have the knob covered in tin foil (100 or so breads later) and its fully intact! … the dutch oven on the other hand is dirty on the outside (proof that its being USED!!!) and i never clean the inside, just empty any crumb/crust out. My bread always comes out nice and easy.
Thanks again for the PEACE OF MIND! Kept this simple to make bread even simpler!
I’ve tried this recipe twice now and my dough does not rise. I’m using 3 cups of 100% whole wheat flour because I think it’s healthier and I want to feed my baby this bread. Could this be the problem? Also, I’m using active yeast instead of instant yeast but I read they act similarly. Is this not true? Could it be it’s not warm enough where I’m letting my bread rise? Thanks for your help!!
Yes, that’s your problem. Using 100% whole wheat flour will definitely give you different results – I normally will sub 1 cup of whole wheat flour for the all purpose. However, if you’re looking for healthy bread recipes, definitely pick up Healthy Bread in 5 Min a Day by my friends Zoe and Jeff.
You can use either active or instant for this recipe.
didn,t read all the interesting responses so don’t know if anyone has asked this before but can the bread be baked in a loaf pan also
You’ll have to divide dough and bake in separate loaf pans, but yes, I’ve done No Knead Bread in loaf pans before.
The photo of your son kissing the bowl of dough night night before putting it to bed in the fridge is precious! We also have a four year old. We will have to try this recipe. It looks good.
Hi,
I just purchased my first ever Le Creuset emameled cast-iron. The sales lady mentioned “no knead bread” so when I Googled it and your post was the first link listed. I was delighted when I realized I was at “SteamyKitchen.com”. I love your posts on Pioneer Woman’s TastyKitchen!
I have a bit of OCD and need to know when you say “warm water” what temperature do you mean by “warm”. Is that 80 degrees F or something else? Does it even matter?
I can’t wait to make this bread! Thank you!
Honestly, it doesn’t matter exact temp for warm – like a warm baby’s bath….or a temp you’d wash your face with 😉
Thanks for the info! I made the bread (water temp was 80) – it was wonderfully soft inside. It reminded me of a loaf I bought at a trendy bakery, but cost a lot less! 🙂
Have you ever added anything to it (ex. garlic cloves or rosemary)?
Yes! No Knead Stecca Bread
I made this bread yesterday and blogged about it. It was so perfect that I made it again this morning. I make the dough in the morning and let it rise slowly until the next morning before I bake it (about 20 hours). It works out perfectly! I’m testing out some variations in the amount of white flour and using some White Whole Wheat to see how it goes. Thanks for the inspiration. (I linked back to this post)
Thanks for this i made 2 loaves so far. Neither have been perfect, I get sticking when dumping from the second rise which somewhat throws off my shape but they have been delicious.
Any reason you couldn’t do 100% whole wheat? I know that whole wheat makes a more coarse or tough texture, but it really is so much better for you!
Hi,
I love your explanation & pictures for this recipe and want to try making it. But I do have a question about the pot. Do I need to oil/butter the cast iron pot? or do I have to use parchment paper? I’m concerned with the bread sticking to the sides of the pot.
Thanks for the advice,
Anna
Hey Anna-
Yes, use parchment if you’re afraid of bread sticking (i.e. if your pot is not seasoned well. )
I just sliced a piece of my first loaf, baked using your instructions. It’s fabulous–thank you!
I love when you don’t have to work very hard and you still get such an awesome product! This was really fun to use as a base for my pizzas on Sunday Funday (tradition at our house). It was so easy to make and the kids really enjoyed it. Kudos.
-Sylvia
ok, so i tried it again and used a different yeast. not sure the difference between the 2 besides the look. (see how much im NOT a bread maker?) my motherinlaw gave me some and i used it. the bread turned out much better! i also didnt use the parchment paper, instead dusted the bottom of the pan w/ some flour. that worked perfectly!! i was also a little ambitous and threw some sun-dried tomatoes in the dough just before baking. it was nice. have you tried to use other ingredients like this……maybe olives??
thanks for your response….i will try again and let ya know! the yeast was brand new. however, you say ‘instant yeast’ and i used dry active yeast….is that the same thing?
Thank you, thank you! My bread machine broke recently and I fell upon this recipe. Easy, peasy & delish…I love it! I’ll be making this bread for my 3rd time this evening and I don’t think I’ll need to buy another bread machine now.
Seriously I don’t know how this works. My machine recipe used a bit more flour (4 cups) but 8 times more yeast (2 teaspoons!) as well as a Tbl. of sugar. On top of that, it didn’t taste as good. I always thought that it was the sugar that activated the yeast and the salt that held it back but whatever – somehow this works perfectly.
Two quick questions if I may. I’ve been using bread machine yeast but should/can I use regular less expensive yeast? Also would this recipe double well?
Thanks for a great recipe, amusing article and awesome photos of your cute boy. Did I say thank you?
Seth- aww thank you! I’ll let Andrew know he has a fan.
re: yeast – use the less expensive yeast!
hello…..i tried making this bread today. i need your help! im no bread maker! and im not 4yrs old……..i think maybe i should have had my daughter (4yr old) to help me out. hee hee anyway, i used parchment paper as you said and it ended up sticking to the bottom of the bread. also, the bread was dense….not like the usual rustic bread ive eaten. any help would be appreciated! thanks for your time!
Hi Heather – gosh there are so many factors at play here. Was your oven temperature right? Was your yeast fresh? Did you follow instructions exactly without any changes?
Adorable boy! Glad I found your page – it’s my favourite no-knead one and I love the other recipes too. It helps that I have 2 boys of my own!
I made my first loaf of no-knead bread and was I surprised! It looks so very good and when I cut into it it has the holes I have been looking for in homemade bread, The only thing I am questioning is should the bread be damp on the inside? Am I doing something wrong, Or is it supposed to be that way? I do not have a cast iron pot ( I have ordered one) so I used the liner from my crock pot. But the little tab on the lid did come off! No big deal there tho. Thanks for any help.
If the bread is still wet in the middle, you’ll need to bake longer.
I just did two loaves of this bread… and I’m so impressed with the results… I can’t even get over the fact that this was my first time ever making bread.
Thank you so much for this recipe! – and thank Andrew for me for the demonstration! lol
I read somewhere to add Vital Wheat Gluten to the recipe… do u recommend this?
You can if you want – it just adds more gluten, but I don’t find the need to use it.
LoL. This made me laugh. And your son is cute. 🙂 Thanks for an awesome bread recipe..came out wonderful and I will be making this again and again.
Saw your website and the recipe for the NKB. If your 4 year old can make it, I figured so could I! He’s such a cutie! I can’t wait wait for my 2 yr old to start “helping” me to cook. Anyway, the bread turned out FANTASIC in my 5 qt Le Cruset pot. It was so beautiful that we video taped the crackling of the bread as we took it out of the oven. I used the parchment paper and it worked great. I will definitely be making this one again and again. It’s time to kiss my breadmaker goodbye!
your instructions say “give it a goodnight kiss and let it sleep 12-20 hours”????? the recipe says 2 hours? Please advise.
Letting it sleep for 12-20 hours refers to step 1 in recipe.
There are 2 rises in bread baking. Once overnight; then form; then let rise again for 2 hours
Jaden –
I just mixed the dough together and am letting it sleep overnight.
I was wondering – why the towel? Can’t I just put it back in the bowl I mixed it in or something? Just wondering if there is a specific reason I need to put the shaped dough on a towel. I think I’ll just put it in a bowl and let it rise then bake and see if it makes any difference.
I also don’t have a dutch oven or cast iron pot etc that can go in the oven at 450 and also has a lid. 🙁
So, sadly I will be baking it in a loaf pan or something. I will also let you know how this turns out.
I’ve been too chicken to try this out but am finally going for it – with me luck!!
Jee- the dough will stick to your bowl. The towel makes it easy to lift the dough without deflating.
Without a cover, you won’t be able to generate enough steam to get a crisp crackly crust.
I used a towel and it still stuck to it but I was able to get most of it in the stoneware pan I used. I covered it tightly with foil and when I opened the foil 30 minutes the top was not as pretty as yours in the picture but I still uncovered it and went with it. I had to leave it in the oven for about 10 more minutes but it tasted great!!!
Just one question – how do you get the bread out of the pot once you’re done baking? I had a little trouble with that – thanks again for this recipe!! I think I’m gonna go buy myself a cast iron pot soon. 😉
try using parchment paper instead of towel – and just use the parchment paper to lift dough out of the bowl into the pot. The parchment keeps the bread from sticking in pot.
Thanks for the great piece on no-knead bread. I can’t wait to try it. Will a Lodge 5-Quart Dutch Oven be large enough for this bread baking? I can’t seem to find dimensions on the Internet for the size enclosure to use.Thanks.
Yes, a 5quart dutch oven should be fine! ~j
I tried the recipe 2 days ago (actually made the dough and stuck it into the fridge for one day) and pinched off an orange size one today to make a mini loaf. I baked it for 25 minutes. The texture was chewy with large holes inside. Is it supposed to be like that? I expected soft. It tasted ok, only it felt like I was eating undercooked bread. hmmm…I don’t have a cast iron pan so I chose to peel a bit for this morn. Maybe more tomorrow. Can I use this recipe for pizza base and flavoured breads? I notice you used sweetened dough for your nutella one and olive oil for the pizza one. Wonder if this basic one will with as well.
Well, you can’t expect the same results if you’ve changed the dough size and wing the baking time. Just follow the recipe, master the recipe as-is – then start changing it around. ~jaden
Hi, Steamy! Right now I am in the process of making the bread. I made one loaf all purpuse flour and second with you secret 1/2 cup of whole wheat flour but did you also add more water because it looks that the dough with whole wheat flower is dryer not as floppy like the other one. I don’t know how to explain. We will see results in couple of hours. Iam now on second rising. Thanks
Hi, Steamy! This bread looks lucious! My one question is: can you double the recipe to get a 2-pound loaf? We’re a bread-hound family of six & NEED a big loaf? Thanks so much for your help!
Yes, you can double the recipe, but I’d recommend making two 1-lb loafs. Making a giant 2-lb loaf is tricky in terms of timing and getting the interior cooked through w/o burning the exterior.
Hi, I made this a few days ago and it was great! I was going to make some more but ran out of bread flour and thought I remembered you had said something about whole wheat, so I am in the process of trying it that way. My question is, in the recipe for no knead baguettes there is sugar. I was actually surprised the original did not have some sugar for the yeast to “eat”. I’m not sure if that’s a question! Anyway, should I add sugar to the No Knead Bread or not?
Thanks!
I found this recipie about a year or so ago. I made this easy wonderfully delicous bread several times and impressed everyone. I then lost the recipe. I have been searching for it and decided to look online again. I thought how could I ever find it. As I randomly searched over all these wonderfully looking bread recipies I couldn’t stop looking for yours. As soon as I clicked on this link and saw your cute son I knew I was in luck!! Thanks a ton for this post.
Stacy
PS Im saving you in my favorites!
This is seriously so easy! I can’t believe I’ve been making bread any other way… and I too get a little bit of wheat flour in there sometimes, I like the flavor.
-Sylvia
Any ideas why I have such trouble with my dough sticking to the cloth during the 2 hour nap? I’ve tried this a few times, and each time I lose a third of my dough since it gums onto the baking cloths I use. I always flour them quite well – I’m not sure what else to try.
hi there,
Thank you for sharing this recipe. I have the dough sitting nicely on my kitchen ready for a long sleep tonight. Hopefully it will be ready for tomorrow xmas eve dinner. Just wondering, i am going to use pyrex to bake it, however do you think i can use alumunium foil to cover it while its in the oven? otherwise do you have any other suggestions? thanks
you’ll need a lid – the aluminum foil won’t trap enough moisture. the lid is to trap moisture and create steam for the crisp crust. if you don’t have a perfect sized lid, go ahead use foil – just know that your results will be different.
Thank you for sharing this recipe. I just baked it today…WONDERFUL! It was one of the BEST breads that I have made to date. It also made amazing sandwiches 🙂
Looks like a competent little helper! I’ll try this…
Veeery cute. My boy is 9 now & helps a lot. I have pix of him at 3 sitting on the counter, helping me cook, flour all over him. Question – I have solved many of my baking irregularities with measuring flour by weight instead of volume. Any idea on the flour for best results? I run into a lot of variation, especially with boy child helping & packing the flour in like it’s cement or fluffing it with his fingers. Thanks -Susan
So, would it work using gluten-free all purpose flour? Any changes in ingredients other than the flour to make it gluten-free?
I have no idea! I don’t use GF flour. Try getting this book: Healthy Bread in Five Minutes
It’s got some GF recipes, similar concept to No Knead bread
hi there! i have read i think two days ago about the no knead bread that you can keep for 4 days in the fridge, where you said you could just take a pinch of it and make your bread anytime of the day etc. but i cant find the article anymore 🙁 could you please help me. thanks!
yes – http://www.artisanbreadinfive.com
I can’t wait to try this recipe. Your son is wicked cute, and the end of this post, when you were writing about eating the bread together and hoping he remebers this someday… yeah, that made me cry! I’m a mom… and a wicked sap apparently!
I use the same pot you do (and the same recipe!) but I just unscrew the handle. It makes it a pain to get the top off — silicone-ended tongs seem to work the best.
i do not have instant yeast,i did look for it in the store,what i have is active dry yeast,what would i do different in making the bread,this is my first attempt at making bread and i figure if a 4 year old can do it ,surley i can,i guess i will see.
Yes, you can use active dry. Have fun! Jaden
Ok I’m a little confused. If you’re going to go through all the trouble of stirring and proofing, whats the big deal about kneading it? It really isn’t that hard and the results are much better.
This is much more like pizza dough than any bread I want to cut up and eat.
I just took my first loaf out of the oven – it smells heavenly, and it’s crackling and snapping as it cools on the counter. I can’t wait to cut into it! Thanks for the great recipe tutorial, you make bread baking much more accessible to those of us unfamiliar with the process. I tried your French bread recipe last week and it was delicious, too (although not as pretty as yours).
Great! Thanks for letting me know.
You’ll have to try the no-knead cinnamon rolls next!
I just made these from no knead bread basic recipe
http://twitpic.com/ka61e
jaden
hi, Jaden
thanks for your reply
below is the link to the picture of my bread.
http://www.facebook.com/album.php?aid=110919&id=635914579&l=f5d08d28d2
hi,
My bread looks ok, but I had difficulty cutting the bread. It’s thick & hard on the outside but soft & chewy on the inside. I used about 230 deg Celcius. Did I use too little/ too much water? or did I bake too long? Your recipe says that the crust is thin but mine is thick. I’m not sure what went wrong.
Your advice would be greatly appreciated.
send me a photo of the inside and outside of the bread ~jaden
Thanks for the posting, it looks great!
Your story about little Andrew eating the bread on the steps wiggling his toes brought a tear to my eyes. 🙂 I’m so sappy sometimes!
Hey,”Lady”, (and I don’t use the word loosely),love the site,and the little boy cooking!! I got two little girls,and the little girl,(5),can make you biscuits,cookies,and many other helps,and the 11 year old,can hold her own,in the kitchen.They,need the help,and learning,only parents and grandparents,will give. “The Lord Said ,Bring them up in the Way they should go,and when they are old,they won’t depart”!! Please keep on Cooking!!!
I couldn’t find bread flour so I bought pastry flour. I just took my loaf out of the oven and it’s pretty flat and seems dense. Is it because of the pastry flour? What’s the difference?
bread flour has the gluten that pastry flour doesn’t
That’s why your bread was flat and dense. ~j
I’m delighted with the no knead recipe and find it works perfectly with white flour. However, I prefer wholemeal four (as we call it in the UK) which is much stronger and heavier than white. I have experimented with using some of each, with adding more yeast and even with adding a little oil. The results are all okay and edible but not as crispy and satisfying as when using white flour. Any suggestions?
Jeff- you might want to pose this question to:
http://www.realbakingwithrose.com/
I use my sourdough starter in place of the yeast, about 1/2 cup of starter and enough water to measure 1 & 2/3 water, or a bit more, depending on the amt of flour. The great thing about this recipe is that it is not fussy, a bit more or less and it is still fabulous! Now if only we could figure out how to adapt for french bread…I am a potter so maybe I’ll try to make a ceramic french bread pan with a lid. That would be a challenge!
Helen
fantastic idea! you’ll have to send me pics if you make your own ceramic french bread pan!
Gina and Ollie: I live in New Mexico in the Sandia foothills–our house is at approximately 6,100 ft (and we have very low humidity). I’ve made this bread many times–exactly as the original recipe and once substituting some whole grain flour (but with no other alterations)–and it has always turned out great. I’ve lived here nearly 40 years and seldom alter recipes for high altitude and I’ve had very few bad results. Maybe the yeast was old or not instant?
Make that a 3 year old can make it (although he has always been advanced for his age :).
Thanks!
I’ve just completed the hardest part of this recipe…. the cooling… the waiting for that first bite…then heaven in my mouth. It is ABSOLUTELY WONDERFUL! It is crusty and chewy and yeasty and sooo comforting … I could go on. It’s what I’ve always wanted my homemade bread to be. I will make this again and again.
Thank you Andrew, for your amazing instructions I couldn’t have done it without your help!
Hi. I have been making no-knead bread for awhile, and I have found that while it is not quite as “perfect” nor as “traditional-looking”, it can also be made in a Dutch oven on the stovetop. This is particularly convenient for me, since my oven is not the right size for baking something like this…. I brush the sides of the pot with olive oil, but I am not sure whether or not this makes a difference. I then let it go on low heat for about an hour and a half – until it reaches 205 more or less in the middle of the loaf. I also like adding a tablespoon or two of vinegar, because it tastes more like sourdough.
The first time I made this bread, I let it rise on a floured towel. Once was enough. Ever since, I rest it on parchment paper that I’ve spritzed with some cooking spray. It’s easier to transfer the dough, still on the paper, this way, and I’ve never had a sticking problem.
I, too, use a Le Creuset pot and after many, many loaves the knob shows no signs of damage, even though I heat the pot to 500F before putting in the dough and turning the temp down to 425.
I usually substitute either whole wheat or rye flour for 20% of the bread flour (3 ounces out of 15)and add a heaping tablespoon of vital wheat gluten (wheat flour with the starch removed), which adds a little “oomph” to its oven spring.
Can’t wait ’til my 3-year-old granddaughters (we call them the “real” Minnesota Twins)are old enough to try this. Their daddy and momma already have them joyfully into cooking and baking!
hey this sounds amazing!!! i ve never baked bread before and i guess this will be the beginning of a long love affair! do have a query though… how long ca i leave the dough in the fridge? days? weeks? months? will it keep in the freezer for that long??
I think the key to keeping the bread dough from sticking to the towel is Cornmeal.
After shaping, sprinkle about a half cup of cornmeal onto the towel before giving it a 2 hour nap.
The tricky part is transferring the dough to the hot pan.
Don’t flip the bread, since you want the cornmeal crust to be on the bottom.
Great tip! thanks! ~j
Amber:
User either pot and add a cookie sheet as a lid, or a pie pan/plate if it fits. There are many things that can act as a lid. The first time I made it I used my dutch roasting pan and just made a oblong loaf. Parchment paper helps sticking. I just put the parchment paper in a bowl under the dough for it’s 2 hour rest then lift the whole thing out and into my glass bowl. As long as the glass is tempered it should be safe for the oven – just don’t throw it into a cold sink full of water!! Maybe you have a corningware or pyrex dish some where. That and a makeshift lid works fine too.
Danneauxs
I just made your 3 hr. french bread recipe, and it was perfect! I am drooling over this No-Knead recipe, however the only pot that I have is a stainless steal pot with a glass lid (the handle is steal with a rubber covering… i wonder if that would melt?)… I do own a ceramic crock pot… however it too has a glass lid… what would glass do at extreme heat and then being removed from extreme heat?
My daughter made this bread for us for Father’s Day. She used the same recipe, from a different source, and added chopped rosemary and lemon zest. It was wonderful. I have never made bread in my life and I am determined to try this recipe this week. I looked it up online and ran across your website with your adorable little son. He makes me want to bake! Here he is, making bread, with nary a (perfectly coifed)hair out of place. Your website was fun and entertaining and I learned a thing or two about bread. Thanks!
Thanks for sharing this great recipe! I too have been enjoying your bread recipe, I’ve made it every day this week and unfortunatly eaten it too! The only problem I seem to have is that it sticks to the pot every time. And I end up leaving chunks of it in the pot… Has anyone else had this problem and does anyone have any suggestions?
Try putting the dough on parchment paper to rise…then lift entire thing into the hot pot to bake. That way you don’t have to worry about handling wobbly dough! Just lift dough up holding parchment paper and put into pot. The parchment paper will protect your dough from sticking to pot. ~jaden
Kalyn- I too had the same problem with the dough sticking to the floured towel. If I used enough flour to keep the dough from sticking to the towel, then the finished bread had big hunks of baked flour stuck to it, yuck. I finally had success by easing the dough onto my Silpat sheet and then tucking it into a large bowl to keep it from oozing over the edge for the 2 hour nap. I then very gently tipped it into my cast iron pot. There were a few tiny pieces that stuck to the Silpat sheet, but they unstuck themselves very easily and the bread turned out fantastic. Good luck!
Wow, I just finished baking this and am now waiting impatiently for it to cool. I can’t believe I just made my own bread! Thanks so much for sharing this recipe!
WOW how simple and how good. i could not of asked for better results. crusty outside, soft and light inside. i have to admit i used simple all purpose flour, rapid rise dry yeast, and table salt. i did add a little sugar. i ‘baked’ it in a non stick calphalon pot, and have amazing results !!! i did use the parchament paper idea and it was so simple to do. i will be using this over and over. 5 stars.
Thanks! yay for bread. Yes, the parchment makes it so much easier.
jaden
i tried making a regular kneaded dough last night and it tasted ok but it was too dense and heavy, i came across this no knead bread today and after flouring my kitchen last night !!! i cant believe how easy this seems. i like a sweeter bread and having never tried this before i wonder if i should add a little sugar to the mix. has anyone tried this before?
this looks ssoooo good!! this might sound weird, but i think that everything tastes good dipped into the perfect barbeque baked beans. surprisingly, winn dixie has one of the most mouth watering baked beans i’ve ever eaten!!!!!
Help! I love the taste, and the ease, but have tried five times now and no matter what I do, I cannot get the dough to not stick and fall as I put it into the baking pan. I have tried floured towels, more heavily floured towels, parchment paper, parchment paper with cornmeal. Do you have any advice for me? I saw above that Kirsten used a greased bowl and I wonder if that makes the crust more soft?
Thank you.
SteamyKitchen, Jaden,
Thanks for your comments. I tried to add flour and knead after the 20 hour wait. It didn’t work well. After 20 hours rise time the dough actually looks like starter. To knead it into a soft dry dough it requires several cups more flour. After adding one cup and still have on my hands a gooyee sticky dough, I decided to wait the additional 2 hours rise and bake as usual. I still got a good loaf of bread, but I recommend sticking to the original recipe.
I grew up in Germany and miss their bread terribly. I tried many recipes and also a bread machine, but gave up. Your recipe was recommended by a friend and after seeing that gorgeous, handsome, tattooed helper of yours, I just had to give it a shot. I halved the recipe and used 1 cup bread flour and 1/2 cup mixed, whole grain flours and I got goose bumps when I cut it and put the first piece in my mouth. ***FANTASTIC***
I’ll definitely let Andrew know you loved it! ~j
Bob-
hmm…that I don’t know. I’m sure by kneading you will get smaller holes and a denser bread. Try it and let me know!
jaden
You and your site and your son and this bread recipe kick ass!
Seriously, I feel like such a rockstar today. Homemade bread and soup d’jour just in time for the papa bear and baby bear’s arrival.
Thank you for this!
I just baked my sixth No-Knead bread, and it is perfect. I am ready for some changes and would like your opinion.
What would happen if after the 20-hour rise time I drop the dough on a floured board and instead of just turning it over with a wooden spoon I actually kneed it with additional flour. I do this until the dough is soft and slightly dry. Then I continue the same as before. Heat the baking dish and proceed as in the recipe.
Using the no-knead method, is there a way to get a denser bread?
I have made this recipe for the past year every which way but loose…..it is fabulous….my favorite is adding grated orange rind, raisins and walnuts…yum
also made it w/:
black olives
roasted garlic paste
dried cranberries
dried rosemary/thyme
chocolate chips
chopped almonds
For Ollie in Idaho: the effect of altitude on the yeast may be your problem. I’ll be moving to 7000 feet soon, so I’ve started looking into it. This article http://www.associatedcontent.com/article/74882/taking_the_guesswork_out_of_high_altitude.html gives a little help. Please post if you find a solution that works for you, I’d be very interested in hearing it.
I use cake yeast 1/4 of a pat. Mix all the ingredients at one time..Why did you use vinegar….It is not on the list.
I also use my kitchen aid mixer…this works best and I mix it for 6 minutes…on medium.
This is a no stress bread.
s.
This is a fantastic recipe..I make it 2x a week.
I use a very large Roosewood Pottery mixing bowl covered with a stainless steel lid for the top. I preheat both and make one loaf at a time…I keep the lid in the oven when it is off of the bowl and it is waiting for the next loaf….
It works just as well as the cast iron…
Thanks for this wonderful recipe…
s.
I have to add that I have altered this to use a greased bowl in place of the towel and I had better results ( no matter how much I floured the towel, it stuck).
love it! 3rd loaf in three days!
My mom makes your bread everyday and is always successful. She lives in Fla. When she was here last week, we decided to make it at my home in Idaho. We tried 5 days in a row and were unsuccessful. We tried different yeast, flour, adding wine vinegar, bowls and spoons. It would not do anything but sit like a heavy brick blob. Any suggestions why it won’t work in Idaho vs. Fla? We thought it could have been because of the lack of humidity so we tried to raise it on the special setting in the oven for rainsing bread… didnt work. HELP!
Ollie
Have you ever tried fresh bread with ganache schmeared over it?!? I used to own a bakery and my favorite treat was french bagette schmeared w/ganache (usually left over from decorating chocolate cakes or brownies). . .try it!
ganache – is that like frosting? I have some chocolate frosting in the fridge and have been wondering what to do with it – on fresh bread??? yum….
thanks for this great recipe and story! i was unsure if i could pull off no-knead bread but this post was a great guide, it came out perfectly!
I stumbled upon your recipe, Googling “no knead bread” recipes. Yours is one of two that I tried, beginning yesterday. While the other tasted fine as a toast bread this morning for breakfast…your bread? It is OHMYGOD DELICIOUS!!! It seems almost sinful!!!
And that delightful son of yours? If the recipe doesn’t sell itself…that handsome face will! 😉
Eureka…it works!
Do you think it will still work if I lower the temp and set my oven to convection bake?
Yes- lower 25% and bake 25% less time ~j
As a culinary graduate, I read the recipe looking for the weak points and everything seems right on target. I would recommend not to use AP flour as it is not as “strong” as bread flour. I would also caution you “bakers” not to eat hot bread right out of the oven. Yea, I know it is tempting but while very hot the bread is still cooking off any CO2 from the yeasting action and could be cause for stomach cramping.///// Now I am excited and have to run to the store for some yeast. This sound awesome!
Thanks for the illustration. a friend of mine had introducced me to the no knead bread back in mid 2007, but for some odd reason (formally diagnosed as L A Z Y syndrome), i never got to it. Then one day, i stumbled on your blog and the images of your son making the bread seriously shamed me into making a loaf. I’m now on my way to making other variations (the seedy ones) :o). Thanks for the post and the eggsellent instructions.
I got this recipe from a friend (But love this step by step!) and she adds 1 tsp fresh rosemary and 1/2 cup chopped kalamata olives to the mixture right at the beginning. She also told me today that she knows some people put it on a pre-heated pizza stone to bake. It is so yummy!
THis is fabulous! I’ve tried this before, but had the most success with this recipe.
Have made it 2x.
The first time, in her excitement, my daughter pushed the “clean” cycle on my oven…we had to turn off breaker and wait for oven to cool. God must have been watching because the oven opened just in time to take out the finished bread (thank goodness the lid was off before this happened).
The 2nd time I decided to freeze the dough. Last minute, I took the dough out and did every trick I could think of to thaw the dough and then let it rise. Well, I was impatient and it didn’t quite rise double, but ended up tasting more like Ciabatta bread.
Thank you! job well done!!! this is a keeper.
I have been trying out this recipe over the last week and am frustrated because the dough is so much goopier than it looks in the picture. Because of that the loaves keep coming out flat (3 inches high) instead of rounded. I started out using active dry yeast and thought that not using instant was causing the problems. So I went out and bought instant yeast and that batch was even goopier than before! I am using all-purpose flour instead of bread flour and am wondering if that is the problem, but I see that others have said they’ve used regular flour with no problems. The only other things I can possibly think of that might be the problem are 1. I am letting the dough sit the whole 20 hours – is that too much? and 2. I am letting the dough sit in a metal bowl. Does anyone know why my dough is so goopy and my bread is flat? Thanks!
Are you weighing your ingredients? Try omitting 2Tbl of water – use less water ~jaden
Wow! Looks fantastic 😀
May I ask if you keep the temperature at 450F during the last part of baking (i.e. the part after you plop it into the hot pot after preheating)?
Thanks! Will try this soon! Got interested in baking recently… 🙂
yes, I keep the temp at 450F ~jaden
Great! Thanks! My bread is going in the oven right now. Since you mentioned good butter I decided to make my own.
You might want to try that with the little guy. It is really neat!
I followed this site.
http://www.instructables.com/id/SNKE6ZXFMMCYH6W/
But used a hand electric beater.
Thanks again.
Wow – fun stuff!
I had great succuss with this, and it was my very first attempt at bread making. I’ll definately do this again, with a little fresh rosemary and kalamata olives next time!
I’d say that one loaf cost me about 50-75 cents. I’m a fan of that for sure – tasty AND cheap!
It works! It works! It’s 12:37 in the am and I’m quietly jumping for joy in the middle of my kitchen ( I don’t want to wake the neighbors…) Thank you for the story, for reminding me about the original published recipe and for the inspiring four year old who opened up the world of bread making to me. I am so excited!
I use a scale and weigh the ingredients
since my cast iron pot is quite large I increased them
500 grams of bread flour
400 grams of water
1/4 tsp yeast (1gram)
10-12 grams of salt
this bread is the best I have ever tasted
thanks for your recipe!!
This recipe doesn’t work. The dough didn’t rise. Don’t be fooled.
Your dough didn’t rise because your yeast was bad. Bad yeast = dead yeast = no rise. ~jaden
Hi,
I am the same Bob with the message of March 15. Here is what you can do to this recipe and still get wonderful bread. For the first rising I usually place the dish in the oven and warm the oven for a couple of minutes until the inside is 90F. Because of a phone call I forgot to turn off the oven, and it baked for 20 minutes at 170F. It did rise but after the 18 hours when I tried to move it to another dish for a second rise it was a sticky mess. No matter how much flour I added it remained sticky and messy. I was ready to chuck it out, but my wife said bake it anyway. It did rise some the second time but not much. After the two hours second rise I tried to place it in the baking dish but met a sticky mess. Somehow it went into the baking dish. On top of everything I forgot to flour the baking dish. I did the 30 minutes covered and the 15 minutes uncovered and came out with a wonderful bread. Great crust, and the inside is full of holes. It tastes just like the first one that had no mistakes.
Wow – great story and I can’t wait to try out the No Knead Bread. The irony is that I found this story looking for crusty bread recipes to try out my new KA stand mixer…
lol! well, you can still use your mixer if you want…use it to mix all ingredients together. 😉 ~jaden
I’m making this bread now, but I had a terrible time with it sticking to my dishtowel! I floured the towel, but I wonder if I should’ve had more flour on my work surface. It was terribly, terribly sticky. Any suggestions for the next time? My 3 1/2 year old loved helping me!!
Try using parchment paper and then just lifting the parchment into the pot – you bake with the parchment. ~jaden
I just made my second batch of this thanks to your directions making it look so easy! Thank you for the step-by-step instructions! My family loved it!
The best bread I ever made. Success the first time. Easy to make, simple ingredients, no sugar and no oil. I used the ingredients given above, but will try with other flours and some additives.
THANK YOU!!!
I made this bread the other day and it was fabulous. The husband went crazy for and I have another batch brewing now. I did add just 1/2 tsp sugar and 1/8 tsp red wine vinegar (like the speedy version calls for) just because I like what it does to the flavor.. almost sour-doughy, sorta, kinda! I live in the SF bay area, so who knows, it just might be the wild yeast here that does it or I’m imagining the sour flavor cuz I know there’s vinegar in it! Anyway, thank you for reminding me about this great and easy recipe again.
OMG this sounds great! I’m 7 months pregnant and have had a mean craving for fresh bread so this sounds perfect. I was wondering about using regular white flour instead of bread flour too; since kendra said she made it that way and it still turned out great all I need to do is get some yeast and I’ll be on my way to making my very first loaf of bread! I can’t wait!
p.s. jean, you’re not alone, I cried too 😀 I’m having a son and I can’t wait to be able to cook and make memories like this with him.
I finally made this the other day (after filing the recipe away ages ago into my To Be Made One Day pile), and wow, it was great. It was my first time making yeast-risen bread, and I had so much fun. I’m trying out the sticky pecan caramel cinnamon rolls next. Thanks so much for the recipes, Jaden!
i just finished eating my third loaf of bread in 4 days. I have been overlapping the resting times and starting new ones as i bake the old off. i love putting cornmeal in the bottom of my cast iron dutch oven and a little bit of celtic sea salt on the top of the loaf. i have yet to try adding olives or garlic, as i am curious as to when to add them? i suppose neither of those things will go terribly bad in less than a day without refrigeration, but i love the bread so much i can’t afford to have any screw ups.
next, i plan to par bake these and freeze them, and i can finish them in the oven at say, 325, whenever i want great bread.
You’ll have to add ingredients when you mix the dough, so choose ingredients that won’t spoil.
Let me know what you end up adding! ~jaden
Great recipe! I’m going to make this on the weekend with my three yr old daughter. Is it ok to use regular white flour instead of bread flour, i already have a huge bag of the regular stuff.
Thanks
My first loaf of this bread is cooling on the counter right now. I cannot wait to try a piece. Thank you!
My question is, Can you freeze this bread?
Suzanne – yes! wait until it cools, wrap tightly with plastic wrap (several layers) and then freeze. to defrost, just heat oven to 300F, pop the bread in and it just takes like 10 minutes.
Hi! Thank you for the inspiration. I actually had this recipe for sometime and heard of the rave but didn’t have the guts to make them inspite of the obvious name “No Knead”. See, i love to cook but baking intimidates me until i saw and read your blog. Genius of you to showcase your cute son, if he can do it, i should be able to do it. My bread came out great even though it didn’t rise as high as yours. It was crispy and and soft pillowy in the inside.
I have made five of the most fantastic door stop/hockey pucks anyone could ask for. After 15 cups of wasted flour, not counting the hours put in…I quit making any no-knead bread since I don’t knead the stress.
I just got this recipe last week and I have making bread for all the neighbours. I went out today an bought a Kitchen Aid pot now my question is will the rubber on the handle take the heat?? It says it can take heat up to 500 but I am worried about the handle. Has anyone baked with the handle on?? Thanks Bev
If it says 500F then it must be the high heat silicone. I’m sure it will be ok ~jaden
This is a great recipe!
I am now no longer afraid to make breads. I failed one a couple months back (the first) and got all discouraged. It was a lot of work for the most nasty “chocolate bread”. But this one, no kneading and no real fuss. Just letting it alone couldn’t be easier…plus baking it in a pot makes the wonderful round (not breadpan shaped) loaf.
This is unbelievable, I have been looking for a way to have fresh bread in the morning and this sounds a perfect idea to prepare a day in advance and bake the next morning.
Thank you SO much for the wonderful descriptions and photos. Your son inspired me…I actually made it (and I DO NOT do dough at all) and I’m sitting here listening to the beautiful crackling sounds…it looks delicious! Thank you! You’re awesome!
I really don’t have a recipe for the pretzels. Have you tried Artisan Bread in Five Minutes book?
Your son is adorable! Can’t wait to try the bread.
Question: I used to have a recipe for no knead soft pretzels. It was quick and easy. Little or no rising time. Do you know of any such recipe. Anyone?
Does this work for wheat bread too?
I enjoyed reading your instructions for making the bread. I have been making bread with my bread machine but the bread is not as good as the no knead bread. I made no knead bread tonite and it is cooling off at the rack. I canno wait till I cut a slice and eat it. I am beking one loaf evey three days and all look and taste vey good. Thanks
Just surfing the web when i came across your recipe the other day for No Knead Bread Dough. After reading the simplicity, seeing the photos and your cute baker … i was convinced this is the dough ive been looking for. Ive been baking breads and dessert with my sons and daughter when they were young and yes …. those times will always be in their hearts. My duaghter now 14yrs old and my youngest son now 17yrs old still at home and still love to help me bake and cook !!! wish they could stay little forever !!!! lol Thanks so much for the great recipe …. can’t wait to try it !!!
Jaden,
Maybe because my now-adult boys so resembled yours at that age and I’m feeling nostalgic . . . or maybe because I’m PMS-ing . . . hell I don’t know why, but your description of Andrew cradling and quietly savoring his three pieces of homemade bread just made me cry! Yes, actual tears! The simple comfort of having as many slices of warm bread as one wants, placed in one’s hands by someone who butters it for you, and all the love and security implied in that small gesture — well, it should be a basic human right available to all little 4-year olds. Thank you for moving me with such a simple and beautiful story. **sniff**
So easly a college student like me can make it! My roomates all loved it. I used regular flour instead because I didn’t have bread flour and the flavor was still amazing.
OMG! What a fabulous story of bread, your son reminds me of my third son when he was little. My son used to take a big bite off the top of a sour dough loaf right in the grocery store while seated in the cart. I know he will love your recipe for sure!!!
I read about this bread some time ago but never tried it. Well, yesterday I did try it using you and your son’s instruction/photos and it turned out great! Thank you for posting it.
I’d forgotten all about this recipe until finding your site on google tonight. I love the photos – and I’m inspired. I’m off to give this recipe a try!
That bread looks awesome!!! I can’t wait to make it, it looks so fluffy and the crust looks for crunchy! I would be great toasted with tons of melted butter on it! YUMMMM! thanks for the cool recipe
Game day tomorrow. I figure if that sweet little boy can make this, I surely can! And for Christmas I got that same red pan! I gave the plastic over the dough a “nana” kiss good night, and it is sitting on the counter till tomorrow. Fingers crossed!! I’ll be baking it in the same enamel over cast iron RED pan! I’ll be serving it with carmelized onions, ham, melted cheese, and lots of love!!
I got that red pan because we like to camp now and then. I found some nice sites for parchment liners and foil liners for dutch ovens. Google that, and you will find them too!! Who wants to do dishes? Hello??
My only deviation is my sour dough starter. I increased the flour by 1/2 cup, and increased the 1/4 tsp instant yeast to 1/4 C sour dough starter. (I got that from another site) But your little son and the fact that you baked in MY red pan was my inspiration!!
Thanks! Great site!!
To add garlic, olives, etc., should I do this during the first rising/resting or the second? Any help will be appreciated! Thanks.
Wonderful story, and delicious bread – thank you!!!
I have created a web page to better illustrate the tools and techniques of baking this bread at http://www.aresrocket.com/bread – illustrated and very detailed.
Jaden – Thanks!
Bill- Easier to lift and release into your baking vessel without deflating or deforming the “blob” of dough. The risen dough is pretty delicate and wobbly.
This may be a simple question, but.. why the floured towel instead of just a bowl?
I’ve got a batch rising tonight, I’ll probably try it with a bowl instead of a towel (just to be difficult) in the morning. Unless, of course, someone gives me some great reason between now and then 🙂
I just found this site when looking up variations of the no knead bread and I actually got a little misty thinking of you and your boy making bread together. I love seeing children enjoying cross gender work. It will give him an appreciation of women’s world and as he grows into a man he will honor and respect our contribution whether he chooses more traditional pursuits or not.
i just made my first version of this bread -and my first successful bread ever!
Jaden this is a lovely site, thanks.
after about 16 hours of rising i took my dough and “jelly-rolled” fresh rosemary, garlic and grated asiago into the middle, then let rise some more and tucked-n-baked as directed. lord it’s tasty 🙂
though the pictorial with your son is awesome (Bourdain does need to watch out, in a few years, lol) if any visitors haven’t seen the NYT youtube of Jim Lahey at Sullivan Street Bakery demo-ing it here you go:
http://www.youtube.com/watch?v=13Ah9ES2yTU
also check out the ARTISAN BREAD IN FIVE MINUTES A DAY site:
http://www.artisanbreadinfive.com/
p.s. in the Lahey vid he notes that not just a 6 year old, “even a 4 year old”, can make this bread -perhaps referencing your son?
In actual fact very good site…successes are in advancement
Hello I am a soviet that I called on this site I very like here
Hello, for you good site! Interesting design
The good convenient site is made.
whole sale
Hi! I’m a budding homemaker (20 y/o and counting)…anyhoo….my fiancee has been pretty impressed with my cooking (thanks SO MUCH to you). So, this past weekend I decided to make a cheddar and broccoli soup in a bread bowl (I know, fancy, right?) and used this recipe. IT WAS ABSOLUTELY FABULOUS (if I don’t say so myself). My fiancee and his daughter are very picky eaters and will NOT eat ANYTHING that looks like it MIGHT be good for them (hence, why I had to puree the broccoli in my soup) but they ate the soup, the bread, and TRIED to lick the plate!
I divided the dough into 3 smaller rounds after the 20 hr rest and then let them nap for the 2 hrs in separate containers….I actually used 3 small metal pots to bake them in and they came out fabulous. I cut off the tops, spooned out the middle and glazed them with butter….mmmmm….DELICIOUS!
I made more on Sunday and am eating it at work as I type….my coworkers are SEETHING with jealousy!
So, thanks!!!! This blog is MUCH appreciated 🙂
Keep this bread out of the refrigerator! It will ruin the crust. Keep it cut side down covered with a piece of paper or a towel. That keeps the moisture in but does not ruin the crust.
—————————-
hennry
Link Building
So Cute! Both those boys are dolls. I just had to try the bread–and I must bow down to the killer whale Prince, who made way better bread than me! (Had to put a link on my blog, too!) Thank you!
Roxanne,
Try using just parchment and then lift the entire parchment into the hot pot. You can bake with the parchment.
This was very tasty. We really loved it.
However, I’ve made it twice in two days and despite how much flour I use on the non-terry cloth kitchen towel, the dough sticks to it badly. Any ideas?
http://roxanne-rr.blogspot.com/2008/09/as-it-should-be.html
I tried this recipe today, it was delicious! Your version of the recipe was really fun to read and easy to follow. I linked you on my blog, too! I hope that is ok, the recipe was just too good not to be shared!
Thanks to your precious son and the wonderful pics showing how really ez it is, I will now attempt to make homemade bread, something I never thought I could ever do. Thank you. And thank you, Andrew.
can the no knead bread recipe be doubled to make more than one loaf at a time?
Ummm…that’d be “spoons” — I gave them spoons, not poons!
Awwwww…..your son is so precious! I loved the photos more than the recipe — no offense, but no bread can compete with that handsome little fella! My son is 21 now, but I sure do remember all the “kitchen experiments” (or “ditchin spearmin” in 2 yr old speak) we shared when he was a little guy. He loved it up to about age 6 or so, at which point he decided it wasn’t as cool or fun as playing with his buds — shooting up the joint with nerf darts and such.
I tell ya, give kids a big ol’ bowl, some baking soda, vinegar, flour, food color, cereal, pasta shapes, sprinkles and the like, and they can have so much fun. Of course, he didn’t actually make anything edible the majority of the time — I would just set out bowls, poons, plastic knives, pots and pans, all kinds of little measuring implements, and lots of ingredients…and let my son and niece go at it. They had little chef aprons and caps and would stand on stools to reach the counter. They were so darling!
Of course, they helped with “real” recipes, too (they loved to help mix up mini-cupcakes and have little bowls of icing and decorations for them), but the most fun they had was making a great big mess and showing off their creations afterward. I can’t believe I’m getting a little misty-eyed telling about such a simple little thing, but seeing your little guy sure brought back some treasured memories.
If you have little ones, folks, let them play with food ingredients (the baking soda/vinegar bubbly action gets ’em excited every time). It really is every bit as much a constructive creative outlet as coloring or building with blocks. And it makes lots of fun memories (especially these days with cameras and video recorders ever at the ready).
More adorable kid pictures, please! Thanks for sharing! (Oh, and thanks for sharing the recipe, too!) 😉
Yes.
I haven’t made them but there are a ton of google search results for No Knead Dinner Rolls!
Would it be possible to make this bread into dinner rolls.
…yep, made it several times. it’s so easy, takes no time to pull it together. my way is using 1 teaspoon yeast, just not yeasty enough for me without. also I put in 1 Tablespoon of sugar too, don’t know where I got that idea, thought it was posted somewhere but maybe not. also I pump up the salt as to us, bread without the addition of enough salt is bland and flat.
this bread’s a winner for sure, loved your photo’s with the little guy…thanks for sharing…
OK – I have been properly humiliated by your son into making this bread! LOL Seriously, I think I can do it now. I tried one other time and rushed it – didn’t work at all!!!! Thank you.
Miss Steamy (Hot)-
I’ve been using the inner, removable liner from my slow-cooker. I make two batches at a time (conserves energy) and I usually mix several batches of the dry stuff, put them in zip-lock freezer bags to speed up the next baking. I haven’t tried going to the next step of mixing the water in and then freezing the whole thing. I’ll keep you posted.
Warmly
michael
Miss Steamy-
I have been making this for some time and it’s true- a four year old can make this…and as soon as she gets here….
Anyway, I’ve been using 2 tablespoons of sugar and it is even more wonderful.
michael
Wow I make this recipe all the time ,I add 1 teaspoon vingar in the dough, the bread stay crisp,a long time.
made 4 loft all great, in Oklahoma it rise more than double in 5 hours in a room without a/c great and so good
This bread is amazing, it is so easy! Thank you! I love your pics, and your son is adorable. I bet he is a lot bigger now!
Here’s the loaf I made:
http://hellagranola.wordpress.com/2008/07/01/homemade-bread/
Hi,
Great recipe!!! I am so sick of paying over $4(nz) for a loaf of pretty bad bread!! And have to say that Id never seen myself making my own- but you have changed my life…… This bread ROCKS!!!!
I linked to your site from mine- hope you dont mind….?
KatG
Hi, I tried the recipe a couple of times and I always have the problem with the rising.
In winter I have barely 70F in the kitchen, so I thought that was the problem. Yesterday I started a new batch. I started a new package of dry yeast. I had at least 75F in the kitchen. The dough seemed to rise well and looked according recipe last night. This morning after abt. 20 hours later I tried the second step. However when I took it out of the pot, the dough was very wet on the bottom and everything collapsed. It was very sticky and shaping was not possible.
Was it that the temperature was too low at night, or is it the all purpose whole wheat flour?
Bread tastes great but the slices look more like biscotti than real bread slices.
Any ideas?
Wow! Awesome photos!
I am making this bread this morning after seeing the recipe in the W&S catalog. It’s rising on the counter getting ready to go into the oven and I thought I would look it up on the internet….then I found your site. First, your son is adorable!! Your pictures of making the bread sure helped because so far so good. Only question I have is W&S tells you to use a 2 3/4 qt. dutch oven. I invested in such pan and now everyone tells me it’s not going to be big enough. I don’t want to have an I Love Lucy moment….what is the minimum size pan you reccomend?
Bread has been my big sis’ specialty. One that I’ve observed to be too complicated to be bothered with. But this has convinced me to venture into. #1, because your son is too cute #2, because I want to be loved by my boyfriend Mr. G, forever and ever and ever like the way he loves his bread. (Hey, didn’t they say the way to a man’s heart is through his guts?).
Thank you for making it so easy for me.
Monkee
I took Jaden’s advice and threw away my old yeast and went out and bought new ones to bake again. The bread rose beautifully, this was my second attempt to bake bread you see, I was excited! It was also solid enough to fold over and the only different thing I did from the last time was change the yeast. Stuck it in the oven and I got a loaf that looked exactly like Jaden’s! Anyways, for the dough sticking to the kitchen towel part, I lined the towel with parchment before the 2nd resting phase.Problem solved. I will be baking this bread a lot more.
I have the same problem with the dough not getting hard enough to fold it over on itself or hard enough for the ball, but it does double in size at the end because I put it in the towel, and then put the whole thing in a small 2 quart bowl for the last rising. Then I make sure I put it in a small enough covered pot for the baking so that it does rise enough for it to look like a loaf, not a pizza crust. I’m thinking of using a 1/2 teaspoon of yeast instead of a 1/4 because maybe I’m not using the right kind of yeast.
Help!!!
As an incurable bread lover, I went out and bought an expensive Le Creuset pot to create the spectacular European-style boule described in the Times, but I have failed every time. Step 1 (combine flour, yeast and salt, 1 5/8 cups water, and stir until shaggy and sticky) is a breeze. Then nothing seems to go right.
First, the bread doesn’t get hard enough during the 18-hour resting period to fold it over on itself for the fifteen minute resting period.
Second, it doesn’t get hard enough to shape it into a ball for the two-hour resting period.
Third, it doesn’t double in size during the two-hour rising period, and in fact it does not increase at all.
Not having any good options, I then put the too-soft, liquidy, unrisen dough in the hot Le Creuset in the oven for 45 minutes (30+15), where it bakes and browns beautifully–but what comes out is what you would expect if you crossed a boule and a matzoh. Really great crust, but barely an inch of bread.
This is very embarrassing because, based on assurances that even a kid could do this successfully, I have promised any number of people loaves of greatb read.
I would be indebted to anyone who can help me overcome my embarrassment!
Thanks very much!
Kavie,
your yeast is may be bad – try a new package of yeast. if a bread doesn’t rise, it’s because of the yeast expiring or just bad, dead yeast.
My bread didnt rise at all, the prep work was fine. I let it rest for 20 hours, but as I was trying to fold over the edges to create the round taut shape it became too wet. When i plonked it onto the kitchen towel it got stuck to the kitchen towel and getting it to plonk into the bowl after 2 ours resting time was a struggle. after all that, it didnt rise. It was heavy and dense and flat. What did I do wrong?! Please help!
Well, I’m on the phone with my brother (Uncle Bubba) and I just mixed up the ingredients , I’ve got my wet globby mess in a bowl covered sitting on the counter, and I can’t wait for 2morrow!!!! I’ll let you know how it works out.
Maybe I’ll post a couple pics on our blog.
Vapont: It could have been bad yeast. If the bread didn’t rise, usually it’s due to the yeast. I would suggest reading through Rose Levy Beranbaum’s thread on the bread – your question may be answered there!
http://www.realbakingwithrose.com/2006/11/holy_bread.html
I TRIED TO MAKE THIS BREAD.. AND IT WAS A DISASTER.. IT DIDN’T RISE AND WAS COMPLETELY UNDONE AND BURNT ON THE BOTTOM… COULD IT HAVE BEEN THE POT.. I USED ACTIVE YEAST AND FOLLOWED DIRECTIONS EXACTLY.. CAN YOU HELP ME… I LET THE DOUGH SIT FOR ABOUT 12 HOURS… WHAT DID I DO WRONG?
Jaden, I need help! I did this twice, using half recipe. The first time I uses 225g bread flour vs 3/4 c warm water. After mixing, the dough looks wet (yours look drier than mine). But that turns out a little ok finally, though far from perfect.
I wanted to improve it so I did it another round today. This time I use my measuring cup to measure 1.5 cups of bread flour (which only turns out to be around 156g). It didn’t work well this time round. I think my dough is far too wet as it is very flowable after the 12 hrs and it doesn’t rise much. It smells of beer too. In the end I threw the whole stuff away.
Are you able to advise what could have gone wrong? What should be the consistency/texture of the dough after the initial mixing? Should it be liquid or dry?
Thanks for your help!
I’ve tried many bread recipes over the years. This one beats them all, hands down. So amazingly easy, and so forgiving. I’ve used specialty bread flour, grunt bread flour, unbleached all-purpose flour, instant yeast, packaged yeast (which I actually liked better than the instant), Kosher salt, sea salt…and got great bread every time.
I live at just over 3,200 feet so I’ve tweaked the basic recipe some. I add a little more water and I back off the yeast just a titch. I convection bake at 400 degrees for 30 minutes, uncover and start checking around 10 minutes.
Getting a good rise at altitude can be tricky so I rarely add other flours to the mix. I’ve experimented with whole wheat and have found that I can sub about 1/2 cup without losing too much loft. More than this has resulted in flatter, denser loaves. Still good eats, though.
I don’t worry that much about adding more flour during the shaping process. My dough’s usually pretty wet as I use more water; I don’t slather the flour on but I do use enough to keep the dough from sticking to things. For the most part anyway. I’ve used both cornmeal and bran for coating the exterior; I prefer cornmeal for texture but bran adds a nice, rustic flavor to the crust and boosts the crunch a bit.
Regarding the baking pot–mine’s a three-quart Chefmate from Target, enameled, cast-iron, bought on clearance for less than $10. I replaced the knob with a stainless steel drawer pull because it smelled while baking. I also have a four-quart Lodge, but I get better results with the smaller pot.
I was thinking about teaching my 10 year old niece this recipe when I visit next month. Now I’m even more inspired.
Oh thank you, thank you! It was absolutely delicious, and easy enough to make when I feel awful. This is probably my new favorite sick food!
Of course it will work! It won’t taste exactly the same, as bread flour has higher protein content. BUT, I’ve done the nkb with AP flour and still worked fine. The dough was a softer texture (you might need a bit more flour in the dough) but still delicious.
Hey Jaden, I’ve been crazy sick and it seems like bread is all I can keep down. I’ve been making French Bread, but this sounds so much easier. I only have All-Purpose flour, not bread flour. Will that work? Thanks.
Loved reading your site. I very nearly felt like I was in the kitchen with you and your little guy, and could smell the bread if I closed my eyes. Its a cold, rainy weekend in Florida, I’m going to make some NKB! 🙂
Hey Bread2000-
I’ve not used the dough for pizza, but I have an easier no-knead for pizza: https://steamykitchen.com/blog/2008/02/19/no-knead-pizza-dough-pear-and-gorgonzola-flatbread-with-baby-arugula-and-shaved-parmesan/
xo, jaden
Wow! I do not know how to blog or anything, but I have made this bread several times, and was desparately looking for answers on line to my questions. I’m surprised that in 186 responses, no one asked my question. How do I use this recipe to make pizza? I have made rolls with this bread (makes 12) and have used the 1/3 whole wheat flour (tastes great). I make mine in a regular glass bread loaf pan with no cover and it still tastes great, but has a less crusty crust, which is good for sandwich making. The rolls are good for not eating too much! And people, please! If you are having problems with cleaning your linen towels full of dough – don’t use them!! I don’t. Now, does anyone know how to use this recipe to make pizza? HELP!
wow – I love the idea of honey butter!!!
Just baked a 3rd loaf (whole wheat)….in a large clay tagine. I only have one dutch oven and was desperate to bake 2 loaves at once. I plugged the steam vent in the tagine’s lid with some tin foil. It worked like a champ.
Slathered with honey butter this bread is a little bit of heaven in my mouth!!
Sticking problems are gone when I use oat bran sprinkled on the top of the dough, and I use a silicon spatula to scrape the dough off the towel and into the pot/pan to bake it. Wheat bran can also work if you prefer it.
thanks blue sandals I’ll try it!!!!!!!
lulu
Hi lulu from portland!
I had the same problem too. Silkpat and corn meal work wonder for me now. Give them a try. I hope it works out better for you.
Hi,
I LOVE this recipe and use it all the time. I have one question….I can’t seem to get the sticky dough off the floured towel…it sticks onto the towel and I have to really pry it off to get it into the pot, any suggestions???
Thanks
lulu
First your son is adorable. Second, love the bread and it is a perfect project for my 4 yr old daughter. Thanks!
I’ve been battling with bread for a few months now. It took a trip to the Le Creuset store (hehe – lucky me!), but I finally got a pot worthy of this bread.
Boy is it worth it!
Thanks for sharing this recipe and the lovely step-by-step instructions! It’s truly delicious and may just be the last bread recipe I ever need!
am finally trying this today- it has been raining and the temp here is in its high 70’s. i’ll email you a pic if this is a success for me, if not, try and try again!
this is so great.. I definitely will give a try 🙂
I just ate my first piece of this bread with softened butter and honey from Germany. Reminds me of my grandma’s bread from Bavaria and the smell was just like walking into the B�ckerei (German for bakery) early in the morning to purchase fresh bread. As a college student, it’s always hard finding time and good recipes that aren’t packed with additives and preservatives. Since Christmas I’ve sworn off all white products and have lost 20 pounds. Now I won’t feel so guilty about baking this bread and sharing it. Plan on making a vegetable soup tonight so that we have some bread for a second spoon. Danke sch�n!
I love it – maybe I can motivate my kids to do something other than lift the fork 🙂 – and they’re in their 20’s..ha ha
I have discovered that putting oat bran on the top of the dough before it is baked is a nutritious and delicious addition.
Your little boy has inspired me to bake the bread. I waited for a long time before I decided to get everything that I need and really try to do it. Thanks a lot! Love your blog!
I’ve been making this bread 2-3 times a week and the only trouble is that I’ve gained weight. It’s irresistible! My hints: regular yeast works just as well as instant; spray the heated pot with cooking spray just before you put the dough in to bake since that’s easier than parchment paper; don’t leave out all of the salt, but you can cut it down; 1 cup whole wheat flour and 2 cups white flour is also good, but all whole wheat is tasteless; don’t worry about timing since I often leave the first rising about 24 hours just because sometimes I can’t get to it sooner; use cornmeal to sprinkle on the dough near the end and you will retain the correct proportions of flour to water. Thanks for the suggestion of the last “nap” being in a tall bowl because I would like to get a higher rise on the bread that is otherwise perfect. Any covered casserole dish for baking, as long as it has high enough sides, will work.
dana, dana, dana, i too live alone & if you try i bet you Could finish the no-knead bread in 1 day- o.k., 2- but who’s counting? enjoy!
I love this bread, I have made it a few times now. One question….you say to re-crisp the crust put it in a 350 degree oven for 10 minutes. Should it be covered with foil or a covered pot again? I am single and have tried, but cannot eat a whole loaf in one sitting. Thank you for the wonderful and easy way to make bread
Dana
Thanks for posting your modifications to the recipe (especially for the hint about the parchment!). I just tried it out and even with yeast that’s long past its expiry date and just plain all-purpose flour, the bread turned out great. It didn’t seem to rise much so I was a bit worried, but I guess I just wasn’t good at remembering the “before” state for comparison.
It’s so great that baking bread is this easy — the one German thing I miss daily here in New Zealand is the bread…
hi steamy- i just saw this on a martha stewart show and i remembered reading it in your blog- the way you showed the directions is so much easier. i will defintely get back to you with the results. i, like nathan, live in the Philippines, so i may have to wait for the ideal weather to try this. thanks and good luck to me as well.
this is one tasty recipe. My son and I make it all the time. We have done several riffs and all were great. I am convinced that the kiss goodnight is important. It is my sons second favorite part ( eating the finished product is first of course). Thank you for sharing this.
I love this recipe! I’ve made it several times
A couple of comments on other posts:
Do NOT use self-raising flour. You need strong bread flour.
The texture is chewy, not gluey or rubbery. It’s not a soft crumb, it’s more like a strong Italian loaf.
Try flouring your teatowels more heavily, or using a silicone mat.
I am the only one who has ended up with unusable dish towels after using it for dumping the moist dough for the no-knead bread?
Thanks for your advice! I just wanted to follow up and say that I’ve now made two more loaves since my first disappointing results and have a couple of “lessons learned” to share:
1. Oven temperature is very important. My original loaf was baked at 225 C. Better results are obtained at 260 C.
2. I’m using bakers flour rather than self-rising flour (I’m in Australia).
I’ll now start experimenting with whole wheat flour, sourdough starter, and steel cut oats.
Thanks again!
I have been baking for 20 years, I made a few loaves of this bread, and my family thinks it turns out underdeveloped and gummy tasting.
I went back to adding the flour slowly to the water and besting the dough for 2 minutes when 1/2 the flour is in, then I got a better dough. so it you get gummy bread, give that a try.
Loved seeing your little one make bread. It’s a great recipe. I’ve been making 4-6 loaves each week since I discovered the recipe in April, 2007. Gained a little weight, too.
As a vegetarian who mostly eats organic, healthy foods, Thanksgiving is not a favorite holiday. Statistically the average person consumes 4500 calories on Thanksgiving! Traditional stuffing is full of calories. My solution was to make “stuffing bread” – no-knead bread made with vegetable broth and after about 19 hours I gently folded in 2 cups worth of minced, onion, celery, carrot, fresh sage, thyme, rosemary, parsley, coarse black pepper and salt. Delicious and I highly recommend you give it a try.
The no-knead bread recipe is a lot of fun to experiment with. I always use half whole-wheat flour and have added ingredients such as:
Walnuts
Corn meal
Whole raw garlic cloves
Caramelized onions with gruyere
Cheddar cheese cubes
All of which turned out very well.
I’ve made this several times in the past month, my favorite application — add 1-2 tbsps gluten flour for each cup of flour, use it for pizza dough.
Hi Jaden! Just thought i should drop u a note to say I made this and posted it on my blog. I hope you don’t mind pasting the recipe over.. if not, let me know! The bread was delicious!
This page is now #7 in google while searching for “No Knead Bread” Great job!
Cooking and gardening http://red-icculus.com
I have baked a loaf a day since the original NYT article came out. Became a proselytizer as I gifted all my friends and relatives with loaves and the recipe with encouragement to look at the video on the NYT website. YouTube has picked up the video-hopefully it stays for years and isn’t yanked because of copyright infringement.
So basic and rewarding. My family can’t wait to cut into the loaf while it cools. We’ll never go back to store or even bakery bread again.
Noush- Olives! great idea. Stir the olives in the dough after its long overnight nap, right before you shape it into a ball.
Daily Optic- sorry for long delay in answering your comment – I’m in Shanghai at the moment and finally got Internet access after 4 days on the Yangtze River! There could be a number of things that went wrong with your bread…but I suspect that you had 2 problems – the yeast and the type of flour. If your bread did not rise during its second nap, you may not have good yeast. Yeast expires (those little buggers don’t live that long) Chk the expiration date on your package. The other problem is your flour. Usually, self rising flour is used for making biscuits. It has a lower protein content salt and baking powder mixed into it already. You might want to try the no knead bread with bread flour (high protein content = high gluten = good bread structure) next time!
Jaden,
I have made this bread several times now with great success thanks to your great instructions. I however, have this intense urge to put more into it (ie, OLIVES). I am afraid the saltiness of the olives will affect the rising of the dough if i put them in from the start. Do you have any suggestions as to when i can add additional ingredients without messing with the integrity of the dough?
Hello again. I guess I should describe how I made it.
I used the ingredients as specified in the amended recipe, meaning I adjusted the water to 1.5 cups. I’m in Australia, so I used the Australian self-rising flour and “instant” yeast, but I imagine (as a former American) they’re about the same.
It’s spring here and the weather’s warm, easily over 70 degrees, but that shouldn’t be an issue. It rained all day so the humidity was a bit high.
I used an LC pot–oval, 4-quart–and heated it for 30 mins at 500F in the oven before I put the bread in. Everything else as specified in the recipe. The only thing I noticed that didn’t seem right was that the dough didn’t double in volume during the second rising (after the folding). It seemed at pretty much the same volume it was at when I took it out of the bowl after the first 18 hours.
So that’s about it. What I have is a decent-looking loaf of bread that leaves a bit to be desired taste-wise. Supermarket bread tastes better than this. What a disappointment!
Any advice?
After reading all these rave reviews, I was eager to make this bread. I started yesterday afternoon and pulled my first loaf out of the oven this afternoon… followed the recipe to the letter.
The crust was excellent but the inside of the bread was exceptionally moist, and as the day progessed it became what I can only describe as rubbery. Has anyone else had this experience?
I didn’t find the bread particularly flavorful, but it wasn’t bad. I just expected a lot more from a bread that has been so touted all across the web. There was nothing not to like about it, but not too much to rave about, except for the ease of making it. I’m sorry to be so unimpressed–perhaps something went awry with my first effort. I find it to be almost too moist… to the point of being more like an untoasted english muffin–sort of limp and rubbery and without much flavour.
Have I done something wrong? If others have made this bread and not had these impressions, I’d love to know that I simply did something wrong.
Another thing I wanted to mention. About 10 years ago I saw a Swiss woman I know make a no-knead bread and it stuck in my mind all these years until I finally looked on the internet the other day and found this recipe. Is it possible that this method has been around in Europe for a long time? I think she did it with whole wheat flour. In fact she even ground her own flour! But, that’s a whole other story. I’d like to know if anyone has tried this with whole wheat flour? I plan to do so and will let you know how it goes.
I just made my first loaf of this bread and the whole family loved it. I was disappointed at first because in the AM the dough had risen very little but, it was quite cool in my kitchen so, I placed the dough by the wood stove all day and by the afternoon it did rise and get bubbles. I then made a ball and placed it a towel to let it rise but, by then it was late and I was too tired to bake it that night so I let it sit again all night. I thought it may rise too much but, it looked fine when I got up. I baked it in a covered Pyrex dish and it came out perfect. In all it was about a 36 hour affair to bake it! Then it only took about 10 minutes for us to eat it! This bread really is fool proof!
Your son is just so adorable, my boys also like to help me out in the kitchen. I love your serving suggestions.
Thanks for a great article, Jaden! Your son has the face of an angel, like my granddaughter.
Sounds like such a cool thing to do with your kids !
Hmm, the idea is good, but wouldn’t it be easier to spend 15 minutes kneading then leave for an hour or so and do it again? Most people waste 15 mins on a coffee break!
Love that no-knead bread. I enjoy making variations like walnut and garlic. I always use 50% whole-wheat flour. Anything goes with this simple recipe.
lynn asked if a dutch oven would be alright. It occurs to me that this is a dutch oven recipe, except that you bake it further after uncovering. Aren’t dutch ovens designed to bake on a stove top?
I love love LOVE this recipe! Hope you try it and enjoy.
Wonderful Blog! I know you were worried about your Plastic knob on your Le Creuset pot. If you cover the knob with tin foil it will deflict the heat from the knob. It should last forever! The knob should be made of cast metal. But, whatever… Check out my blog… Regards, David
Hi Jaden,
I love your site. I am lucky to have discovered it tonight. I like your recipes and I will try cook some of them one day.
You must be on Food Network. Your young and beautiful, have a great personality, and I am pretty sure you will make it big. Pursue your dreams and good luck to you and your family.
Chris
Mmmmm.. That bread looks very good… and with a little bit of improvisation on the recipe.. I’m thinking I could even make it here at college. 🙂 mmmmmmm… I shall have to try it, once this poor college student amasses enough money for such things as a bag of bread flour and a packet of yeast….
Is this sort of like a really mild version of sourdough bread- rising for 22 hours or so reminds me of making sourdough…. (which I have attempted several times at home…. but it never came out quite right… either good flavor but too dense…or fluffy and no sourdough flavor at all…. do you have some blog post about adventures with THAT?)
I loved your story. Very heartwarming and funny!
I have made no-knead bread 4 times now, and I’m in love.
After it’s no longer oven-fresh, it makes the best toast on the planet.
Having read a recipe from King Arthur’s Baker’s catalog , I incorporated some of their instructions as well as my own to make the recipe even easier (if you can believe that).
I skip towels altogether, and do everything on a lightly floured board.
I do all the manipulating with a silicone spatula or bench scraper (no hands).
When it’s time to do the second rise, I put a lightly oiled bowl over the cutting board (after brushing off surrounding excess flour) and just turn the whole thing upside down and let the dough fall into the bowl. When it’s time to bake, I sprinkle corn meal on top of the loaf, and a little into the bottom of the pot, and just dump the bowl into the pot. It always comes out a little crooked (some corn meal on one side of the top, some oil on the other side) but the results after baking are great. I can’t tell what was ever on the surface.
This is becoming a weekend tradition for me and my family.
thanks for sharing such a great recipe and i do hope i could do this wid my kid 😉
Thanks so much for the witty humor, fun story, cute kid pics, oh and the recipe too. I so have to make this as soon as I have a pot with a lid that will work. Thanks for the inspiration.
Seems like bread always has a story. Love yours, too.
Thanks for reminding me about this bread. I wanted to try it last year when the recipe first appeared, but my oven was too flaky. New oven + new Mario Batali dutch oven + your inspiration = DELICIOUS!
hey fyi everyone i always use the ceramic bit from my crock pot. works like a charm!
I whipped this up yesterday…super easy..easiest bread ever~! I got up early, did the finals and baked it so it was warm for breakfast. Fantastic! This must be the easiest bread in history. My wife and I LOVE a crusty “holey” bread. Very rustic and sooo good. Thanks for sharing this one.
Looks easy and tasty! Definitely going to try this.
My mouth is watering! I’m tempted to get a loaf of No Knead Bread sleeping, and then mix up a loaf of regular ol’ bread to tide me over. Looks delicious!
Hi Jaden,
I’ve tried making the KNB, however the mixture that slept for 20 hour, it’s watery that I can’t even hold it as a dough at all.
I used the exactly amount of every ingredient, does it got to do with the flour?
OMG that’s my couch! LOL! Now if only that was my dutch oven…
I just had my first bread baking experience and now I’m addicted! And not just to this delicious bread either 🙂
Amazing. Such a wonderful bread that required so little effort! This is an instant classic. I’m glad I finally heard about it.
Topslakr
Will certainly do, my gorgeous yeasty muse =) I will also use my 5-qt oval Le Creuset instead of the round 10-qt monster I used the first time around. My first loaf didn’t rise high enough and I was looking forward to a taller loaf. I’ve got a silly Williams-Sonoma thermometer with 2 probes and (very annoying) pre-set temperatures for roasting meat. Still, I guess it will do with a little fiddling. You know what they say about beggars and being choosy… =)
DS- as long as you’re not a stalker! 😉
Nathan- I actually use 1.5 cups…knowing that I wet my hands while handling dough will add a bit more water. I live in FL where its pretty humid (but I do have the air conditioner on inside which makes a different). Next time, try 1.5 cups of water and go from there. Also, do you have a thermometer? Take the temp of the bread, which should be 210F. Good luck!
Nags- lol! Well, then I suggest making friends with people who have ovens!
Hello Jaden,
So sweet of you to invite me to try this. Actually, I have seen this recipe in so many blogs that I am dying to make it. I have two problems that prevent me.
I don’t have an oven! Yeah yeah, I know you have totally judged me by now but let me make an effort at a defense. I stay in a bachelors apt in a city called Hyderabad in India, where kitchens don’t come with in-built ovens and stoves and (hahaha) dishwashers. So all I have is a toaster, which can be doubled up as an oven to bake cookies but that’s about it. It does not generate enough heat to bake bread 🙁 I am working on this, I promise. And I will bake bread atleast once in my life, as you say 🙂
What? You still want me to give the second reason why I can’t do this? Err..
Hi Jaden. After almost a year of procrastinating, I finally made the recipe. In a display of my dazzling mathematical prowess, I put in 1 7/8 cups instead of 1 5/8 cups of water (I had the original Mark Bittman recipe handy; should have printed out the one you tweaked). I let the dough rise for almost 22 hours, shaped (ok, more like patted, really, since it was too wet to shape), then let rest for almost 3 hours while we went for late-night groceries. Slipped it into my pre-heated pot and let it bake 30 minutes covered and another 15 minutes uncovered. The bread came out a little gummy but had a terrific crust and aroma. Still, not bad for a measurement-challenged baker =) We ate the last of it for breakfast today and I will try it again this week with less water. When I made this, the skies were overcast and the weather was hot and humid. Mila, I live in the Philippines where it�s hot and humid most of the time; I would love to read about your experience. What would you have done differently?
Loved this bread…so easy…so tasty. Thanks so much for oh too simple bread recipe. Used sea salt instead and used maybe a little more iodized salt but less than kosher. Love your website, come so often I think I’m OCD about visiting.
Wow! I saw this post on friday and was thinking about making this bread all day at work! So I baked it today and I was amazed!! Thank you for sharing and the wonderful pictures. No just have to decide what we are going to have along side of it for dinner!
I made the bread last December (wrote about it and the problems of making the bread in a tropical – humid – country). Haven’t done it since due to the extremely hot summer, but as I head into the cooler months, will be baking again. Lovely pictures of your bread!
I make bread every couple of days…..that being said, this may go down as my new favorite. Easy to make, and holy cow is it GOOD!
Very nice post!
I bake my NKB in a Romertopf Potato Roaster (a clay pot designed for, uh, roasting potatoes), with perfect results every time (it also improves other breads).
After trying the NKB for numerous times, I’ve compiled this list of tips:
1) 1 1/2 cups of water are (IMO) too much – I usually use no more than a single cup. The dough is far more workable that way, and has a stronger flavor.
2) You can substitute up to a 1/4 of the flour with whole-wheat or rye flour.
3) I’ve replaced the water with beer or malt. Beer gives the bread a distinct “yeasty” taste (though not bitter, unless it’s a stout). Malt beverage (“non-alcoholic beer”) makes the loaf darker and sweeter.
Hah! I was planning my first attempt at making a bread this weekend. All that kneading would do me well in the stress relief department (knead knead die die knead …) but now you’ve suggested a way out of all that kneading..(the lazy side of me finds that very appealing!) now I’m not so sure if I should’ve come visit you today after all… LOL
Aww he kissed the bread goodnight! How cute! That killer whale tattoo is pretty sweet. 😀
Li – Hey there. My home is always at 78F – and I let it sit overnight. If you home is super warm, like 80F or hotter, then put the dough in the refrigerator overnight (8 hours ish) and then take it out on the counter for the rest of the time.
mn48225- absolutely! just use a pot 5qt or larger with lid that can go in the oven
C. Webb- that is a cool product. I love the shape of it – I’m sure it would make the bread bake up tall. I’ll have to find one in the U.S.
Cindy- OH CRAP!!!!
the bread looks awesome…i adore bread! your little baker is totally adorable also! i must warn you, i used tattoo bribery as well, now my son has about a dozen real ones! um, my daughter has a few too. ;]
I’ve been making the wonderful No-Knead since the Bittman column first came out. It’s soooo good and soooo easy, but still, it would be great to have a cute little tatooed guy to help 🙂 I have a cast iron bread pot with lid made by Cadac (which seems to be a European company, not sure). I’ll add a link to a web site that sells them although I know nothing about the manufacturer or the seller. Mine was a gift from a friend overseas. It is PERFECT for the job, and for other breads as well.
http://www.mousemall.co.za/product.php?productid=19527&cat=0&page=1
OK, I confess, I’ve never made NKB. I just love kneading dough. Seriously. But maybe if I had Andrew as my companion, I’d change my mind. Precious. Simply precious. 🙂
I have been making this bread since I saw the Mark Bittman article in the NY Times. It is the first bread I have ever made and it is the best bread I have ever eaten! I make it every day for my sons, who bake it for themselves when they are away at university. I even love it when the crust has gone soft and chewy (not that it stays around that long usually!)
A few hints to make it even easier: turn the wet dough onto a Silpat (silicon baker’s) mat, so you don’t have to clean a mess off the counter. Also, cut a piece of parchment paper to fit the bottom of the cooking container, and put it in just before you add the bread; this prevents the bread from sticking to the bottom of the pot. (Don’t forget to remove the paper afterwards — you can reuse it.)
Would I be able to bake this bread without the dutch oven?
I had a hard time finding the instant yeast, but just used regular yeast in an tweaked proportion. (Thanks to Smitten Kitchen for the calculation!) It was not as…robust…as yours but tasted great.
Hi Jaden,
Love your no knead bread, always have phobia in baking bread, cakes etc.. but will definitely try this bread. Do I need to let the dough sleep for 12-20 hours as I stay in Malaysia where the weather is always hot? Thanks.
What a cute little photo essay. He surely will follow his mum’s footsteps! 😉
Oh Jaden! What a fabulous post! I have never made no-knead bread (although I do enjoy making bread) but of course I have seen it all around the blog-world. It always look so tempting…but not as tempting as when you have an adorable 4-year old demostrating how to make it!!! Gadzooks! I am totally hook, line, and sinkered by the talented whale-tatooed bread-baker! 🙂 I must try this! I have no cast iron/enamel pots though (waaaaaah! sob!), you mentioned stainless steel (a good one) would do? I’m excited 🙂
That is one sexy loaf of bread. And one cute son. I’m wondering if this would translate to gluten-free. It might. Wonderful post!
Why do people always want to eat other people’s cute children? Am I missing something here?
Anyway, Jaden? I made this foolproof bread, and you have no idea how awesome it was to have my house smell of fresh-baked bread again (I actually kept stepping outside and back in again just to get that blast of yummy smells). That’s something I’ve not been able to enjoy in years since arthritis has made kneading impossible for me, and bread was out of the question.
The only problem is that I think I’m going to have more bread in my house than any normal human really needs.
So, thanks for passing this recipe along and making my world a much nicer (and nicer smelling) place.
This looks quite simple to what’s called Outrageously Easy BIG Bread in the vegan baking world: http://vegweb.com/index.php?topic=5716.0, but we don’t need the Le Creuset – just a BIG baking sheet. Just a thought for re-naming it…
Jeni- he’ll taste like chocolate, gummi bears and apple juice!
Forget the bread. I want to eat your son. He’s too cute!
I have made this bread several times and just think it’s great. Easy, easy. I hadn’t blogged about it because there were so many people who did already. I wrote up a posting on my blog today about it, and added my blog to your link list. My story isn’t anywhere near as cute as yours, though.
http://tastingspoons.blogspot.com/2007/09/no-knead-bread.html
I read your blog every time you post and enjoy it very much. Loved the pictures of your son making the bread. Clever idea!
Thanks for reminding me I had this recipe! The first time I tried it, I think I used too much flour after dumping the dough out of the bowl. Thanks for the tip on using “wet hands”. I’m going to go try it again now with that modification:-)) I just love your blog and sense of humor…and your pics make me speechless…and very hungry! Please keep up the good work!
What a fun post. I love that you’re baking bread with your son! And your NKB has one of the prettiest crusts I’ve ever seen. I just ate, but all I can think about is bread! 🙂
Your new link feature is neat. I added a link to my Italiano version of NKB–it makes a fantastic grilled cheese sandwich!
Jim- Yes you can use wheat flour. I prefer 1/2 cup wheat and 2 1/2 cups white….I haven’t tried ratios greater than that.
Is it possible to use wheat flour? I prefer wheat to white, but in this case even if it’s not I desperately want to try this bread!
I think your son is totally cute helping you make bread. Absolutely adorable 🙂 Makes me want to have a baby now. Yeah….. haha
Maybe I should give this no-knead recipe a try next weekend. I’ve heard so much about it.
Gosh, didn’t know it was that easy! But your little story on the side warms my heart more :o)
What a coincidence! I am making Ciabatta and my sponge is the fridge since last night. Now I kinda wish I saw this recipe first, it looks really easy. 🙂
I think I should start baking breads now…hmmmm
i haven’t, no. but after seeing your perfect crumb here, i will immediately. i will work with fresh yeast though as i’ve got some left over and because that’s the kind of gal i am. mmmhh. can’t wait for it to come out of the oven!
Hey J,
I have been busy but wow, look at all the action on your site. 🙂
The bread and boy are the best. I loved your steak osmosis and the revolt as well. 🙂 Salt Salt no Salt Salty!! Gotta love it.
I remember hearing about the No Knead Bread but, even though it was from Mark Bittman, I dismissed it as something that wouldn’t work out.
After seeing your post, we decided to try it out and mixed up the dough last night then baked it this afternoon and ended up eating the whole loaf with Kerrygold butter. Man oh man that was good.
We have access to some wonderful artisan bakeries around the Seattle area but this no knead bread was just fantastic.
Steamy, I like it that you are sharing more pictures…does wordpress support Lightbox (like the one I use for my pictures)?
Tell you a secret, I have never tried making bread at home. 😛
So adorable 🙂
Thanks for reminding me about this recipe – I’ll have to remake it. For some reason, I forgot about it.
Awww… That’s such a great story. I love that he kissed the bread goodnight after wrapping it up.
Oh Steamy, I just love it when you use your boys in the blog. He is terrific and his tattoo is really scaring me.
No Knead bread is a old stand by in our house now.
This is the only bread my dad ever wants me to make now. When are you making the bread? Have you made the bread yet? Why don’t you make that bread? It never ends!
See, I like kneading bread… I make a wonderful olive cilantro bread come the winter that I love love love. Plus how can you not like beating the crud out of a ball of dough?
Awesome! I have a question!
Say I wanted to make this SOUR DOUGH bread… How would one do that?
Mrs Steamy, unfortunately I don’t have the patience to wait 12 hours and then 2 hours. I’d rather do 5 minutes of kneading and proofing twice (with the adding of seeds and nuts and shaping the loaf in between).
I’ve enjoyed making many loaves of bread — each one is unique and savoured like the way you savour bread with your dear cute son (whose hair is so neatly combed for this series of pictures!). Ah, yes, butter on warm slices of bread!
Have you tried any of Mrs Rose Beranbaum’s ‘Bread Bible’ recipes? I tried one once and it was excellent. Most days though, I do a Jamie Oliver loaf, which is simpler and quicker.
Hi, I just wanted to say I stumbled on your blog and have been lurking for awhile but this absolutely adorable post of your son (and great bread) made me feel like de-lurking. I love your blog, it makes my mouth water without fail whenever I read your posts!
your son looks cute.
I have a le criset pan and i have never thought of making bread in it.
It is a good idea.
Oh, yes I’ve made this bread! (posted about it on 12 November 06) And actually it really does sing! It’s called musique du pain.
Your 4y/o is a super baker in the making!
OK, I’m sold: if a 4 year old can do this, I reckon I can too. But I must admit I like the workout a good knead gives your arms.
Could your son BE any cuter?? Holy cow, I wanna pinch those cheeks! Course I won’t, because when I was little if I could have bit the hands off my aunts and uncles that use to do that to me, I would have.
But anyhoo, he’s definitely a charmer 😉
I’ve wanted to make this bread from day one but have no vessel to bake it in. Isn’t that horrible? Gawd.
One day the Le Creuset fairy will come knocking and then I’ll make it – probably one of the first things I will make in it.
Lovely post – as always!
xoxo
Isn’t this bread amazing? I made it and blogged about it 2 weeks ago. Definitely a keeper.
You know how much I love your sons. Bribing my little man with fake tattoos 🙂
Jaden, your son is so handsome and cute. What a wonderful looking loaf of bread. I am going to try making it this week.
No knead bread! This I got to try it out immediately. Looks so cool! Well little ninja is a bit too young to do it right now. Have to wait for another 3 years.
uh oh. Read the post through and got to the part where you mentioned the Le Creuset rep, and how yours is still ok even after 30 loaves of NKB. Been raring to bake this with my son ever since I read it in NY times last year. I’m sorry I jumped the gun. Great blog!
uh oh. I just read the part of your post about the Le Creuset rep telling you that its ok. I’m sorry I jumped the gun. Great story! My son loves to eat the crisp crust from the bread and I’ve been wanting to do this with him so badly ever since I read the NY times article last year. Has anybody told you how fantastic you look?
I’ve been wanting to make this recipe with my 4-year old son too. I’ve got the Le Creuset dutch oven and all and am just worried about how the little bakelite knob on the lid will fare while its pre-heating in a 450 deg F oven. Will it melt? Will wrapping it in foil help?
Nummers!!! Hey send me a flick of your carved wood panel pleeze! You rock!
Jaden, I was so excited to see this post on No Knead Bread. It is my absolute favorite bread recipe. I usually make it 2-3 times per week, and it is foolproof. It reminds me of the bread my mother used to buy on Arthur Avenue (in NY) when I was little. I have experimented with the recipe a bit and have come up with a few nice variations. I have mixed in diced Gaeta olives and sundried tomatoes into the dough and it was wonderful. Also, I have browned some diced pancetta and mixed that in. Very Italian! I think my favorite way to serve it is by using it as a bread bowl filled with a fresh tomato salad. The olive oil and tomato juices saturate the bread and it is delicious. The possibilities are endless!
I don’t know why, but there is nothing so satisfying as taking a fresh, hot loaf of bread that you baked yourself out of the oven.
Your little boy is absolutely adorable! He is going to be a real heartbreaker. It is so great to engage our children in activities like this. He will have such wonderful memories to share with his own family someday.
Absolutely precious.
Your son is just as gorgeous as his mama. I wonder if he’ll grow up and make bread for his sweethearts… wouldn’t he be the hottest ticket in town?!
xox,
Jennifer
Jaden, didnt realize that bee had already tagged our post.. sorry for the duplicate. pls remove it.
ur son is adorable. getting well trained it seems like ! –jai
The bread looks great. I will have to try this.
What a wonderful post! I’ve made this bread before too and it was a hit, but for some reason I’ve not made it in aaaages, and reading this has made me want to give it another hit!
As for your little man…I think its wonderful that you’re not only documenting your cooking, but also your wonderful family 🙂 It will be a wonderful piece of their past they can cherish later when they grow up!
That looks so much nicer than my efforts. I need to borrow your son.
Did my reply work, or did you wise up and finally ban me?
Your kid is cool, but Johnathon the zombie still pwns.
What a cute kid! Can’t wait til I can bride my kiddos to help in the kitchen. 🙂 Beautiful rustic bread!!!
Oh man, he’s the cutest thing ever. And he’s learned how to pose for the camera just like his mom. 😉
OK, if your son could make this, I should totally be able to swing it, never having baked bread before. Nice new banner, Jaden!
Your son is the cutest little thing! Adorable!
I’m never good with baking. But if a 4 year old can do it, why can’t I? I think I am going to give it a try tomorrow.
I love No Knead Bread! If anyone jumps to my post about it, please forgive me – blog is still in its infancy.
Oh great, I’m always on a lookout for children friendly recipes (Not that i hv any children yet but the neighbour’s kept coming around + i figure it’s safer to try child friendly recipe as it’s easier! LOL). That is one good recipe to store.
What a adorable sous chef you have there with you. It’s heart warming to see mother and son duo spending quality time like that!! =)
Oh great! I’m always on a lookout for kids friendly recipes (not that i have any children but neighbour’s kids always come around!) so that’s a good one to have in store!
What a handsome sous chef you have there with you. Heart warming to see a mum and son sharing some good quality time together.
Okay, I guess I no longer have the excuse of being yeast dough challenged 🙂
What an adorable post — and what an adorable chef! I keep meaning to try this bread — I have the “official” Le Creuset pot and everything — and just haven’t gotten around to it.
Love the new blog banner.
I haven’t made this but would like to when I get a bigger oven (one day!)
Oh man is he adorable. I must go home and make that bread…
i’ve made it. we love it. whole-wheat no-knead bread is next on our list.
is it considered blasphemy if I use a bread maker? Not for this one, of course, but just in general?
My kids (22,25) come for sunday brunch and love the smell when they walk into the kitchen after i have programmed my bread baker….Jaden, they grow up so fast and one day u turn around and they’ve graduated university…
One of my favorite pastimes is baking bread, but I’ve never tried this knuckle-friendly one (I have arthritis, so kneading is a real pain). I’m pretty sure you can bet I will give it a whirl tomorrow. Of course, I think I first have to get my Le Creuset back from my idiot brother.
My mother baked our bread until she went back to work when I was 10. nothing compares to the taste. Its nice to think I won’t have to quit my job and be a homemaker in order to give myself the time that homemade bread requires. thanks jaden. this is AWESOME!
B
http://handtomouthkitchen.wordpress.com
Cool new feature!
I love no-knead bread. Yours looks lovely.
So if a 4 year old can do this, you’re saying I can? Oh the pressure. I have to actually bake a loaf of bread for once in my life? Deep breath…bookmarking…maybe next month…I can I can I can.
Jaden, I am starting now to campaign for you a Food Network Show. This was the best yet. Been lurking and sending your site to all my friends!!! You are the next Paula Deen, I am predicting. I hope that Gordon Elliott is checking out this site. He discovered Paula. That demo of the No Knead Bread with your 4 year old is simply the best. Love it and plan to make it!!!
Sooo … where was he in the morning? Still in bed while mommy slaved over finishing up??
Lessee … No Knead Bread … Knead No … Need No Bread? No … Kneed No … Kneed Knock … Knock-Kneed Bread? Kneed … Elbo … Elbow-Room Bread? Elbow Into the Room with Bread on your Knock-Knees?? Bakes easy … Easy Bake … Easy Bake Bread? Kno Knead Knecessary? Tattoo You Bread? Kisses at Knight & Kisses in the Kmorning Bread? Kmart Bread … kno … ok, keep it simple, smarta … ‘KISS’ Bread!! The picture says it all! 🙂
I really enjoyed reading this post and it was so fun to watch your son making the dough – very cute.
Oh Jaden, this is beautiful. Especially the part about your resemblance to risen bread in the mornings 🙂 I love the new header by the way! It totally screams, “Feenin’ for a Steamin’!”
your son is such a heartbreaker! I wish I was the clingwrap that he was kissing. 😛
I haven’t tried this recipe. I also haven’t made bread since my bread machine went on strike, so I’ll have to give it a try.
Just beautiful! I love your baker boy pictures (yes, a tat is a great motivator) and I’m in love with your bread. Now I want, no need, to go buy a pot big enough to make it. Or would a round pot do, like a Dutch oven?
My girl’s Po Po loves bread too. We will have to try this when its NOT 90+ F outside. Winter will be a nice time. I LOVE homemade bread. We have a bread maker but haven’t been able to find the bread mixes to make in it. 🙁
Wonderfull your reporting Jaden, I would like to do this bread a lot of time ago, now I am crazy to do.
Thanks always
XOXO
Wow, a year’s gone by and I still haven’t made the No-Knead Bread. And I used to be a bread-baker, so it’s not like I’m scared of it. Just procrastinating, I guess. I’ll have to make it now.
And that brought back the sweetest memories of cooking with my son at about that age — he just turned 20. Those were some of my very favorite really close mothering times.
Your son is so adorable! And already a baker at 4 years of age!
Oh Yeah, the famous no-knead bread. I made this last year and it’s the easiest full proof way to make bread. Your son is tooo cute!
Haha… could I borrow him so that he can kiss MY batch of bread dough goodnight? 🙂 I bet that’s the secret to great bread!
Jaden,
your bread looks amazing! If you are interested in bread books look for Richard Bertinet “Dough”
http://www.amazon.com/Dough-Simple-Contemporary-Richard-Bertinet/dp/1904920209/ref=pd_bbs_sr_1/103-4194327-2683048?ie=UTF8&s=books&qid=1189443195&sr=8-1
BTW, I was in Kopenhagen last week-end for a winetasting, wonderful city and such friendly, relaxed people.
All the Best,
Martin “BerlinKitchen”
great post. thanks you admin..
wow your son is so cute, a cute little kitchen helper of yours!! anyways thanks for sharing this! i would let my son also do this, and i know he will because he’s only 2 years old who wants to do everything what mommy does! so when he sees me mixing those ingredients, i’m sure he will be willingly to do it heheehe
🙂 love your site, i get inspiration from it
You have great shares, I like to follow thanks
It’s good that Children are getting themselves involved in something productive